
Two-Note Non-Electric Door Chime With Viewer Owner's Manual


© 2007 HeathCo LLC 598-1139-02
Two-Note
Non-Electric Door
Chime – With Viewer
Installation Instructions and Drill Template.
Read and Save these Instructions.
• The non-electric chime mounts directly
through the door and will accommodate
door thicknesses of 3/4" to 2".
• The chime is equipped with a viewer.
LOCATING THE DOOR CHIME
1. Mount the chime in the center of the door
approximately 4
1
/
2
feet to 5 feet above
the floor. Note: Be sure there are no
obstructions on the inside of the door
to interfere with the chime’s baseplate.
2. Using the template provided, mark the
location of the mounting holes parallel
to the edge of the door (see Figure 1).
Note: It is important that the holes are
parallel to the edge of the door for proper
operation of the chime.
3. Drill two 1" holes parallel to edge of
door.
4. Drill three pilot holes using a 1/16" drill
bit.
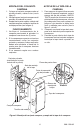
PUSH BUTTON ASSEMBLY
See Figure 1 for push button assembly.
Note: If push button assembly is located
in an area that is exposed to rain, caulk
around the 1” holes before attaching push
button to door.
Figure 1 - Attaching Push Button Assembly to Door
ATTACHING PUSH BUTTON
ASSEMBLY
1. Remove metal trim screw, metal trim,
name card holder, and name card from
push button assembly to locate mounting
holes (see Figure 1).
2. Insert viewer and push button shaft into
predrilled until push button assembly is
flush against door face. Attach using the
three mounting screws provided (see
Figure 1).
3. Print or type name and address on name
card (provided). Place card in holder
with printing visible through front of card
holder.
4. Place metal trim over push button as-
sembly and name card holder. Secure
trim with trim screw (see Figure 1).
1/16" Pilot Hole
1" Viewer Hole
1" Shaft Hole
Viewer
Push Button Shaft
Push Button Assembly
Mounting Screw
Name Card
Name Card Holder
Metal Trim
Door Edge
Trim Screw
MODEL: 29