
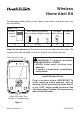
Installation Instructions


Helpful Videos – www.hzsupport.com Helpful Answers – 1-800-858-8501
2
Install Door Sensor
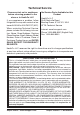
1. Remove orange battery tab from sensor.
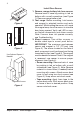
Remove back of case by pushing in tab on
bottom with a small screwdriver (see Figure
1). Remove orange battery tab.
2. Test range. Before mounting, hold sensor
and magnet in selected location and verify
operation. While holding the sensor still, move
the magnet away from the sensor to simulate
door being opened. Verify red LED on sen-
sor flashes momentarily and chime sounds.
Note: If sensor does not operate correctly,
see Troubleshooting.
3. Mount sensor. Use either screws or
double sided tape to mount push button.
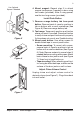
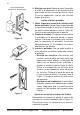
IMPORTANT: The maximum gap between
sensor and magnet is 1/2" (13 mm) (see
Figure 3). The arrows located on the face of
each component must be aligned and facing
toward each other (see Figure 4). The magnet
must be beside the sensor. Note: If the magnet
is recessed, use spacer to ensure proper
alignment (see Figure 4).
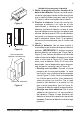
• Screw mounting: Remove back of case
by pushing in tab on bottom with a small
screwdriver (see Figure 2). Note: Remove
material in screw holes (if needed) before
mounting with screws. Attach sensor back
cover to wall using two short screws (see
Figure 5). Snap sensor onto back cover.
• Tape mounting: Apply foam tape to the
sensor back cover. Stick sensor back cover
to frame of door in desired position. Snap
sensor onto back cover.
Figure 2
Alignment Arrows
1/2" Maximum
Use Optional Spacer if
Needed
Figure 3
Figure 4