
Installation & Assembly


7
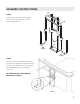
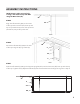
8. Attach the left and right U-Arm assemblies to the open tubes of the ccEE Pivot Arm using the spring
buttons. Use the hole that will allow the U-Arms to swing as low as possible, without hitting the ground. See
Fig 8.
Figure 8
NOTE: If your folded spa cover is too thick to fit within the U-Arms, use the ccF U-Arm Extension to widen
the arms.
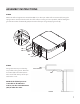
Figure 9
9. Swing the U-Arms up so that they are parallel to the ground. Raise the Main Unit so that the bottom tube
of the U-Arms is level with the top of the spa without the cover. See Fig 9.
ASSEMBLY INSTRUCTIONS
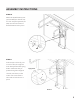
STEP 8
Attach the left and right U-Arm assemblies (BB, CC) to the open tubes of the Pivot Arm (EE) using the
spring buttons. Use the hole that will allow the U-Arms to swing as low as possible, without hitting the
ground. Mount the Lift Assembly (AA) to the side of the spa using the (4) Lag Screws (Z).
STEP 9
Swing the U-Arms up so that they
are parallel to the ground. Raise the
Pivot Arm (EE) so that the bottom
tube is level with the top of the spa
without the cover.
NOTE: If the folded spa cover
is too thick to t within the
U-Arms, use the U-Arm Extension
(HH) to widen the arms.
Adjustment
Holes
Spring
Button
HH
U-Arm Extension
EE
EE
F
Z
BB
Z
CC
HH
Z
EE