
Manual


15 of 24
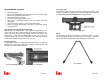
STRIPPING THE RIFLE FOR CLEANING
¾ Engage the safety!
¾ Remove magazine.
¾ Unload chamber; retract cocking lever and make sure that the
chamber is clear. Let cocking lever snap forward.
¾ Unhook carrying sling from front sight holder.
¾ Remove buttstock locking pin and put it in the tubular rivets in the
fixed buttstock.
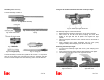
¾ Slide off buttstock and back plate (Fig. 35). Remove grip assembly.
Retract bolt assembly by means of the cocking lever and remove it
from the receiver (Fig. 37).
¾ Remove handguard.
Fig. 36 Removing the buttstock
Fig. 37 Removing the bolt assembly
Stripping the bolt assembly
¾ Remove recoil spring from recoil spring rod by edging it off, in the
rearmost position.
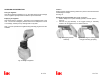
¾ Remove the bolt head from the bolt assembly by turning it 90
degrees to the right. Turn locking piece until lug is clear and can be
withdrawn from the bolt head carrier (Fig. 38).
¾ Remove firing pin with its spring (Fig. 39).
Reassembling of bolt is done by reversing the disassembly procedure.
¾ Push bolt head with its slanted surface under the nose of the locking
lever holding a distance of about 5 mm to the bolt head carrier and
turn to the left until the slide-surfaces of the bolt head and the bolt
head carrier are at the same level.
¾ Press recoil spring into recoil spring guide rod.
12 of 24
SAFETY FEATURES
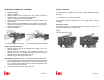
The safety lever is located on the left side of the grip assembly and can
be set at:
“S” = Safe and “F” = Fire (Fig. 28 and 29).
The position selected is indicated also on the right side of the grip
assembly.
How to put at safe
Set safety lever at “S”. The trigger cannot be squeezed. however, the
rifle can be loaded while in “safe” position.
Firing
Fire: Set safety lever at “F”.
Fig. 28 Safe
Fig. 29 Fire