
Owners Manual


8
Dear HECO Customer,
Congratulations on your ne new loudspeakers and thank you very much for choosing HECO! You
have made an excellent choice. The high-quality speakers produced by HECO are renowned all over
the world.
Please study the instructions and information below carefully before using your new loudspeakers.
FITTING THE FEET (CELANREVOLUTION 9 AND 7)
The (2) feet included in the delivery package must be tted to the loudspeaker before use. To do this,
place the speakers on a clean, stable base with the bottom facing upwards. It is better not to remove
the protective bag until after tting has been completed so as to avoid damage to the paint surface.
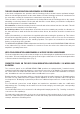
First t the four metal spikes to the two metal traverses, as shown in Fig. 1: Two spikes each (x) are
screwed into the threaded holes in the traverses (w) from below as far as they will go. The lock screw
(z) is then tted and tightened.
Now t the two pre-assembled feet using the M6 screws provided, as shown in Fig. 1.
The metal spikes (x) are height-adjustable so as to guarantee the stability of the speaker. To do this,
loosen the top lock nut (z) and adjust the spike by turning it. Once the right setting has been found,
tighten the lock nut again.
Rubber inserts are screwed into the bottom of the cone spikes. These ensure optimum stability on
smooth, hard oor coverings, such as laminate or tiles. The rubber inserts can be replaced with metal
inserts (included in the package). This variation is better suited for carpets, for example.
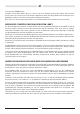
GENERAL INFORMATION ABOUT CONNECTING YOUR HECO CELANREVOLUTION LOUDSPEAKERS
Please always use a good quality loudspeaker connection cable from an audio dealer. To prevent
impairment of sound quality, we recommend cables with cross-sections of at least 2.5 mm² for lengths
up to 3 m and at least 4 mm² for lengths above 3 m.
Always turn off the amplier or receiver before connecting or disconnecting loudspeaker cables. Place
the loudspeakers in their planned positions and cut the cables to the right length. The cables for both
channels should always be exactly the same length.
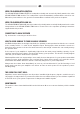
Strip 10 – 15 mm of insulation from the ends of the cables. Twist the ends – this is much better than
tinning them with solder – insert them in the terminals and tighten the terminal screws rmly. (Fig. 2)
For good sound it is imperative that the cables must be connected in such a way that the speakers are
“in phase”. This means that the black negative terminals on the speakers (-) must be connected to the
negative (-) terminals on the amplier, the red positive (+) speaker terminals to the positive (+) amplier
terminals. To make this easier one wire of most speaker cables is marked with a coloured strip or a
ridge in the insulation.
Before switching on the system double-check all your connections and make sure that the terminal
screws are tight and that there are no short circuits caused by stray wire laments – this could cause
serious damage to your amplier!