User’s Manual MC13H & MM13H series
CONTENTS 1. Safety Instructions………………………………………..………………….…..4 2. Regulatory Information………………………………………….….…….……..5 3. Precautions………………………..………………………………………….…..6 4. Before setting up…………………………………..…………………..…….…..7 5. Features & checking the products…….…………………………..…….….….8 Features of Lumimed series…………………………………………………...8 Checking the products………………………………………………………….8 6 Setting up the LCD Monitor…………………………………………….……......9 Features of Connectors…………………………………………………….....
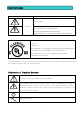
Safety Instructions Symbol Explanation RISK OF ELCTRIC SHOCK DO NOT OPEN CAUTION ! TO REDUCE THE RISK OF ELECTRIC SHOCK, DO NOT REMOVE COVER(OR BACK) NO USER-SERVICEABLE PARTS INSIDE REFER SERVICING TO QUALIFIED SERVICE PERSONNEL MEDICAL EQUIPMENT 13XX E246477 WITH RESPECT TO ELECTRIC SHOCK.FIRE AND MECHANICAL HAZARDS ONLY IN ACCORDANCE WITH UL60601-1, AND CAN/CSA C22.2 NO. 601.
Regulatory Information FCC RF INTERFERENCE STATEMENT This equipment has been tested and found to comply with the limits for a Class B digital device, pursuant to part 15 of the FCC Rules. These limits are designed to provide reasonable protection against harmful interference when the equipment is operated in a commercial environment.
Precautions ● Plug the power cord into a properly grounded outlet. There is the risk of electric shock. ● If you hear a noise or smell smoke from the view box or power cord, unplug the power cord immediately, and call service center. There is the risk of electric shock or fire ● Do not overload an electrical outlet with too many devices. There is the risk of fire ● Do not unplug from the outlet by pulling the power cord or when your hands are wet.
Before setting up Before setting up the LCD monitor, please read this manual to help your understanding of the Monochrome TFT-LCD Monitor. ● Install the LCD Monitor on a flat place. ● Don’t install in the place with much of water or moisture ● Put the LCD Monitor in a place with low humidity and a few of dust. ● Don’t overload an electrical outlet with too many devices. There is the risk of fire. ● Don’t expose the LCD monitor to the direct sun light. ● Keep the monitor away from high temperature.
Features & checking the products Features of Lumimed series ● High luminance & High contrast ratio ● Built-in 10-bit LUT ● Integrated Stable Brightness Control System ● OSD control for user control ● Digital Video Interface ● Video mode(CVBS,S-Video) support ● Narrow bezel design for space-saving Checking the products The following accessories are included in package. Check to see if they are enclosed with the monitor. If anything is missing or damaged, please contact your local dealer.
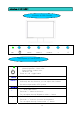
Setting up the LCD Monitor Feature of Connectors Description of Connectors No Name Cable Connections ① DC input Connect the DC jack of the Power adaptor ② DVI Digital Video Interface connection from PC ③ PC 15 Pin D-sub cable connection from PC ④ Video Connect the RCA cable from the video system ⑤ S-video Connect the S-video cable from the video system 8
Setting up the LCD Monitor Connecting the LCD Monitor 1) Connect the DVI-D signal cable to the signal port of the Graphic Card in your computer. 2) Connect the D-sub signal cable to the signal port of the Graphic Card in your computer. 3) Connect the DC input cable to the DC input port on the rear side of the monitor 4) Connect the RCA,S-video cable to the video system like a DVD 5) Turn on the monitor with the power switch of the user control port.
Adjusting of OSD MENU Features of OSD Controls LED MENU SELECT SOURCE - Description of Control ports . MENU SELECT Indicate Monitor power status by LED color Normal Operation : Green color Power Saving : Amber color Off Mode : off. Power on / off toggle button Launch OSD Menu Menu select button. . In Directly hot-key function, you can adjust Auto-balance for various input mode of PC system SOURCE - Select the input signal source “-“ Menu shift button.
Adjusting of OSD MENU OSD Operation BRIGHTNESS/CONTRAST Brightness: Changes the overall light intensity of the images being displayed Contrast : Changes the ratio of light intensity between the brightness white and darkest black You can adjust brightness/contrast values that you want by this hot key COLOR The tone of color can be changed from blush-white to reddish-white. Color1 : Blue type Color2 : Red type User : You can adjust a color control.
OSD TIME OSD TIME : Shows the OSD TIME displays from 10 to 30 seconds.
LINE: Control the gamma value without using LUT GSDF : Control the gamma value with using10bit LUT USER : Control the value INPUT SELECT INPUT SELECT : Select the input signal source. Please see the Input signal source of below order DSUB => DVI => CVBS => S-VIDEO => DSUB.
and then adjust the monitor’s height and angle to your own preference. ● Height ,Tilt ,Swivel - You are able to adjust the monitor’s height up to 110mm, angle up to 35degrees right and left, 35 degrees upward - Adjust the monitor’s height to the maximum. ● Rotation(Pivot) Function - Rotate the panel 90 degree -> Portrait : Turn clockwise. ->Landscape : Turn counter clockwise. NOTE - Do not touch the LCD screen when you change the height or the angle. - It may cause damage or break the LCD screen.
Appendix DVI-D Connector Pin Signal Pin Signal Pin Signal 1 T.M.D.S.Data2- 9 T.M.D.S.Data1- 17 T.M.D.S.Data0- 2 T.M.D.S.Data2+ 10 T.M.D.S.Data1+ 18 T.M.D.S.Data0+ 3 T.M.D.S.Data2/4 11 T.M.D.S.Data1/3 19 T.M.D.S.Data0/5 Shield Shield Shield 4 T.M.D.S.Data4- 12 T.M.D.S.Data3- 20 T.M.D.S.Data5- 5 T.M.D.S.Data4+ 13 T.M.D.S.Data3+ 21 T.M.D.S.Data5+ 6 DDC Clock 14 +5V Power 22 T.M.D.S. Clock Shield 7 DDC Data 15 Ground 23 T.M.D.S. Clock+ 8 N.
Appendix Power-Saving Mode Mode LED Indicator Power Dissipation Normal Operation Green Normal consumption Power Saving Mode Amber Less than 5W Off Mode Off Less than 5W Display mode in PC mode 16
Appendix SPEC ITEM LCD Frequency Resolution Input Terminal Input Signal Spec User control DESCRIPTION Size 19.0 inch Type 0.294 x 0.294mm Pixel Pitch a-Si TFT active matrix Surface Anti-Glare, Hard coating, 3H Viewable Size 376 x 301mm Color depth 16.
Appendix Trouble Shooting What you see Suggested Actions Screen is blank and Make sure that the power cord is firmly connected and the LCD power indicator is off monitor is on. No signal message Make sure that the signal cable is firmly connected to computer Make sure that the computer is turned on The display image is too Adjust the brightness & contrast dark or too light Screen is blank and The monitor is using its power saving system.