
Manual


10
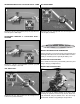
the blades are the same. If they are not, adjust one of the
linkages to bring the blades into the same plane.
TAKEOFF
During your fi rst fl ight it is important to have light winds and an
assistant to keep an eye on things around you. Also, if you are
fl ying from grass, make sure it’s cut low as this will allow the
helicopter to slide around without catching. Also make sure
there are no obstacles in your fl ying area to distract you.
Slowly add power and observe the model. If you feel it needs
trimming, do so before lift off. You will fi nd that model helicopters
never allow you to return the sticks to center. Simply hold the
sticks as needed to keep a steady hover. Please don’t fi ght
the trim too much as it is a normal thing to experience. Winds
have a large effect on model helicopters. Please wait for
calmer days and slowly work into windy days.
You will notice the cyclic controls lag slightly behind your
inputs. This is perfectly normal and something you become
accustomed to. It is normal to drift around some in a hover,
until you get used to fl ying the model. The cyclic controls
on the AXE 400 3D RTF are fairly sensitive so only small
movements are necessary.
HOVERING
Once the helicopter is in the air simply try to keep the
helicopter in one spot. This will take some practice and wind
has a big effect on the stability of the helicopter. Be patient
and slowly progress. Trying to rush the learning process can
be costly.
LANDING
Level the helicopter into a steady hover and slowly decrease
power until the helicopter settles onto the ground.
BASIC MANEUVERS
Once you are comfortable with hovering at different
orientations and landing, it’s time to move on to more
advanced maneuvers.
Slow Pirouettes: Add a small amount of tail rotor (left or
right) and try rotating the helicopter slightly sideways and
see if you can hold it there. If you become uncomfortable
bring the tail back towards you. Once you are comfortable,
try moving the helicopter to the side and turning back.
Then fl y back to the other side in straight lines. You can
try rotating the helicopter around 360°, which is called a
pirouette. The helicopter can drift during this maneuver so
make certain you have plenty of room when you fi rst start
practicing.
Nose-In Hovering: After pirouettes it’s time to move onto
nose-in hovering. The best bet is to wait for a calm day. Take
off and climb to 15 feet, practice half pirouettes from tail-in
to nose-in hovering, and try to lengthen the delay between
transitions. This will allow you to practice nose-in and still
give you a chance to get out of trouble. As you improve you’ll
remain nose-in for longer periods of time.
Forward Flight: Now it’s time to work into basic forward
fl ight. Just take the basic hovering maneuvers listed above
and slowly fl y out farther and faster and always bring the
helicopter back after one pass. Practice controlled slow fl ight
in close as well. The more time you spend practicing here,
the easier things will be later on.
AEROBATICS
So you are getting comfortable in fast forward fl ight? Well,
now it’s time to slowly progress into aerobatics. Once you are
in forward fl ight start using the idle up switch* which raises
the rotor RPM for aerobatics and allows the AXE 400 3D
RTF to fl y inverted (*please refer to page 11 to activate this
function). Also, in wind it may be diffi cult to descend to land
without the idle up on.
Chandelles: Your fi rst step is chandelles. Fly straight across
in front of you and pull up to a 45° angle. Now at the top, when
the helicopter slows down to a stop, apply left or right tail
rotor to bring the nose around 180° and continue back down
the 45° angle. As you progress with the maneuver you can
pull a greater angle than 45°, but 90° would be considered
a stall turn.
Loops: Once you become comfortable with the chandelles
and stall turns it’s time to move onto the loop. The key to the
loop is to enter with plenty of speed. Start pulling aft cyclic
to enter the loop and as the model transitions to inverted at
the top of the loop pull back on the throttle (towards negative
(–) collective). This will help maintain altitude. As the model
returns back to vertical add some positive (+) collective to
maintain the speed. One of the most common mistakes
made on loops is using too much negative (–) collective at
the top.
Flips: Be certain to start with plenty of altitude. From an
upright hover slowly add in full forward cyclic. As the model
approaches vertical, bring the collective stick back to center.
Now, as the model continues to inverted, you will need to
start adding in negative (–) collective (or pull the collective
stick back towards yourself). As the model transitions back
to vertical, again bring the collective stick back to the middle
and start adding in positive (+) collective as the model
returns back to upright. It’s simply a matter of timing. The
most important thing is, do not throw the sticks around. This
can cause the head speed to drop and may cause the tail
to drift.
Inverted Hovering: Keep in mind fl ying a helicopter inverted
is very diffi cult but can be learned. One of the main problems
is 3 out of 4 of the controls are reversed (forward/aft cyclic,
collective and tail rotor). You have to mentally reverse these
while fl ying. It will take some practice. Take the loop you
learned above and just hold the inverted portion for short