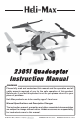
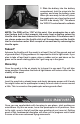
® 230Si Quadcopter Instruction Manual WARNING Please fully read and understand this manual and the operation and all safety aspects required of you for the safe operation of this product. Before use, if you feel this product is not for you please return it to your place of purchase. Heli-Max products are to be used by ages 14 and over. Manual Specifications and Description Changes The instruction manual, warranties and other associated documentation are subject to change without notice.
® INTRODUCTION Thank you for purchasing the Heli-Max 230Si Quadcopter. We are certain you will get many hours of enjoyment out of this model. If you should have any questions or concerns please feel free to contact us at: helihotline@ hobbico.com. For the latest technical updates or manual corrections visit the Heli-Max web site at www.helimax-rc.com. If there is any new technical information, changes or important updates to this model a “tech notice” box will appear on the 230Si product page.
® WARRANTY SERVICE Heli-Max guarantees this kit to be free from defects in both material and workmanship at the date of purchase. This warranty does not cover any component parts damaged by use or modification. In no case shall HeliMax’s liability exceed the original cost of the purchased kit. Further, Heli-Max reserves the right to change or modify this warranty without notice.
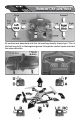
® FEATURES & SPECIFICATIONS Features ● ● ● ● ● ● ● ● ● Switchable TAGS-FX™ Sensor Fusion stabilization system On board micro digital video camera (HMXE0846 only) On board micro snap-shot digital picture camera (HMXE0846 only) USB Micro SD Card reader (HMXE0846 only) 2G Micro SD removable card (HMXE0846 only) LEDs for orientation built into frame Actual Direction Control flight mode Return to Pilot function Failsafe Product Specifications Size: 230 mm (9.
away from the rotors. The spinning blades of a model of this type can cause serious injury. ● When choosing a flying site stay clear of buildings, trees and power lines. AVOID flying in or near crowded areas. ● DO NOT fly close to people or pets. Maintain a safe distance from the quadcopter. ● Do not alter or modify the model. Doing so may result in an unsafe or unflyable model.
Charge Warnings ● Only use the included charger with the included LiPo battery. Do not attempt to use the provided charger with NiCd, NiMH or batteries with other chemistries. ● Do not leave the charger unattended while in use and always charge your battery in a fire-resistant location. ● Disconnect the battery and remove input power from the charger immediately if either becomes hot! ● Do not allow water or other foreign objects to enter the charger.
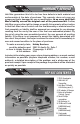
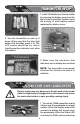
® TRANSMITTER CONTROLS All controls are described with the tail pointing directly toward you. This is the best way to fly in the beginning since it keeps the control inputs oriented the same direction.
® TRANSMITTER SETUP 1. Install 4 AA batteries in the transmitter by removing the battery cover from the back of the transmitter. Double-check the polarity of each battery before replacing the battery cover. 2. Turn the transmitter on and lay it down. Make sure that the blue light behind the Heli-Max panel is lit. The LCD screen should be on, with a throttle position indicator and other information. 3. Make sure the electronic trim indicators on the display are centered.
2. Slide the battery into the battery compartment, tuck the wires into the opening, and close the battery cover. When you are ready to take off, place the quadcopter on a level surface and the LED to be steady “ON”. This allows the TAGS-FX control board to calibrate. NOTE: The 230Si will be “ON” at this point. Your quadcopter has a safe start feature built in that prevents the motor from activating unless the throttle stick has been lowered to the lowest position.
Slow Pirouettes By moving the left stick (left or right), you can rotate the quadcopter around 360°, which is called a pirouette. Forward Flight Now it’s time to work into basic forward flight. Just take the basic hovering maneuvers listed above and slowly fly out farther and faster and always bring the Quadcopter back after one pass. Practice controlled slow flight in close as well. The more time you spend practicing here, the easier things will be later on.
flight modes, press down on the right control stick and release it. When the transmitter is changed to low rates, the ellipse in the lower center of the LCD screen will show a half ellipse and emit a single low pitch single beep. When changed to high rates, the ellipse will be complete and the transmitter will emit a single high pitch beep. Flight Control Sensitivity You can change the overall sensitivity of the TX465 transmitter. To do this, press and hold the right stick down.
for a second, flashes one more time, and then remains steady. In this mode, the quadcopter will maintain the current altitude when the throttle is at the mid-stick position. Moving the throttle below that point will allow the quadcopter to descend and raising the throttle above mid-stick will allow it climb. This setting makes the model more stable than just releasing the throttle and would be recommended any time the 230Si is used for photography.
bring it to a hover. IMPORTANT! The transmitter antenna should be pointed at the 230Si at all times for this feature to work correctly. Failsafe If the 230Si loses contact with the transmitter, it will hover for few seconds and slowly land. You can test this feature by turning off transmitter. Please perform this test in an open area because the quadcopter may drift away from the point where it lost the signal. Do not turn the transmitter back on until the quadcopter has landed.
Downloading the Video & Pictures from the Camera Install the MicroSD card into the reader. Plug the reader into the USB port of your computer. The USB connection will be auto recognized and the files ready to be transferred. At this point you can copy or transfer your files to your folder structure. ® SYSTEM ADJUSTMENTS NOTE: The TX465 is set up from the factory. However, if you ever need to make changes or calibrate the gyros, see the instructions below.
® TROUBLESHOOTING PROBLEM: 230Si does not react to any stick movements. Solution 1: Make sure that the battery voltage is above 4.0 volts Solution 2: If the LED on the rear of the model is not steady, unplug the battery and turn off the transmitter to allow the control board to reset itself. After about a minute, turn on the transmitter and reconnect the battery. PROBLEM: 230Si responds to the controls, but barely moves left or right.
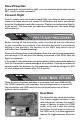
® MAINTENANCE Replacing a Rotor Blade Remove the screw holding the rotor blade to the motor shaft and pull the blade up to remove it. There are arrows on the rotor blade and arm indicating which direction the rotor blade will rotate. When installing the rotor blades on the 230Si, please select a blade the same color and with an arrow in the same direction. When the blades are correctly installed, they should look like the blades on the quadcopter in this photo. Replacing a Motor 1.
® REPLACEMENT PARTS Key 1 2 3 4 5 6 7 8 9 10 11 12 13 14 15 16 17 18 19 20 21 22 23 24 Part No.
® EXPLODED VIEW 19
®