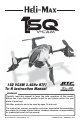
® TM 1SQ VCAM 2.4GHz RTF/ Tx-R Instruction Manual ™ WARNING Carefully read this manual to learn the safe operation of this model. Before use, if you feel this product is not for you, please return it to your place of purchase. Heli-Max products are to be used by ages 14 and over. The instruction manual, warranties and other associated documentation are subject to change without notice. Hobbico assumes no responsibility for inadvertent errors to this manual. Entire Contents © 2013 Hobbico®, Inc.
® INTRODUCTION Thank you for purchasing the Heli-Max 1SQ V-cam Quadcopter. We are certain you will get many hours of enjoyment out of this model. If you should have any questions or concerns please feel free to contact us at: helihotline@ hobbico.com. For the latest technical updates or manual corrections visit the Heli-Max web site at www.helimax-rc.com. If there is any new technical information, changes or important updates to this model a “tech notice” box will appear on the 1SQ V-cam product page.
® WARRANTY SERVICE Heli-Max guarantees this kit to be free from defects in both material and workmanship at the date of purchase. This warranty does not cover any component parts damaged by use or modification. In no case shall HeliMax’s liability exceed the original cost of the purchased kit. Further, Heli-Max reserves the right to change or modify this warranty without notice.
® FEATURES & SPECIFICATIONS Features ● ● ● ● ● ● ● ● ● TAGS-FX Sensor Fusion stabilization system On board micro digital video camera 3D Aerobatic Auto-FLIP feature On board micro snap-shot digital picture camera USB Micro SD Card reader 2G Micro SD removable card LED Lights on each of the motor pods Tx-R SLT Auto-define programming SLT TX460 Transmitter with feature activation buttons Quadcopter Specifications Size: 125 mm (4.
away from the rotors. The spinning blades of a model of this type can cause serious injury. ● When choosing a flying site stay clear of buildings, trees and power lines. AVOID flying in or near crowded areas. ● DO NOT fly close to people or pets. Maintain a safe distance from the quadcopter. ● Do not alter or modify the model; doing so may result in an unsafe or unflyable model.
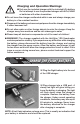
Charging and Operation Warnings ● Only use the included charger with the included LiPo battery. Do not attempt to use the provided charger with NiCd, NiMH or batteries with other chemistries. ● Do not leave the charger unattended while in use and always charge your battery in a fire-resistant location. ● Disconnect the battery and remove input power from the charger immediately if either becomes hot! ● Do not allow water or other foreign objects to enter the charger.
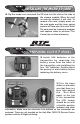
® INSTALLING THE MICRO SD CARD ❏ Flip the model over and push the SD card into the slot on the side of the camera module. When the card is correctly installed, it will click. To remove the card, simply press on the card again and the inner spring system will help eject the card. Note: The card must be in place to program and capture video or pictures. The V-cam has no internal memory.
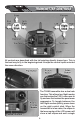
® TRANSMITTER CONTROLS All controls are described with the tail pointing directly toward you. This is the best way to fly in the beginning since it keeps the control inputs oriented the same direction. The TX460 transmitter has a dual rate function. This allows two flight modes, one that makes the 1SQ V-cam easer to fly and one that makes the quad more aggressive. To toggle between the two flight modes quickly press down on the right control stick.
low pitch single beep. For high rates, the ellipse will be complete and the transmitter will emit a single high pitch beep. Moving the right stick right or left will cause the quad to tilt and start moving that direction. Moves Right or Left Moves Backwards or Forwards Moving the right stick forward or backward will cause the quad to tilt and start moving that direction. Moving the left stick up or down will cause the quad to climb or descend.
Moving the left stick left or right will cause the quad to rotate in that direction. Rotates Left or Right ® ADJUSTING THE FLIGHT SENSITIVITY You can make your 1SQ V-cam fly more aggressively by changing the gyro sensitivity. To do this press and hold the right control stick down so the transmitter will emit a slow beeping sound.
picture button again to take the picture. You will notice that the LED will flash momentarily as the picture is being taken. When the flashing is complete you can take more pictures. You can switch back and forth between Video and Picture but remember you will have to press the appropriate button to re-enter that mode. ® HELI-MAX TX460 SERVO REVERSING This transmitter features SLT protocol. Therefore, it will bind with other SLT receivers.
® PROGRAMMING THE Tx-R MODEL Your 1SQ V-cam uses Tactic’s SLT protocol for communication. If using the Anylink with your non SLT protocol radio system you must make sure to follow the proper mapping procedure listed with the Anylink that matches your radio brand. Failing to do so could cause an unsafe condition. How to map your transmitter, as well as a list of compatible transmitters, is included with your Anylink. You can find this and more information on the Tactic website, www.tacticrc.
Futabs / Tactic Transmitter Settings AILE 1 ELEV THRO RUDD 2 3 4 Function Servo Rev Travel Dual Rate EXPO Timer Spektrum / JR Transmitter Settings Dual Rate EXPO Timer AUX 6 AUX 7 Flip Video Picture N N N N N N N 100/100 100/100 100/100 100/100 100/100 100/100 100/100 100/80 100/80 100/100 0/-20 0/-20 NULL 5 min AILE 1 ELEV THRO RUDD 2 3 4 Function Servo Rev Travel AUX 5 AUX 5 AUX 6 AUX 7 Flip Video Picture R R R R R R R 100/100 100/100 100/100 100/100 100/100 100/100 100/100 100/80 10
channels “turned on” and separate switches mapped to those channels before linking the transmitter to the V-Cam. Make sure all these channels are adjusted to maximum endpoints (EPA)! Programming Order Will Be Flip, Video and Lastly Still Picture ❏ 1. Move the transmitter’s throttle stick to the lowest position, all switches back, and dials to full CCW. ❏ 2. ❏ 3. ❏ 4. ❏ 5. ❏ 6. ❏ 7. ❏ 8. ❏ 9. Power the quad; the LED will glow solid. Press and hold the link button for 3 seconds, then release.
® FLYING YOUR 1SQ V-CAM ❏ Move the left stick to the lowest position and then turn the transmitter on. Electric motors are very dangerous. Do not work on the model while the flight battery is plugged in as interference may cause the main rotor blades to spin, possibly causing injury to yourself. ❏ Install the flight battery by sliding the battery into the bottom of the quad. Make sure the battery is slid all the way to the stop of the battery tray. Connect the battery to the connector.
Hovering Once the quad is in the air simply try to keep it in one spot. This will take some practice. Remember that even a light breeze will have an effect on the stability of the quad. Landing Level the quad into a steady hover and slowly decrease power until it lands. You might notice as the Quadcopter is ready to touch down it moves around a little. This is normal as the Quadcopter enters ground effect. Remember to unplug the battery from the Quadcopter after your flight is complete.
Press the video button (Tx-R, Flip the switch) again to start taking video. Press the video button (Tx-R, Flip the switch) once again to stop taking video. NOTE: The LED of the camera will flash letting you know you’re actively taking video. It’s also important to know that if you unplug the main power battery while taking video you will lose that capture. Taking Photos Press the photo button to “enter photo mode.
PROBLEM: The Camera System will not take a photo or start recording a video. Solution 1: Install the micro SD card if it is not in the slot. Solution 2: Eject the card and check for any debris on the contacts. Solution 3: Make sure card is OK by putting the card in the reader and checking on your PC. ® MAINTENANCE The maintenance tips for the 1SQ quadcopter will apply to the V-Cam quadcopter also. The guide can be found at the WWW.Helimax-rc.com in the download section with the other 1SQ files.
6 2 13 8 11 1 9 4 2 10 3 7 2 9 12 Forward 13 2 5 ® EXPLODED VIEW 19
FCC REQUIREMENT This device complies with part 15 of the FCC rules. Operation is subject to the following two conditions. (1) This device may not cause harmful interference. (2) This device must accept any interference received, including interference that may cause undesired operation. NOTE: THE MANUFACTURER IS NOT RESPONSIBLE FOR ANY RADIO OR TV INTERFERENCE CAUSED BY UNAUTHORIZED MODIFICATIONS TO THIS EQUIPMENT. SUCH MODIFICATIONS COULD VOID THE USER’S AUTHORITY TO OPERATE THE EQUIPMENT.