Operating Instructions 2.4 GHz Radio Controlled Model Boat Please read instruction manual carefully before operating. CAUTION: DESIGNED FOR FRESH WATER USE ONLY! SPECIFICATIONS: Hull length: 24.25” (615.95mm) Overall length: 28” (711.2m) Height: 4.5” (114.3mm) Battery: 2600mAh 7.2 V Nimh Charger: 7.2V 300mAh NiMh AC charger Transmitter: 2CH 2.4GHz Motor: Brushed 550 On-Board Electronics: 30A water cooled ESC, full size steering servo, 2.
Table of Contents Introduction 2 Safety Precautions 3 FCC Information 3 Battery Install and Charging 4 Contents 4 Transmitter Details 5 Preparing your Boat 6 Binding 6 How to Operate your Boat 7 Important Battery Cautions 7 Brushless Motor Upgrade 8 Setting Failsafe 9 Low Voltage Cutoff 9 Maintenance and Inspection 10 Rivos Spare Parts 10 Introduction The Helion Rivos will have you rocketing across your local pond or lake and making sharp turns like a pr
Safety Precautions Failure to use this product in the intended manner as described in the following instructions can result in damage and/or personal injury. A Radio Controlled (RC) boat is not a toy! If misused it can cause serious bodily harm and damage to property. Keep items that could become entangled in the propeller away from the propeller, including loose clothing, tools, etc. Be especially sure to keep your hands, face and other parts of your body away from the propeller.
Contents Rivos Boat RTR Not Available Separately AA Batteries (4) HLNB0035 7.2V, 2600mAh NiMh Battery HLNB0040 7.2V 300mAh NiMh AC charger HLNB0045R/B 2-Channel 2.4GHz Transmitter, Red/Blue Battery Install and Charging Install Batteries in Transmitter Slide the battery door off of the bottom of the transmitter and install the 4-AA batteries. Make sure to check the orientation of the cells, the correct orientation is indicated inside the battery box.
Transmitter Details The Rivos includes a pistol grip 2-channel transmitter equipped with 2.4GHz technology, digital trims, servo reversing and travel volume adjustment on the steering channel 50/50 70/30 Proportion Switch Rudder Trim Steering Wheel Throttle Trim Antenna LED Bind Button On/Off Steering Reverse Throttle Trigger Rudder Travel Volume Knob Throttle Reverse Battery Box 70/30 ON 50/50 OFF Power Switch is located on the upper end panel of the pistol grip.
Preparing your Boat Slide your fully charged drive battery into the hull and strap in place with the hook and loop fasteners. With your transmitter turned on, plug the drive battery into the speed control. Important Do not arm the boat motor until you have placed the boat into the water. Once in the water, arm the motor by pushing the throttle trigger forward and then pulling it to the rear. Place the top hatch in position and rotate the latch to secure. Binding The Rivos comes already bound.
How to Operate your Boat Place your boat in the water. Push the trigger slightly away from you to arm the motor and then pull it towards you to make the boat go forward. The speed control is proportional, the farther you pull it the faster the boat will go. Release the trigger to stop. To initiate a right turn, rotate the steering wheel clockwise while holding the trigger to the speed setting you desire.
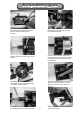
Brushless Motor Upgrade Disconnect the brushed speed control from the throttle channel of the receiver. Disconnect both water lines from the brushed speed control. Loosen the two set screws on the motor coupler. Remove the four phillips screws from the motor mount. Disconnect the water lines.Remove motor and speed control from the hull. Install the brushless motor mount to the brushless motor using the included 3mmX6mm machine screws.
Reconnect the new water line to the water pickup tube. Connect the new water line to the 40A brushless speed control. Connect a short tube to the speed control and to the right side of the brushless motor. Feed the other short tube through the side of the hull and connect to the left side of the brushless motor. Connect the receiver plug to the throttle channel on the receiver and you are ready to go. Setting Failsafe The Rivos comes with the receiver failsafe set to NONE.
Maintenance and Inspection Check for excess water in the hull after everyuse. If you do find excess water in the hill, pay special attention to installing the top hatch, ensuring a tight seal. Always unplug the battery after each use and charge it outside of the hull. After use, store the boat in the shade or inside to prevent the sun fading the decoration. Never use chemicals to clean the boat as this may also damage the finish. The boat is designed for fresh water use ONLY.
Exclusively Available at HobbyTown 30 Day Limited Warranty We warranty that the Product(s) purchased (the “Product”) will be free from defects in materials and workmanship when the product is new (before being used) for the limited warranty term period, 30 days, from the date of purchase by the Purchaser. If you believe a defect in material, workmanship, etc. was not apparent when the Product was new and only became evident after the Product was used, take the following steps.
www.Helion-RC.com ©2014 Revision 1.