
Download


CAUTION:
Select a suitable location for the unit. Always choose a safe location in accordance to the
safely recommendations outlined.
The fan should always be switched off when making any adjustments to the fan head angle.
Always keep the unit upright.
NOTE: Before inserting the plug into a power outlet, make sure that the correct voltage being used
corresponds to what is indicated on the rating label, and that the socket has an earth facility.
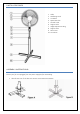
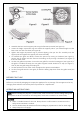
2. Assemble the base to the support pole using the fasteners provided (see Figure A).
3. Loosen the height adjustment ring and extend the support pole to your desired height. Put the
base cover over the cross base (see Figure B).
4. Tighten the height adjustment ring to prevent slipping, then put the fan assembly onto the
support pole and tighten the support pole screw manually.
5. To assemble the grille and blade, remove the spinner by turning it clockwise (see Figure C),
remove the fan blade and then remove the locking nut by turning it clockwise (see Figure D)
from the motor shaft.
6. Put the rear grille into position. Ensure the rear grille fits onto the locating pins (see Figure D). If
the grille is installed correctly, the rear grilles support handle should be on top (see Figure F).
Then fix the rear grille using the locking nut.
7. Put the fan blade on the motor shaft and tighten the spinner anticlockwise.
8. Put the front grille onto the rear grille, fix with the locking clips then fasten the grille screw (see
Figure E).
BEFORE FIRST USE
Before use, remove all packaging and inspect the appliance for any damage. If there appears to be any
damage, please take the unit back to place of purchase for a replacement.
OPERATING INSTRUCTIONS