
Manual


5. Locate existing spare tire crossmember on vehicle frame.
Place square U-bolt over the frame rail in front of the
crossmember with the legs of the U-bolt pointing down-
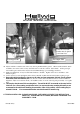
ward. If equipped with trailer brake controller, loosen the 3
bolts attaching controller to frame rail and slide controller
off slots in rail (see photo) - DO NOT DISCONNECT
CONTROLLER FROM HARNESS. This will allow
the drivers side U-bolt to be installed on frame rail.
6. Reattach trailer brake controller to frame rail if required.
7. Insert the legs of the U-bolts into the slotted holes of the
frame brackets. Using 1/2” locknuts and washers, install
the frame bracket with the clevis on the RH side of the
bracket as shown in photos. The large hole in the bracket
must be centered over the frame rivet. LEAVE LOOSE
for adjustment later.
8. Insert hourglass bushing first and then the sleeve into the
loops of the end links. Lubricate the bushing and sleeve
before assembly. Attach 9/16 nut to threaded half of end
link before assembling end link halves.
9. Attach end links to clevis on frame brackets using 7/16 X
2-1/4 bolts and locknuts. LEAVE LOOSE for adjust-
ment later.
559-734-7451 800-367-5480 FAX 559-734-7460
Loosen three bolts to remove
trailer controller for U-bolt instal-
lation. DO NOT UNPLUG CON-
TROLLER FROM HARNESS.
Driver Side
Clevis is installed
on RH side of
bracket on driver
side and pass side
rails.
END LINK MUST BE
ATTACHED TO
REAR –MOST HOLE
PRIOR TO INITIAL
USE.
7698 (R-7698) 10/12/2007
Spacer Plate