
User's Manual


https://heltec.org
Documents
Rev 0.1
P 4 / 4
Apr. 2022
Heltec Automation © Limited standard files
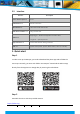
Step 3
When you finish setting up the antenna, subsequently, plug in the adaptor to make
sure the power is connected with the miner. As you can see here, please choose to use
an internet cable (but you can use the WIFI also if you want) and there is also an
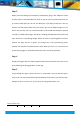
antenna and the power cable. Once you do this you can see different lights on the
device. First it is blue, if it is on, it means the Wi-Fi is connected with the device. Second
it is Red, It is called LoRa TX light. The Miner is sending LoRa data when it becomes red
color. Third one is LoRa RX signal light. When the miner is receiving data from other
hotspot, the light will turn to green. The orange one is the synchronizing status
indicator, the process of synchronization is done when you see it’s on. Last one is the
system working light, it will be white when the miner is working smoothly.
Step 4
Ready to configure with the Helium Appoint takes a few minutes for the miner to set
up by following the paring guidance via the App.
Step 5
Check through the App to assure the miner is connected, I must say that the app is
easy to use, not over complicated, and if you follow the instructions, you will have your
Hotspot set up in no time. If so, your journey of mining with Helium is on.