
Operation Manual


4.1.2. Installation in Windows XP
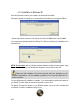
Once files have been copied to your computer, the drivers will be installed.
A dialog box appears, prompting you to connect DeeJay Trim 4&6 to your computer's USB port.
- Set the power switch at the back of the DeeJay Trim 4&6 to the ON position, then click Next.
Your computer automatically detects the DeeJay Trim 4&6 and completes the installation of the
required drivers.
NOTE:
Do not interact with any Windows hardware detection windows that may appear during
the installation process; any such windows will disappear in a short while on their own.
Please note that installation of the drivers may take some time, depending on your
computer’s performance. Let the installation procedure run its course and follow the on-
screen instructions.
You are notified when the installation is complete. If you are prompted to update the firmware for
your DeeJay Trim 4&6, follow the instructions provided in order to do so.
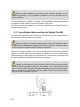
The DeeJay Trim 4&6 icon appears in your Windows taskbar, next to the clock, indicating that
your DeeJay Trim 4&6 is installed and ready for use:
6/24