
Operation Manual


10/32 – User Manual
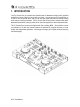
If you are using a turntable:
- Set the Line-Phono switch to the Phono position.
- Connect the ground wire from your turntable to the corresponding ground connector above the
Line-Phono switch. Grounding helps to eliminate the interference which can otherwise occur
with turntables, giving you crystal-clear sound.
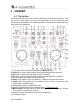
You can use the two Source buttons on your DJ Console Rmx (Source 1 for Deck A, Source 2
for Deck B) to control the audio input for the corresponding deck. By default, the input is set to
computer audio tracks: simply press the Source button to switch to the external audio source.
Press the button again to disable the external source and return to computer audio (please see
section
7.6 Source buttons
You can use the Gain knobs on your DJ Console Rmx to adjust the volume for each deck.
).
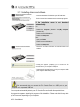
6.2. Connecting a microphone
Your DJ Console Rmx features 2 microphone connectors: 1 mono ¼" jack plug on the top face,
and one on the front face. You can only use one microphone input at a time: if two microphones
are connected simultaneously, the microphone input on the unit's top face will take precedence
over the input on the front face.
You can use your microphone to talk over the music and communicate with your audience (mix
the microphone input with audio outputs 1-2, for example), or use your microphone to replace the
music on Deck A with your voice.
Press the Mic On/Off button on your DJ Console Rmx to toggle the microphone on or off. You
can use the volume knob beside it to adjust the input volume for your microphone.
The DJ Console Rmx features a talkover function for the microphone input, which automatically
reduces the level of the music that's playing to allow you to be heard when you're speaking. The
music level is restored once the microphone input is disabled.
Please see section
8.2 Using the DJ Console Rmx control panel for more information on adjusting
the talkover attenuation function and using your microphone.