
Operation Manual


ITALIANO
DEUTSCH
ESPAÑOL
NEDERLANDS
ENGLISH
FRANÇAIS
User Manual – 5/32
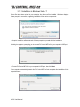
Please note that installation of the drivers may take some time, depending on your
computer’s performance. Let the installation procedure run its course and follow the on-screen
instructions.
You are notified when the installation is complete.
The DJ Control MP3 e2 icon appears in your Windows taskbar, next to the clock, indicating that
your DJ Control MP3 e2 is installed and ready for use:
To display the DJ icon in Windows 7, you must first click on the up arrow icon in the
notification area. When the list of hidden icons displays, drag-and-drop the DJ icon into the
notification area.
You should now install the VirtualDJ DJC Edition mixing software on your computer:
- In the installation menu, click Install VirtualDJ DJC Edition
and follow the on-screen instructions.
The software is installed on your computer. When installation is complete, the VirtualDJ icon
appears on your desktop.
- Double-click the VirtualDJ icon and enter the serial number, then click OK.
The serial number is found on the installation CD-ROM's envelope.
For more information on configuring your DJ Control MP3 E2, please refer to chapter
5.2. The DJ
Control MP3 e2 control panel
3.1.2. Installation in Windows XP
.
Once files have been copied to your computer, the drivers will be installed.
A dialog box appears, prompting you to connect DJ Control MP3 e2 to your computer's USB port.