
Installation Manual


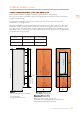

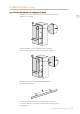


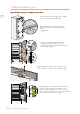
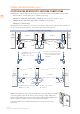
Table Of Contents
- SAFETY PRECAUTIONS - BEFORE YOU BEGIN
- MODEL NUMBERS
- RATING LABEL
- REGULATORY / CODE REQUIREMENTS
- IMPORTANT CHILD SAFETY
- LOCATION AND PREPARATION
- CONNECTIONS
- Overlay Panels
- FINAL INSTALLATION
- TESTING AND INITIAL START UP
- PARTS AND SERVICE
- PRÉCAUTIONS DE SÉCURITÉ - AVANT DE COMMENCER
- numéros de modèle
- PLAQUE SIGNALÉTIQUE
- EXIGENCES RÉGLEMENTAIRES / CODE
- POUR LA SÉCURITÉ DES ENFANTS
- Lieu et préparation
- CONNECTER
- PRÉPARATION DES PANNEAUX DÉCORATIFS
- Installation finale
- ESSAIS ET DÉMARRAGE INITIAL
- LISTE DES PIÈCES
- SERVICE

OVERLAY PANELS
(CONT.)
MOUNTING OVERLAY PANELS TO DOORMOUNTING OVERLAY PANELS TO DOOR
6
8
9
7
10
11
Hook the panel to the hanger bolts starting
from the top aligning brackets
(6).
After the panel is hooked on all hanger
bolts, install the two vertical adjustment
screws.
See
(9) below.
At this point, alignment between the
panel and adjacent cabinets can be
adjusted using the alignment brackets and
brackets (7) and (8).
Vertical alignment: tighten or loosen the screws
in the brackets to raise or lower the panel. (
9)
Depth alignment: working from the inside of
the door, after lifting up the magnetic seal,
adjust the panel position so it is closer to or
further away from the door using (
10)
and then
fix the panel in position using (
11)
© 2020 Hestan Commercial Corporation
26
EN