Outdoor Beer Dispensing Equipment Installation and Instruction Manual GFDSR241 GFDSL241 GFDSR242 24” SINGLE FAUCET BEER DISPENSER SOLID DOOR RIGHT HINGE 24” SINGLE FAUCET BEER DISPENSER SOLID DOOR LEFT HINGE 24” DOUBLE FAUCET BEER DISPENSER SOLID DOOR RIGHT HINGE GFDSL242 24” DOUBLE FAUCET BEER DISPENSER SOLID DOOR LEFT HINGE P/N 011028 rev A Form. No.
HESTAN RESIDENTIAL INSTALLATION MANUAL FOR BEER DISPENSING EQUIPMENT CONGRATULATIONS Congratulations on your purchase of a Hestan high quality residential beer dispenser. Hestan has proudly partnered, IMPORTANT! to our exact specifications, with a quality manufacturer for The installation of the actual beer its beer dispensing systems.
HESTAN RESIDENTIAL INSTALLATION MANUAL FOR BEER DISPENSING EQUIPMENT INSTALLATION OF DISPENSING EQUIPMENT Open the tapping kit box and become familiar with its components. The instructions on pages 4 through 8 will demonstrate how to properly install the tapping equipment on your new Hestan Beer Dispenser.
HESTAN RESIDENTIAL INSTALLATION MANUAL FOR BEER DISPENSING EQUIPMENT 1. Locate the dispensing head , black beer line(s), and hose clamp(s). Slide one end of each beer line onto the stainless steel tubes which protrude out the bottom of the dispensing head and clamp tight. 2. Remove transit tape with a utility knife around the hole in the top of the unit from both inside and outside of the cabinet. Gently punch out foam w/screwdriver and remove. Insert the beer line(s) through the hole in the counter top.
HESTAN RESIDENTIAL INSTALLATION MANUAL FOR BEER DISPENSING EQUIPMENT 4. Install the Air Scoop Kit. Start by removing the upper set of screws located above the fan on the back wall of the cabinet. 5. Assemble components from the kit as follows – Insert black snap bushing into air scoop mounting bracket, then insert one end of the air snorkel through the snap bushing. A zip tie can be inserted behind the mounting bracket to keep the tube in place. 6.
HESTAN RESIDENTIAL INSTALLATION MANUAL FOR BEER DISPENSING EQUIPMENT 7. If installing a two faucet system, a CO2 manifold will need to be installed. Locate the red CO2 lines, CO2 manifold and a #10 x 1/2” sheet metal screw. Slide one end of each hose onto the barbed fittings on the manifold and clamp. On the left rear side wall of the beer compartment there is a double row of screws which run vertically. Remove one of the two top screws and discard.
HESTAN RESIDENTIAL INSTALLATION MANUAL FOR BEER DISPENSING EQUIPMENT 10. On the right rear sidewall there is a double column of screws. Remove the left screw. Locate the safety chain and a #10 x 1/2” sheet metal screw from the parts bag. Insert the screw through the closed end link of the chain and tighten in the vacant screw hole. The chain can now be used to secure the tank with “S” hook, preventing damage to the regulator. 11. CO2 tanks are shipped empty and must be filled prior to use.
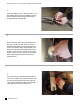
HESTAN RESIDENTIAL INSTALLATION MANUAL FOR BEER DISPENSING EQUIPMENT 13. Before tapping, make sure the beer faucet is closed. To tap a keg, insert the coupler into the neck of the barrel. Turn the coupler clockwise until it stops (about an 1/8 turn), then push down on the top of the coupler and again turn clockwise until it stops. Your barrel is now tapped. Open the CO2 valve on the regulator as well as the valve on the manifold if used. CONNECTING THE REGULATOR TO THE CO2 CYLINDER 1.
HESTAN RESIDENTIAL INSTALLATION MANUAL FOR BEER DISPENSING EQUIPMENT MOUNTING HOLE TEMPLATE FOR DRAFT ARMS hestanoutdoor.
Use and Care Guides, Specification Sheets, Wood Overlay Templates for Doors, Drawers and Grilles, and Corresponding Compliance and Energy Guides are available for download at http://www.hestanoutdoor.com/ . Contact Hestan Customer or Technical Service at 888-905-7463 Customer Service and Technical Service are available business days Monday through Friday from 8 a.m. to 5:00 p.m. PST. P/N 011028 rev A Form. No.