
Gas Conversion Kit Guide


©2016 Hestan Commercial Corporation
2
EN
CHANGING ORIFICES
SPUD
ORIFICE
LOCK-NUT
FLEX
HOSE
BURNER
BRACKET
ELBOW
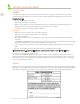
2. Beginning with the Infrared Burner in the upper canopy area of the grill, access the spud orifice
shown in the image below. Disconnect the flex hose first. Then use a wrench to hold the brass
elbow steady, while using another wrench to remove the lock-nut. You may now remove the elbow
out of the burner bracket. Try not to disturb the flex hose connection by unduly bending it too
much. Be careful not to damage the wires and copper thermocouple tube nearby.
1. Open your grill and remove the grates, radiant trays, and burners from the firebox area. Open flame
burners (Trellis burners in Hestan Grills, and U-Burners in Aspire Grills) are removed by lifting up
the rear of the burner, and carefully twisting to clear the igniter shroud. Sear burners have a small
metal cover over the igniter which must be removed first. There is also a screw at the rear firebox
wall which must be removed. The sear burner can then be carefully removed using the same twisting
action to avoid breaking the ceramic igniter. Remove the rear cover of the grill. If your grill is
mounted on a cart, remove the rear access panel of the cart as well. Also remove the control knobs
and drip pan.