
Sear Burner Conversion Kit Guide

©2017 Hestan Commercial Corporation
3
EN
REPLACING THE VALVE MARKER (HESTAN GRILL ONLY)
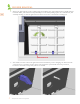
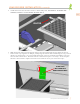
1. Remove the screws securing the control panel to the front of the grill. Carefully tilt down the
control panel being careful not to damage the wires to the switches and LED light bar. Using a 7mm
or 9/32” wrench, remove the small nut which secures the valve marker and exchange it for the new
one supplied in the kit. Replace the nut and tighten.
IF YOUR GRILL HAS NATURAL GAS FUEL (NG),
SKIP THIS SECTION AND PROCEED TO BURNER INSTALLATION
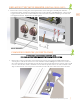
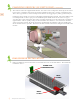
1. Remove the screws securing the control panel (see previous section) and carefully tilt down the
control panel. Pull off the connectors to the switches and the LED light bar at this time. Remove
the control panel from the grill and set aside. Before removing the main burner orifices, take a visual
note as to how far the orifice is installed onto the valve body. The orifices are removed with a 1/2”
deep socket wrench. Use even pressure to break loose the old orifice and remove from the valve.
CHANGING ORIFICES (LP UNITS ONLY)