
Sear Burner Conversion Kit Guide

©2017 Hestan Commercial Corporation
5
EN
SEAR BURNER INSTALLATION
(continued)
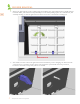
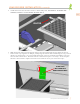
2. Install the burner onto the valve / orifice so that it fully seats. BE CAREFUL TO AVOID THE
CERAMIC IGNITER - IT CAN CRACK OR SNAP OFF !!!
IGNITER
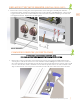
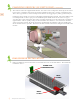
3. With the burner fully inserted, align the hole in the rear bracket with the tiny dimple in the rear
firebox wall. If your grill has no dimple, visually align the burner while maintaining the 1.25” vertical
distance as shown below. Use a power drill with 5/16” socket to install the self-drilling screw into
the rear wall of the firebox. This will secure the sear burner in place. Go slowly - do not strip the
threads or the new hole. Replace the metal cover and mesh screen you removed in step 1.
ALIGN HOLE
WITH DIMPLE IN
REAR FIREBOX WALL
1.25”