INDOOR / OUTDOOR UNDERCOUNTER REFRIGERATION Refrigerators & Freezers Installation Manual
TABLE OF CONTENTS 2 3 4 4 4 6 10 EN SAFETY DEFINITIONS MODEL NUMBERS RATING LABEL REGULATORY/CODE REQUIREMENTS SAFETY INSTALLATION DOOR INFORMATION READ THESE INSTRUCTIONS CAREFULLY AND COMPLETELY BEFORE INSTALLING OR USING YOUR APPLIANCE TO REDUCE THE RISK OF FIRE, SHOCK HAZARD, OR OTHER INJURY. KEEP THIS MANUAL FOR FUTURE REFERENCE. Read and understand all information in this manual before attempting the installation.
MODEL NUMBERS Model No.
RATING LABEL The rating label contains important information about your Hestan appliance such as the model and serial number, and refrigerant information if service is required. EN RATING LABEL The rating label is attached to the inside top of the cabinet. REGULATORY / CODE REQUIREMENTS Installation of this appliance must be made in accordance with local codes. In the absence of local codes, this unit should be installed in accordance with the National Electrical Code and local codes.
SAFETY (continued) If unit has been laid on its back or sides, place unit upright and allow a minimum of 24 hours before connecting power. EN PLUMBING No plumbing connections are required. Condensate from the cooling coil is automatically evaporated through a condensate pan located in the condensing section of the unit. DANGER ELECTRICAL SHOCK HAZARD Disconnect power before installing or servicing appliance. Failure to do so can result in death or electrical shock.
INSTALLATION ANTI-TIP BRACKETS Unit may tip forward if loaded racks/shelves are all pulled out at the same time. To prevent tipping, and to provide stable installation, the unit must be secured in place with the anti-tip brackets supplied with the unit. The anti-tip brackets, when properly installed, should secure the rear legs/ glides to the mounting surface and prevent the unit from tipping forward.
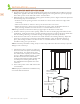
INSTALLATION (continued) 1. Make sure the space opening is correctly sized for the unit. See typical appliance dimensions below, and the chart below for finished rough opening requirements: 11” EN TYPICAL APPLIANCE DIMENSIONS POWER CORD 5 FT. LONG CUTOUT DIMENSIONS: 34-3⁄8” H - 24” W - 24” D 3-1⁄4” MIN. CLEARANCE FROM A CORNER TO ACHIEVE 90° SWING 90° SWING REQUIRED FOR PULL-OUT SHELF CLEARANCE 24-15⁄16” MIN.
INSTALLATION (continued) INSTALLING THE UNIT INTO THE SPACE 1. Plug the unit into the 15 amp grounded electrical outlet located within the installation opening. With power applied to the unit, check that the lighting and cooling functions operate properly. Turn off the power to the wall outlet at the circuit breaker. 2.
INSTALLATION (continued) INSTALLING THE FRONT GRILLE COVER Once the unit is secured in place, install the louvered front grille cover. Secure the cover by snapping the latch into the latch catch on the unit (Figure 3). The vent grille must be removed to service the unit. The floor cannot interfere with removal, and the louvered sections must not be covered or obstructed. Obstructions could prevent proper air circulation, which may damage the unit.
DOOR INFORMATION DOOR OPTIONS Hestan residential units can be converted from stainless steel to overlay panels to match existing cabinetry. Solid stainless steel and stainless steel glass doors are shipped from the factory with decorative stainless steel panels and handles in place on the unit. All stainless steel doors and drawers are convertible to fully integrated models, ready to accept custom panels from your cabinetry supplier.
DOOR INFORMATION (continued) OVERLAY INSTALLATION Before beginning installation, check all components for proper fit and finish. NOTE: For more detailed installation information, please request or download document 028374 mentioned on the previous page. EN For best performance and functionality, the overlay panels should be 3/4” [19 mm] thick. The weight of the overlays should not exceed 20 lbs [9 kg] for solid doors, 10 lbs [4.5 kg] for glass doors, or 10 lbs [4.5 kg] for drawer models. 1.
NOTES
TABLES DES MATIERES 2 3 4 4 4 6 10 DÉFINITIONS DE SÉCURITÉ NUMÉROS DE MODÈLE PLAQUE SIGNALÉTIQUE RESPECT DE LA RÉGLEMENTATION ET DES CODES EN VIGUEUR SÉCURITÉ INSTALLATION INFORMATION SUR LA PORTE FR LISEZ ATTENTIVEMENT ET COMPLÈTEMENT CES INSTRUCTIONS AVANT D’INSTALLER OU D’UTILISER VOTRE APPAREIL AFIN DE RÉDUIRE LES RISQUES D’INCENDIE, DE BRÛLURE OU D’AUTRES BLESSURES. CONSERVER CE MANUEL POUR RÉFÉRENCE FUTURE.
NUMÉROS DE MODÈLE No.
PLAQUE SIGNALÉTIQUE La plaque signalétique contient des informations importantes sur votre appareil Hestan, telles que le modèle et le numéro de série, ainsi que des informations sur le réfrigérant si un entretien est nécessaire. PLAQUE SIGNALÉTIQUE FR La plaque signalétique est fixée sur le dessus intérieur de la caisse. RESPECT DE LA RÉGLEMENTATION ET DES CODES EN VIGUEUR L’installation de cet appareil doit être effectuée conformément aux codes locaux.
SÉCURITÉ (suite) Si l’unité a été posée sur le dos ou sur les côtés, placez-la à la verticale et attendez au moins 24 heures avant de brancher l’alimentation. PLOMBERIE FR Aucun raccord de plomberie n’est requis. Les condensats du serpentin de refroidissement s’évaporent automatiquement à travers un bac à condensats situé dans la section de condensation de l’unité. DANGER RISQUE DE CHOC ÉLECTRIQUE Coupez l’alimentation avant d’installer ou d’entretenir l’appareil.
INSTALLATION SUPPORTS ANTI-BASCULEMENT L’unité peut basculer vers l’avant si les racks / étagères chargés sont tous retirés en même temps. Pour éviter tout basculement et assurer une installation stable, l’unité doit être fixée en place avec les supports anti-basculement fournis avec l’unité. Les supports anti-basculement, lorsqu’ils sont correctement installés, devraient fixer les pattes arrière / patins à la surface de montage et empêcher l’unité de basculer vers l’avant.
INSTALLATION (suite) 1. Assurez-vous que l’ouverture de l’espace est correctement dimensionnée pour l’unité. Voir les dimensions typiques de l’appareil ci-dessous et le tableau ci-dessous pour les exigences d’ouverture brute finie: 11 po CORDON D'ALIMENTATION 5 PIEDS FR DIMENSIONS TYPIQUES DE L'APPAREIL DIMENSIONS DE DÉCOUPE: 34-3⁄8 po H - 24 po W - 24 po D 3-1⁄4 po MIN.
INSTALLATION (suite) INSTALLATION DE L’UNITÉ DANS L’ESPACE 1. Branchez l’unité dans la prise électrique mise à la terre de 15 Ampères située dans l’ouverture d’installation. Une fois l’appareil sous tension, vérifiez que les fonctions d’éclairage et de refroidissement fonctionnent correctement. Coupez l’alimentation de la prise murale du disjoncteur. 2.
INSTALLATION (suite) INSTALLATION DU COUVERCLE DE GRILLE AVANT Une fois l’unité en place, installez le couvercle de la grille avant à persiennes. Fixez le couvercle en enclenchant le pêne dans le loquet de l’unité (Figure 3). FR La grille de ventilation doit être retirée pour l’entretien de l’unité. Le sol ne peut pas interférer avec l’enlèvement, et les sections persiennes ne doit pas être couvert ou obstrué.
INFORMATION SUR LA PORTE OPTIONS DE PORTE Les unités résidentielles Hestan peuvent être converties de l’acier inoxydable au des panneaux de revêtement dans le champ. Les portes solides et en verre, sont expédiées de l’usine avec des panneaux en acier inoxydable et des poignées en place sur l’unité. Toutes les portes et tiroirs en acier inoxydable sont convertibles en modèles entièrement intégrés, prêts à accepter des panneaux personnalisés (revêtement) de votre fournisseur d’armoires.
INFORMATION SUR LA PORTE (suite) INSTALLATION DU PANNEAU DE REVÊTEMENT Avant de commencer l’installation, vérifiez que tous les composants sont bien ajustés et finis. REMARQUE: Pour des informations d’installation plus détaillées, veuillez demander ou télécharger le document 028374 mentionné à la page précédente. FR Pour de meilleures performances et fonctionnalités, les panneaux de revêtement doivent avoir une épaisseur de 3/4 po [19 mm].
NOTES ©2020 Hestan Commercial Corporation 12
RETAIN THIS MANUAL FOR FUTURE REFERENCE CONSERVEZ CE MANUEL POUR UNE RÉFÉRENCE FUTURE Hestan Commercial Corporation 3375 E. La Palma Ave.