
Installation Instructions


HESTAN RESIDENTIAL INSTALLATION MANUAL
8
hestanoutdoor.com
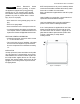
SHELVING/DRAWER ADJUSTMENTS
Completely empty shelf or drawer
before removing.
1. Pull the shelf/drawer out to its furthest position. Locate
the tabs in the middle of both extenders. Lift one tab up
while pushing the opposite tab down, and pull shelf/
drawer out (Figure 4).
2. Position each bracket separately. Grasp the middle of
the bracket, pull the front end up and out, then forward
to remove it.
3. Place bracket at desired location. Push the bracket rear
hook into the rear mounting slot, then set front of the
bracket in the front slot.
4. Repeat for other brackets.
5. Push extenders completely into brackets. Align the
shelf/drawer grooves with the extenders and slide
completely into the unit.
CAUTION
Lift one tab on extender UP while
pushing tab on opposite extender DOWN
and pull out to remove.
To remove brackets,
remove shelf, lift front
of bracket to disengage
the front key slot, then
pull forward to disengage
the rear key slot.
DOOR OPTIONS
NOTE: Glass with stainless steel trim and glass with wood trim
may sweat in conditions with relative humidity over 75%.
Figure 4. Shelving/Drawer Adjustment
Hestan residential units can be converted from stainless steel
to wood overlay in the field. Solid stainless steel and stainless
steel glass doors are shipped from the factory with decorative
stainless steel panels and handles in place on the unit. All
stainless steel doors and drawers are convertible to fully
integrated models, ready to accept custom panels from your
cabinetry supplier. Templates for custom panels are available
at www.hestanoutdoor.com.
Take care in choosing the correct template for your specific
unit. Original appliance handle or custom cabinet handle can
be installed onto overlay panel.