INDOOR / OUTDOOR UNDERCOUNTER REFRIGERATION Refrigerators & Freezers Installation Manual
TABLE OF CONTENTS 2 3 4 4 4 6 10 12 EN SAFETY DEFINITIONS MODEL NUMBERS RATING LABEL REGULATORY/CODE REQUIREMENTS SAFETY CABINET INSTALLATION DOOR INFORMATION DISPOSAL READ THESE INSTRUCTIONS CAREFULLY AND COMPLETELY BEFORE INSTALLING OR USING YOUR APPLIANCE TO REDUCE THE RISK OF FIRE, SHOCK HAZARD, OR OTHER INJURY. KEEP THIS MANUAL FOR FUTURE REFERENCE. IMPORTANT! Read and understand all information in this manual before attempting the installation.
SAFETY DEFINITIIONS (continued) NOTICE This product contains blown foam insulation using blowing agent R-611 (Methyl Formate). The foam in this product does not contain HFC’s, CFC’s, or HCFC’s. EN All models covered in this manual are manufactured using refrigerant R600a (Isobutane). R600a is a hydrocarbon.
RATING LABEL The rating label contains important information about your Hestan appliance such as the model and serial number, and refrigerant information if service is required. EN RATING LABEL The rating label is attached to the inside top of the cabinet. REGULATORY / CODE REQUIREMENTS Installation of this appliance must be made in accordance with local codes. In the absence of local codes, this unit should be installed in accordance with the National Electrical Code and local codes.
SAFETY (continued) PLUMBING No plumbing connections are required. Condensate from the cooling coil is automatically evaporated through a condensate pan located in the condensing section of the unit. DANGER ELECTRICAL SHOCK HAZARD Disconnect power before installing or servicing appliance. Failure to do so can result in death or electrical shock. ELECTRICAL GROUNDING • • • • This appliance must be grounded. Grounding reduces the risk of electric shock in the event of a short circuit.
CABINET INSTALLATION RISK OF FIRE OR EXPLOSION - FLAMMABLE REFRIGERANT USED. Use caution when handling, moving and using the product to avoid damaging the refrigerant tubing or increasing the risk of a leak. DANGER EN CASTER KIT (OPTIONAL) A Caster Kit (AGCK24) is available for Hestan undercounter refrigeration models. Refer to the instructions supplied with the caster kit for proper installation. Note: Installation of the kit adds 3.75” [9.5 cm] to overall height of the unit.
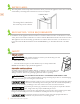
CABINET INSTALLATION (continued) To assure maximum performance, fresh air must be allowed to circulate through the machinery compartment. Do not place anything in front of the unit that would obstruct air flow at these front grilles. Do not place the unit in an unventilated small room. NOTICE EN Cabinet should be leveled front to back, then side to side. 1. Make sure the space opening is correctly sized for the unit.
CABINET INSTALLATION (continued) To prevent possible damage to the countertop, do not place heavy objects on countertop directly over unit. EN INSTALLING THE UNIT INTO THE SPACE 1. Plug the unit into the 15 amp grounded electrical outlet located within the installation opening. With power applied to the unit, check that the lighting and cooling functions operate properly. Turn off the power to the wall outlet at the circuit breaker. 2.
CABINET INSTALLATION (continued) INSTALLING THE FRONT GRILLE COVER Once the unit is secured in place, install the louvered front grille cover. Secure the cover by snapping the latch into the latch catch on the unit (Figure 3). The vent grille must be removed to service the unit. The floor cannot interfere with removal, and the louvered sections must not be covered or obstructed. Obstructions could prevent proper air circulation, which may damage the unit.
DOOR INFORMATION DOOR OPTIONS Hestan residential units can be converted from stainless steel to overlay panels to match existing cabinetry. Solid stainless steel and stainless steel glass doors are shipped from the factory with decorative stainless steel panels and handles in place on the unit. All stainless steel doors and drawers are convertible to fully integrated models, ready to accept custom panels from your cabinetry supplier.
DOOR INFORMATION (continued) OVERLAY INSTALLATION Before beginning installation, check all components for proper fit and finish. NOTE: For more detailed installation information, please request or download document 028374 mentioned on the previous page. EN For best performance and functionality, the overlay panels should be 3/4” [19 mm] thick. The weight of the overlays should not exceed 20 lbs [9 kg] for solid doors, 10 lbs [4.5 kg] for glass doors, or 10 lbs [4.5 kg] for drawer models. 1.
DISPOSAL DANGER Risk of child entrapment. Before you throw away your old refrigerator or freezer: EN • Take off the door. • Leave the shelves in place so that children may not easily climb inside. • Do not allow children to play inside, on, or around the appliance. Risk of fire or explosion. Please dispose the appliance according to federal or local regulations for its flammable refrigerant and blowing gas.
TABLES DES MATIERES 1 2 3 3 3 5 9 11 DÉFINITIONS DE SÉCURITÉ NUMÉROS DE MODÈLE PLAQUE SIGNALÉTIQUE RESPECT DE LA RÉGLEMENTATION ET DES CODES EN VIGUEUR SÉCURITÉ INSTALLATION DE L’ARMOIRE INFORMATION SUR LA PORTE ÉLIMINATION FR LISEZ ATTENTIVEMENT ET COMPLÈTEMENT CES INSTRUCTIONS AVANT D’INSTALLER OU D’UTILISER VOTRE APPAREIL AFIN DE RÉDUIRE LES RISQUES D’INCENDIE, DE BRÛLURE OU D’AUTRES BLESSURES. CONSERVER CE MANUEL POUR RÉFÉRENCE FUTURE.
DÉFINITIONS DE SÉCURITÉ (SUITE) AVIS Ce produit contient de la mousse isolante thermique utilisant l’agent gonflant R-611 (Formiate de Méthyle). La mousse de ce produit ne contient pas de HFC, CFC ou HCFC. Tous les modèles couverts dans ce manuel sont fabriqués à l’aide du réfrigérant R600a (Isobutane). Le R600a est un hydrocarbure.
PLAQUE SIGNALÉTIQUE La plaque signalétique contient des informations importantes sur votre appareil Hestan, telles que le modèle et le numéro de série, ainsi que des informations sur le réfrigérant si un entretien est nécessaire. PLAQUE SIGNALÉTIQUE FR La plaque signalétique est fixée sur le dessus intérieur de la caisse. RESPECT DE LA RÉGLEMENTATION ET DES CODES EN VIGUEUR L’installation de cet appareil doit être effectuée conformément aux codes locaux.
SÉCURITÉ (suite) PLOMBERIE Aucun raccord de plomberie n’est requis. Les condensats du serpentin de refroidissement s’évaporent automatiquement à travers un bac à condensats situé dans la section de condensation de l’unité. DANGER FR RISQUE DE CHOC ÉLECTRIQUE Coupez l’alimentation avant d’installer ou d’entretenir l’appareil. Ne pas le faire peut entraîner la mort ou un choc électrique. ALIMENTATION ÉLECTRIQUE ET MISE A LA TERRE • • • • Cet appareil doit être mis à la terre.
INSTALLATION DE L’ARMOIRE DANGER RISQUE D’INCENDIE OU D’EXPLOSION - RÉFRIGÉRANT INFLAMMABLE UTILISÉ. Soyez prudent lors de la manipulation, du déplacement et de l’utilisation du produit afin d’éviter d’endommager le tube de réfrigérant ou d’augmenter le risque de fuite. KIT DE ROULETTES (EN OPTION) FR Un kit de roulettes (AGCK24) est disponible pour les modèles de réfrigération Hestan. Reportezvous aux instructions fournies avec le kit de roulettes pour une installation correcte.
INSTALLATION DE L’ARMOIRE (suite) Pour assurer des performances maximales, l’air frais doit pouvoir circuler dans le compartiment des machines. Ne placez rien devant l’appareil qui pourrait obstruer la circulation d’air au niveau de ces grilles avant. Ne placez pas l’appareil dans une petite pièce non ventilée. AVIS FR L’armoire doit être nivelée de l’avant vers l’arrière, puis d’un côté à l’autre. 1. Assurez-vous que l’ouverture de l’espace est correctement dimensionnée pour l’unité.
INSTALLATION DE L’ARMOIRE (suite) Pour éviter d’endommager le comptoir, ne placez pas d’objets lourds sur le comptoir directement au-dessus de l’appareil. INSTALLATION DE L’UNITÉ DANS L’ESPACE 1. Branchez l’unité dans la prise électrique mise à la terre de 15 Ampères située dans l’ouverture d’installation. Une fois l’appareil sous tension, vérifiez que les fonctions d’éclairage et de refroidissement fonctionnent correctement. Coupez l’alimentation de la prise murale du disjoncteur. 2.
INSTALLATION DE L’ARMOIRE (suite) INSTALLATION DU COUVERCLE DE GRILLE AVANT Une fois l’unité en place, installez le couvercle de la grille avant à persiennes. Fixez le couvercle en enclenchant le pêne dans le loquet de l’unité (Figure 3). FR La grille de ventilation doit être retirée pour l’entretien de l’unité. Le sol ne peut pas interférer avec l’enlèvement, et les sections persiennes ne doit pas être couvert ou obstrué.
INFORMATION SUR LA PORTE OPTIONS DE PORTE Les unités résidentielles Hestan peuvent être converties de l’acier inoxydable au des panneaux de revêtement dans le champ. Les portes solides et en verre, sont expédiées de l’usine avec des panneaux en acier inoxydable et des poignées en place sur l’unité. Toutes les portes et tiroirs en acier inoxydable sont convertibles en modèles entièrement intégrés, prêts à accepter des panneaux personnalisés (revêtement) de votre fournisseur d’armoires.
INFORMATION SUR LA PORTE (suite) INSTALLATION DU PANNEAU DE REVÊTEMENT Avant de commencer l’installation, vérifiez que tous les composants sont bien ajustés et finis. REMARQUE: Pour des informations d’installation plus détaillées, veuillez demander ou télécharger le document 028374 mentionné à la page précédente. Pour de meilleures performances et fonctionnalités, les panneaux de revêtement doivent avoir une épaisseur de 3/4 po [19 mm].
ÉLIMINATION DANGER Risque de coincement de l’enfant. Avant de jeter votre ancien réfrigérateur: • Enlevez les portes. • Laissez les étagères en place afn que les enfants ne puissent pas facilement grimper à l’intérieur. • Ne laissez pas les enfants jouer dans, sur ou autour de l’appareil. Risque d’incendie ou d’explosion. Veuillez éliminer l’appareil conformément aux réglementations fédérales ou locales pour son réfrigérant inflammable et son gaz de soufflage.
RETAIN THIS MANUAL FOR FUTURE REFERENCE CONSERVEZ CE MANUEL POUR UNE RÉFÉRENCE FUTURE Hestan Commercial Corporation 3375 E. La Palma Ave.