
User Manual


INSTALLATION
(CONT.)
c) Lightly mark the wall with a short, horizontal mark along the bottom edge of the hood.
d) When finished, remove the hood and duct cover assembly from the wall.
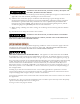
10. Find location of mounting strip:
a) On the back side of the hood, measure the distance between the bottom edge of the hood
and the top edge of the wood mounting strip.
b) Measure this distance above the horizontal mark made in Step 9 and lightly mark the wall
with a level, horizontal line.
c) Measure where the center (left to right) of the hood will be and mark the upper,
horizontal line on the wall with a short, vertical centerline.
11. Attach the mounting strip to the wall as follows:
a) Remove the screws inside the top of the back of the hood that retain the wood strip that
is recessed in the mounting channel. Note: Some retaining screws may be located behind
the blower(s).
b) Remove the wood mounting strip from the back of the hood and place the top edge of the
strip on the upper, level, horizontal line on the wall.
c) Referencing the vertical centerline from Step 10, place the mounting strip on the wall so
it is centered (left to right) in the space where the hood will be located. Mark the strip at
two or more stud locations, and drill clearance holes in the strip to prevent splitting.
d) Using proper hardware, attach the mounting strip to at least two wall studs.
Note: for 48” [122 cm] and larger hoods, three screws into studs are recommended.
12. FOR BACK VENTING APPLICATIONS ONLY. IF NOT BACK VENTING, PROCEED DIRECTLY
TO STEP 13.
• Note: Wall studs may interfere with back venting installations. Additional framing may be
required. It is necessary to cut duct access hole(s) in the wall prior to installing the hood.
• If using a duct cover, this step may be done with the duct cover removed from the hood. The
duct cover must still be mounted to the hood before mounting the hood to the wall.
Method 1:
a) Hold the hood on the mounting strip by aligning the channel at the top of the back of the
hood over the wood mounting strip on the wall.
b) Place the appropriate elbow(s) on top of the hood in line with the hood exhaust collar(s).
On the wall, trace around the elbow(s). Remove the hood and elbow(s) from the wall.
c) Cut around the outside of the traced line(s), avoiding wall studs. Install the duct from the
outside of the home to the opening in the wall. Use HVAC foil tape (not grey cloth duct
tape) to seal joints.
d) Proceed to step 14.
Method 2:
a) Use the the connection diagrams (page13), “BACK VENTING” on page18 , and
“VENT ACCESSORIES” on page19 as a guide. Install the duct(s) from the outside of
the home to the wall so they will meet the exhaust elbows to be used.
b) The end of the duct(s) should extend 1” past the ends of the elbows.
c) Proceed to step 14.
©2019 Hestan Commercial Corporation
15
EN