
Installation Manual


©2018 Hestan Commercial Corporation
11
(continued)
LOCATION AND INSTALLATION
ELECTRICAL AND WATER CONNECTION
(continued)
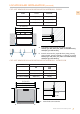
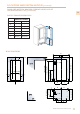
Back of appliance
Water connection
Electrical connection
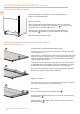
Operate as follows:
Unwind the electric cable and connect it directly to the wall socket.
Make sure the appliance is in the Stand-by condition and that all
lights are off; if not, press the Unit button
to switch it off.
Push the 1/4” source waterline fully into the elbow connector then
thread the elbow adapter to the solenoid at the back of the appli-
ance.
to make a proper seal. Turn on the water and ensure all connections
are not leaking prior to pushing the unit into the niche.
Firmly tighted with ngers - a tool or wrench should not be needed
2
1
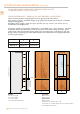
Operate as follows:
Unwind the electric cable and connect it directly to the wall socket.
Make sure the appliance is in the Stand-by condition and that all lights
are off; if not, press the Unit button to switch it off.
Connect the water line to the threaded connection at the base of the
1
Fit the other end of the hose to the water tap, use the gaskets provided
in the Owner’s Kit.
2
make a proper seal. Turn on the water and ensure all connections are
not leaking prior to pushing the unit into the opening.
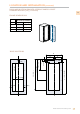
Front of appliance
Back of appliance
Water connectionElectrical connection
unit.
Firmly tighten with ngers - a tool/wrench should not be needed to
KRP MODELS
ALL OTHER MODELS
EN