
Installation Manual

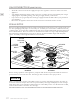


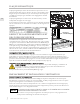
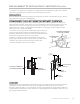
Table Of Contents
- SAFETY PRECAUTIONS - BEFORE YOU BEGIN
- MODEL NUMBERS
- RATING LABEL
- REGULATORY / CODE REQUIREMENTS
- LOCATION AND INSTALLATION / VENTILATION
- BACKGUARD AND ACCESSORIES
- INSTALLATION OF ANTI-TIP DEVICE
- ELECTRICAL CONNECTIONS
- GAS CONNECTION
- FINAL SETUP
- SERVICE
- APPENDIX
- PRÉCAUTIONS DE SÉCURITÉ - AVANT DE COMMENCER
- NUMÉROS DE MODÈLE
- PLAQUE SIGNALÉTIQUE
- RESPECT DE LA RÉGLEMENTATION ET DES CODES EN VIGUEUR
- EMPLACEMENT ET INSTALLATION / VENTILATION
- DOSSERET ET ACCESSOIRES
- INSTALLATION DU DISPOSITIF ANTI-BASCULEMENT
- BRANCHEMENTS ÉLECTRIQUES
- RACCORDEMENT DE GAZ
- PHASE FINALE DE L’INSTALLATION
- SERVICE
- APPENDICE

EN
©2020 Hestan Commercial Corporation
20
• Check all connections from the supply line up to the regulator connection at the rear of the
appliance.
• Soap bubbles will appear where a leak is present. If a leak is present, immediately turn off gas
supply, tighten any leaking fittings, turn the gas supply back on, and recheck.
• If you cannot stop a gas leak, turn off the gas supply and call the dealer where you purchased
your appliance.
• Do not use the appliance until all connections have been checked and do not leak.
FINAL SETUP
Remove any final packaging materials, and protective film from all exterior areas. Check inside oven
for other packaging items, tape on oven racks, etc. Install any loose items like sealed burner heads,
cooking grates, etc. Ensure the sealed burner heads are properly installed and seated on the burner
base as shown below. There are notches on the burner base and cross ring to help with alignment.
The outer burner head features a long slot on the top of the head which aligns with the spark
igniter. Assembly of the single-flow burner head is similar.
Before testing operation of the appliance, verify the leak check was performed and the electrical
power has been restored to the unit. Turn the gas shut-off valve to the open position.
NOTICE
All the control knobs must be in the OFF position to prevent unintended operation at power up.
To ensure customer safety in the event of a power failure, the range will display an error message
when the power is restored unless all the knobs are in the OFF position. Set all the knobs to OFF,
and reset the breaker to clear the error message.
DO NOT ATTEMPT TO USE THE RANGE DURING A PROLONGED POWER FAILURE.
BURNER
RING
BURNER
HEAD
BURNER
BASE
IGNITER
INNER
BURNER
HEAD
OUTER
BURNER
HEAD
BEAUTY
RING
CROSS
RING
BURNER
BASE
DUAL FLOW
BURNER
SINGLE FLOW
BURNER
GAS CONNECTION
(CONTINUED)