
Installation Manual

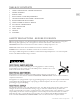


Table Of Contents
- SAFETY PRECAUTIONS - BEFORE YOU BEGIN
- MODEL NUMBERS
- RATING LABEL
- REGULATORY / CODE REQUIREMENTS
- LOCATION AND INSTALLATION / VENTILATION
- BACKGUARD AND ACCESSORIES
- INSTALLATION OF ANTI-TIP DEVICE
- ELECTRICAL CONNECTIONS
- GAS CONNECTION
- FINAL SETUP
- SERVICE
- APPENDIX
- PRÉCAUTIONS DE SÉCURITÉ - AVANT DE COMMENCER
- NUMÉROS DE MODÈLE
- PLAQUE SIGNALÉTIQUE
- RESPECT DE LA RÉGLEMENTATION ET DES CODES EN VIGUEUR
- EMPLACEMENT ET INSTALLATION / VENTILATION
- DOSSERET ET ACCESSOIRES
- INSTALLATION DU DISPOSITIF ANTI-BASCULEMENT
- BRANCHEMENTS ÉLECTRIQUES
- RACCORDEMENT DE GAZ
- PHASE FINALE DE L’INSTALLATION
- SERVICE
- APPENDICE

EN
©2020 Hestan Commercial Corporation
4
LOCATION AND INSTALLATION / VENTILATION
(CONTINUED)
The range is held onto the pallet with 4 large shipping bolts on both sides. Remove these bolts and
then move the range to the floor with the help of 2 persons.
PREPARATION PREPARATION
Before moving the range, protect any finished flooring and
secure the oven door(s) closed to prevent damage.
GAS AND ELECTRICAL SUPPLY CLEARANCESGAS AND ELECTRICAL SUPPLY CLEARANCES
If not already in place, install a gas shut-off valve in an
easily accessible location for servicing of the range. Make
sure all users of the range know where this shut-off is
located, and how to shut off the gas. Any openings in the
wall or floor behind the appliance must be sealed. The
Installation Clearances on the following pages show where
the “G” and “E” zones should be located.
The range is designed to be installed nearly flush to the rear
wall*. It may be necessary to reposition the gas supply and
power receptacle / junction box in order to accommodate the range when pushed back against the
wall.
Wall-mounted junction box may protrude no more than 2-3/8” [6.1 cm] from wall and still allow the
back of the range to be nearly flush to rear wall.
* Unless installed in an island with no rear wall.
GAS
SUPPLY
TO
APPLIANCE
SHUTOFF VALVE
IN OPEN POSITION
1-5/16"
[3.3 cm]
POWER
CORD
JUNCTION BOX
INSIDE WALL
CABINETRYCABINETRY
To eliminate the risk of burns or fire by reaching over heated surface units, cabinet storage space
located above the surface units should be avoided. If cabinet storage is to be provided, the risk can
be reduced by installing the required vent hood that projects horizontally a minimum of 5” [12.7 cm]
beyond the bottom of the cabinets.
2"
[5.1 cm]
RECEPTACLE
NEMA 14-50
JUNCTION
BOX
CONDUIT