
Gas Conversion Kit Installation Guide


©2021 Hestan Commercial Corporation
12
EN
CHANGING ORIFICES - OVEN SECTION (GAS OVEN ONLY)
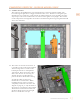
13. Remove the kick plate below the oven door(s). Fully open the door(s) and remove the screws on
the top face of the kick plate. Close the door(s) and pull off the kick plate in a similar way as you
did for the control panel, by using a flat tool to apply light pressure to release the left and right
sides of the plate from the ball retaining studs hidden inside. Set aside.
The main (large) oven cavity has an upper and
lower burner. For 48” ranges, the companion
(small) oven has only 1 lower burner.
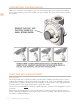
14. MAIN OVEN - LOWER BURNER
The lower burner(s) are accessible from the kick
plate area. Disconnect the hose at the brass
elbow, then remove the 2 screws holding the
bracket (shown here in red). Pull the bracket
back away. Use caution to avoid unnecessarily
bending, twisting, or kinking the hose.
NOTE: It is possible to leave the hose connected,
but you must use caution to avoid kinking or
damaging the hose.
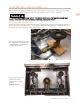
15. You will need to remove the orifice from the brass
elbow fitting. However, it is possible to leave the
elbow attached to the bracket. Use a pair of locking
pliers to keep the elbow from rotating while using a
1/2” wrench to remove the orifice. Notice there is
a locknut just below the orifice which must remain
tight against the bracket. Make a note as to how far
the orifice is threaded onto the elbow fitting. It is
touching, or almost touching the locknut.