
High Altitude Kit Installation Guide


©2021 Hestan Commercial Corporation
16
EN
LEAK TESTING & ADJUSTMENT
(cont.)
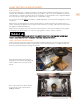
LEAK TESTING OVEN BURNERS (KRG MODELS ONLY)
IF THE INFORMATION BELOW IS NOT FOLLOWED EXACTLY, A FIRE OR IF THE INFORMATION BELOW IS NOT FOLLOWED EXACTLY, A FIRE OR
EXPLOSION MAY RESULT CAUSING PROPERTY DAMAGE, PERSONAL EXPLOSION MAY RESULT CAUSING PROPERTY DAMAGE, PERSONAL
INJURY, OR DEATH.INJURY, OR DEATH.
• Make sure the flex hoses leading to the orifices were all tightened (upper, lower, and rear).
• Make sure all control valves are in the “OFF” position.
• Apply the soap solution to all fittings, flex hoses, etc.
• Turn the gas supply ON.
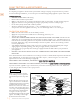
MAIN OVEN - LOWER BURNERMAIN OVEN - LOWER BURNER
• Turn on the power. Open the oven door and place a small piece of tape
on the door switch so the oven light can go off.
• Set the oven selector knob to BAKE .
• Set the temperature control knob to 350°F. From beneath, you may see
the igniter glow continuously and the solenoid gas valve will open in
about 30-40 seconds, igniting the burner. Close the oven door.
• CHECK ALL CONNECTIONS WHERE YOU APPLIED THE SOAP SOLUTION! Check ALL the
hoses from end to end. Bending of the hoses may have resulted in small cracks in the hoses which
must be found. Apply the soapy solution liberally to detect any leaks. If hoses are cracked, you will
need to replace them.
• Soap bubbles will appear where a leak is present. If a leak is present, immediately turn off gas
supply, tighten any leaking fittings, turn the gas supply back on, and recheck.
• If you cannot stop a gas leak, turn off the gas supply and call the dealer where you purchased your
appliance.
• DO NOT USE THE APPLIANCE UNTIL ALL CONNECTIONS HAVE BEEN CHECKED AND DO
NOT LEAK!
If leak testing is done for this burner, you may turn off this oven and proceed to the next step.
SMALL OVEN - LOWER BURNER - SMALL OVEN - LOWER BURNER - If you have a 48” range model, repeat this process for the small
oven lower burner.
MAIN OVEN - UPPER BURNERMAIN OVEN - UPPER BURNER
• Turn on the power. Open the oven door and place a small piece of tape on the door switch so the
oven light can go off.
• Set the oven selector knob to BROIL .
• Set the temperature control knob to BROIL. From inside the oven cavity, you will see the igniter
glow continuously and the solenoid gas valve will open in about 30-40 seconds, igniting the burner.
Close the oven door.
• CHECK ALL CONNECTIONS WHERE YOU APPLIED THE SOAP SOLUTION!
(at rear of appliance)
Check ALL the hoses from end to end. Bending of the hoses may have resulted in small cracks in
the hoses which must be found. Apply the soapy solution liberally to detect any leaks. If hoses are
cracked, you will need to replace them.
• Soap bubbles will appear where a leak is present. If a leak is present, immediately turn off gas
supply, tighten any leaking fittings, turn the gas supply back on, and recheck.
• If you cannot stop a gas leak, turn off the gas supply and call the dealer where you purchased your
appliance.
• DO NOT USE THE APPLIANCE UNTIL ALL CONNECTIONS HAVE BEEN CHECKED AND DO
NOT LEAK!
If leak testing is done successfully, you may turn off this oven and remove the tape from the door
switch. You may re-install the kick plate removed in step 10 and the rear cover removed in step 15.