
User's Manual


3. FUNCTIONAL DESCRIPTION
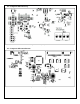
3.1. Theory of Operation
Theory of Operation:
1. Power On
To power on the TC1, a sufficient supply voltage must be applied across the BATTERY terminals (3.3-
5.0V). Solder Jumper J3 should be closed and a TG-N_ESTOP board should be connected via the ESTOP
connector. A magnetic ESTOP cap must be sufficiently close to magnetic sensor on the TG-N_ESTOP
board. To turn on the TC1, any of the toggle switches (TOGGLE inputs) or LCD buttons (BUTTONS
inputs) must be pressed (shorted to +V (SW)). Once turned on, the yellow WDOG LED should begin
blinking regularly. The LCD will display its Software Version for the first few seconds, than a regular
information display will appear.
2. Power Off
To power off the TC1, push the red ESTOP cap to compress the push button on the TG-N_ESTOP board.
The TC1 will also power off if the red ESTOP cap is removed, if the battery is removed or if battery voltage
falls below 3.15V.
3. Regular Operation
Different functions on the receiver are activated by pressing the 7 toggle switches up or down. Compressing
the trigger sends an analog grey code to the receiver. The grey code proportionally represents how far the
trigger is compressed.
The LCD regularly displays information about the machine being controlled. When a toggle switch is
pressed, the screen temporarily changes to display information about whatever function is being used by that
toggle switch. Users can manually scroll through all the different kinds of functions by using the arrow
button next on the LCD. After a user scrolls to a specific function, the LCD will continue to display that
function for 30 seconds before returning to the default display. The user can lock the screen on the current
function by pressing the OK button; pressing the OK button again immediately returns the user to the
default screen. The user can also view a menu using the Menu button. Inside the Menu, the user can scroll
through the various menu options using the arrow button, and can change the menu options' states by
pressing the OK button while a menu is highlighted. To exit the menu, the user can press the Menu button
again. The user can send a Boost signal to the receiver by pressing and holding the boost button. Once boost
is activated, an icon will appear on the corner of the LCD. Boost state will continue for a configurable time,
then cease and be disabled for another configurable amount of time. In the lower corner of the LCD is a
display showing the remaining battery life.