
User Manual

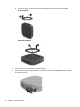
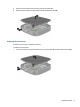
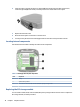
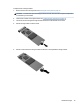
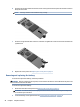
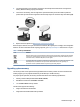
Table Of Contents
- Computer features
- Troubleshooting
- Computer Setup (F10) Utilities
- Changing BIOS Settings from the HP BIOS Configuration Utility (HPBCU)
- Updating or restoring a BIOS
- Diagnostics and troubleshooting LEDs
- Wake-on LAN
- Startup sequence
- Resetting the setup and power-on passwords
- Power-on diagnostic tests
- Interpreting POST diagnostic front panel lights and audible codes
- Basic troubleshooting
- No-disc (no-flash) computer troubleshooting
- Configuring a PXE server
- Using HP ThinUpdate to restore the image
- Device management
- Statement of Volatility
- Using HP PC Hardware Diagnostics
- Power cord set requirements
- Computer operating guidelines, routine care, and shipping preparation
- Specifications
- Electrostatic discharge
- Accessibility
- Index

6. Slide the new storage module into the M.2 socket on the system board and press the module connectors
rmly into the socket.
NOTE: A storage module can be installed in only one way.
7. Press the storage module down and use a screwdriver to tighten the screw and secure the module to the
system board.
8. Replace the access panel. See Replacing the access panel on page 17.
Removing and replacing the battery
To remove and replace the battery, use these procedures.
WARNING! Before removing the access panel, be sure that the thin client is turned o and the AC power cord
is disconnected from the AC outlet.
To remove and replace the battery:
1. Remove the thin client access panel. See Removing the access panel on page 15.
WARNING! To reduce risk of personal injury from hot surfaces, allow the internal system components
to cool before you touch them.
2. Locate the battery on the system board. See Locating internal components on page 18.
20 Chapter 1 Computer features