
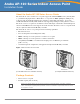
Installation Guide


6 Aruba AP-120 Series Indoor Access Point | Installation Guide
1. Pull the necessary cables through a prepared hole in the ceiling tile near where the AP will be
placed.
2. If necessary, connect the console cable to the console port on the back of the AP.
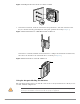
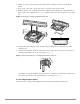
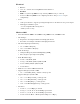
3. Hold the AP next to the ceiling tile rail with the ceiling tile rail mounting slots at approximately a 30-
degree angle to the ceiling tile rail (see Figure 5). Make sure that any cable slack is above the ceiling
tile.
Figure 5 Orienting the Ceiling Tile Rail Mounting Slots
4. Pushing toward the ceiling tile, rotate the AP clockwise until the device clicks into place on the
ceiling tile rail.
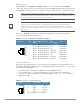
5. On the AP-121 or AP-125, orient the antennas. For best results, rotate the antennas so that they are
vertical (perpendicular to the body of the AP) (see Figure 6).
Figure 6 Antenna Orientation on a Ceiling-Mounted AP-121/AP-125
On the AP-120 or AP-124, install the external antennas according to the manufacturer’s instructions,
and connect the antennas to the antenna interfaces on the AP (see Figure 4).
Connecting Required Cables
Install cables in accordance with all applicable local and national regulations and practices.
ap
1