
Installation Guide Part 2

24 | AP-85 Series Installation Aruba AP-85 Outdoor Access Point Series | Installation Guide
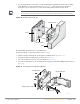
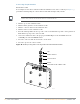
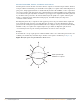
2. Seat the AP-85 into the four keyholes on the mounting plate and tighten down the four mounting
bolts (M8 bolts) to secure the AP-85 in place (see Figure 12). The mounting plate should rest
between the captive flat washer on each of the mounting bolts and the rear of the AP-85.
Figure 12 Wall Mounting the AP-85
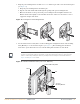
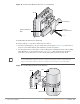
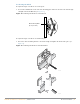
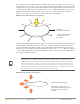
Pole Mounting the AP-85 (1.5” to 3.5” Diameter)
To mount an AP-85 to a pole with a diameter of 1.5” to 3.5”:
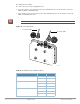
1. Slide the long T-bolt through the opening in the mounting bracket (see Figure 13).
2. Attach the included retaining clip to the T-bolt (see Figure 13).
3. Screw the included nut onto the end of the T-bolt (see Figure 13).
4. Secure the mounting plate to the mounting bracket using the four included phillips head screws (see
Figure 13).
Figure 13 Assembling the Pole Mounting Bracket
NOTE
The positioning of the keyholes on the mounting plate supports horizontal or vertical mounting of the
AP-85, which is achieved by rotating the device by 90 degrees and securing it to the mounting plate.
Mounting Bolts
Mounting Plate
AP-85
Wall
arun 0137
Nut (1x)
T-Bolt (1x)
Phillips Head Screws (4x)
Mounting Bracket
Mounting Plate
Retaining Clip