
User manual
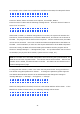

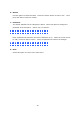
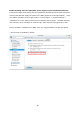
Table Of Contents
- Safety Warnings
- CPU and Memory Specifications
- Power Button and Reset Button Behavior
- USB One Touch Copy
- LED and Alarm Buzzer Specifications
- Upgrade Memory on QNAP Turbo NAS (RAM Module Installation)
- Network Expansion Card Installation
- Install an mSATA Flash module to the NAS.
- Hot-swap Hard Drives
- RAID Recovery
- Use the LCD Panel
- Install Power Supply Unit
- Technical Support
- Product Compliance Class
- GNU GENERAL PUBLIC LICENSE

41
For example, when 5 hard drives installed are available on the NAS, the LCD panel shows:
C
o
n
f
i
g
.
D
i
s
k
s
?
→
R
A
I
D
5
Press the “Select” button to browse more options, for example, RAID 6.
Press the “Enter” button and the following message shows. Press the “Select” button to
select “Yes” to confirm.
C
h
o
o
s
e
R
A
I
D
5
?
→
Y
e
s
N
o
When RAID 1, RAID 5, or RAID 6 configuration is executed, the system will initialize the
hard drives, create the RAID device, format the RAID device, and mount it as a volume on
the NAS. The progress will be shown on the LCD panel. When it reaches 100%, the RAID
volume can be accessed. Users can create share folders and upload files to the folders on
the NAS. In the meantime, to make sure the stripes and blocks in all the RAID component
devices are ready, the NAS will execute RAID synchronization and the progress will be
shown on “Storage Manager” > “Storage Pools” page. The synchronization rate is around
30–60 MB/s (vary by hard drive models, system resource usage, etc.).
Note: If a member drive of a RAID configuration were lost during the synchronization, the
RAID device will enter degraded mode. The volume data is still accessible. When a new
member drive is added, the NAS will start to rebuild. The status can be checked on the
“Volume Management” page.
To encrypt a disk volume*, select “Yes” when the LCD panel shows <Encrypt Volume?>.
The default encryption password is “admin”. To change the password, please login the
web-based administration interface as an administrator and change the settings in
“Storage Manager” > “Storage” > “Encryption” > “Change”.
E
n
c
r
y
p
t
V
o
l
u
m
e
?
→
Y
e
s
N
o
When the configuration is finished, the server name and IP address will be shown. If the
NAS fails to create the disk volume, the following message will be shown.
C
r
e
a
t
i
n
g
.
.
.
R
A
I
D
5
F
a
i
l
e
d