#23282 - CDR882 Ops Cover V2 29/2/08 14:56 Page 1 CDR-882 DUAL DRIVE CD RECORDER HHB Communications Ltd 73-75 Scrubs Lane, London NW10 6QU, UK T +44 (0)20 8962 5000 E sales@hhb.co.uk W www.hhb.co.uk In the USA, Central & South America: Sennheiser Electronic Corporation T 860 434 9190 E HHB-Sales@sennheiserusa.com W www.hhbusa.com In Canada: HHB Communications Canada Ltd T 416 867 9000 E sales@hhbcanada.com W www.hhbcanada.com www.hhb.co.uk Version 1.
CDR-882 La versión en español del manual de operaciones la encontrará en la web de HHB: www.hhb.co.uk La version française de ce manual d’utilisation est disponsible sur le site web de HHB: www.hhb.co.uk Eine deutsch Version dieser Bedienungsangleitung ist im Internet unter der Adresse: www.hhb.co.uk erhältlich. CDR-882 User Manual Version 1.0 www.hhb.co.
Statutory Notifications Important Safety Instructions WARNING: To reduce the risk of fire or electric shock, do not expose this apparatus to rain or moisture. 1 Read these instructions. 2 Keep these instructions. 3 Heed all warnings. 4 Follow all instructions. 5 Do not use this apparatus near water. • Do not expose this apparatus to drips or splashes. 6 Clean only with dry cloth. 7 Do not block any ventilation openings. Install in accordance with the manufacturer’s instructions.
Statutory Notifications Important Safety Precautions CAUTION: TO REDUCE THE RISK OF ELECTRIC SHOCK, DO NOT REMOVE COVER (OR BACK). NO USER-SERVICEABLE PARTS INSIDE. REFER SERVICING TO QUALIFIED SERVICE PERSONNEL. The lightning flash with arrowhead symbol, within equilateral triangle, is intended to alert the user to the presence of uninsulated “dangerous voltage” within the product’s enclosure that may be of sufficient magnitude to constitute a risk of electric shock to persons.
Contents Contents Important Safety Instructions......................................... 2 Menu System.............................................................. 27 Important Safety Precautions......................................... 3 Safety Information......................................................... 3 Contents...................................................................... 4 Introduction.................................................................. 6 What’s in the box............
Contents Advanced Features & Operation.................................... 38 Appendix 1 - Connector Pinouts..................................... 51 Internal & External Clocks............................................ 38 Clock Source display............................................. 38 Recording Features.................................................... 39 Single CD............................................................ 39 Dual Disc Modes and functions...............................
Introduction Introduction Thank you for buying this HHB Professional product. The CDR-882 DualBurn CD Recorder is designed to record and replay audio CDs in a broadcast or other professional audio environment, and incorporates a number of features and facilities that may be unfamiliar to users.
Introduction Cautions and guidance on installation CDR-882 Primary Features • Two shock-mounted recordable disc drives • 64x128 pixel backlit dot matrix LCD display Safety Guidelines • 11-segment dual LED bargraph meters with PPM characteristics • Operate only on a secure and level surface or securely fastened into a rack, noting the precautions below • Separate LED indication of drive status and headphone source • This equipment must be earthed (grounded) • Balanced (+4dBu) and unbalanced (-10dBu)
Introduction Care & cleaning Installing the Remote Control batteries Always switch off and disconnect the unit from the mains before cleaning. The outside surfaces of the unit may be cleaned with a soft dry cloth. For stubborn marks (such as from a liquid spillage), a soft damp cloth may be used in conjunction with a mild detergent solution (dilute a household detergent cleaner 5:1 with water). Wipe thoroughly dry with a dry cloth after. NEVER use solvent cleaners of any kind.
Introduction Using the RC-882 Remote Control handset • Make sure there are no obstacles between the handset and the unit • The handset should work reliably within 7m of the unit, and within 30° of the direct line between the handset and the unit • Strong sunlight or fluorescent lighting may make remote control operation less reliable • Remote control handsets for different equipment sometimes interact.
Connectivity Connectivity Connector Details All electrical connections to the CDR-882 (apart from headphones and/or keyboard) are made via the rear panel. Balanced L & R analogue inputs. These are electronicallybalanced on XLR3F connectors and can accept audio levels of up to +24dBu without clipping. Nominal input sensitivity is set at +4dBu for a digital level of -18dBFS. Nominal input impedance is 10kΩ. The pinout for this (and all other inputs and outputs) can be found at page 51.
Connectivity Unbalanced L & R analogue outputs. These carry the same audio signal as the main outputs (1) above, but in unbalanced form on phono connectors (RCA jacks) at a nominal level of -10dBu. Output level is calibrated internally to be +8dBu from a maximum (digital clip) PCM signal level of 0dBFS. Output impedance is 47Ω. AES/EBU out. This provides a two-channel AES/EBU digital output conforming to AES3-2003. The connector is an XLR3M, output impedance 110Ω. S/PDIF Coaxial digital output.
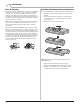
Front Panel Features Front Panel Features All the CDR-882’s controls are on the front panel. Note that many of the unit’s functions and setup options are controlled and selected through the menu system, using the multi-character LED matrix display, which is shown enlarged on page 15. AC power switch.
Front Panel Features AC power switch. The large HHB logo at the left-hand of the front-panel is the push-button on/off switch, and is illuminated when the unit is on. On power-up, the display shows the HHB and DualBurn logos, followed by No Disc if there is no disc in a drive, or Reading if there is. Note that for most CDR-882 functions, the upper main line of the display shows the status of Drive 1, the lower that of Drive 2. Alphanumeric display.
Front Panel Features DISPLAY button. This button changes the time display option for the selected drive. The options available will depend on the drive’s current Status (e.g. STOP, PLAY, etc.). See page 22 for full details. MODE button. This button is used to define the basic record/playback mode of the CDR-882 when both drives are in use. Pressing MODE repeatedly scrolls through the options; the display indicates the selected option. The options are (in sequence): ID AUTO/MAN | AUTO-CUE button.
Front Panel Features FADER button. The CDR-882’s FADER function allows playback or recording to start or end with a smooth fade-in or fade-out as appropriate. The fade-in and fade-out times used are set via the Audio sub-menu of the menu system. See page 29 for more details. Alphanumeric Display The actual operation of the FADER function will depend on the CDR-882’s status when the button is pressed.
RC-882 Remote Control RC-882 Remote Control The RC-882 Remote Control Unit (infra-red handset) supplied with the CDR-882 duplicates many of the front panel buttons in both function and operation. Some additional keys are also provided: a set of 0-9 numeric keys for direct access to individual CD tracks, dedicated NEXT and PREVIOUS keys and a RECORD safety key. Note: “see (*)” refers to associated front panel features. Direct Access keys – see note below.
Quick Start Guide Quick Start Guide This section is intended to get you going quickly with the CDR882’s most basic functions when you use it for the first time. It also tells you where to look in the manual to get additional information about many aspects of the CDR-882’s operation. NOTE: The numbers following the various controls and connectors in the instructions below refer to the front and rear diagrams on page 12 and page 10 respectively.
Quick Start Guide Playing a CD 1. Connect a stereo audio amplifier (and speakers) to either the balanced outputs [XLRs [6] ) or unbalanced outputs (phonos [7] ). 2. Open Drive 1’s disc tray with the EJECT button [5], insert the CD to be played, and close the tray. 3. When the disc’s TOC has been read, the number of tracks and the disc’s total playing time is displayed. To start playback at Track 1, press the PLAY/PAUSE button [8].
Quick Start Guide Reference List of the CDR-882’s other main functions TO DO THIS REFER TO SECTION ON PAGE Start and end a CD recording automatically from DAT/MD subcodes or audio level detection Synchronised Recording page 24 Search through a disc at high speed FFWD & FREW page 20 Fade-in and/or fade-out of a track, in either playback or record Fader page 21 Change the disc time information being displayed Time Displays page 22 Insert Track IDs automatically while recording Tracks IDs pag
Basic Operation Basic Operation Disc insertion and removal Transport Controls The disc drive trays may be opened with the EJECT buttons [5 & 6] and closed either with a second press of EJECT, or by gently pushing the front of the tray. A standard set of five CD drive buttons is provided, which operate on the currently-selected drive. The transport buttons are illuminated and colour-coded, and their functions are duplicated on the RC-882 remote control.
Basic Operation Manual Record Fader The RECORD button is only enabled if certain conditions are met. These are that i) there is a blank recordable disc in the selected drive and ii) that if the currently-selected input is one of the three digital inputs, there is a valid signal (AES/EBU or S/PDIF) at the input connector (even though it may have zero audio content).
Basic Operation Selecting an input Time displays The CDR-882 is equipped with five stereo audio inputs, in various formats. Only one may be active at any one time, and provides the real-time recording or monitor source. In the case of DualBurn Record Mode (see page 39), the selected input is the source for both drives. The track or disc time information shown on the front panel display is determined both by the drive’s current status and the selected DISPLAY option.
Basic Operation Monitoring Main Outputs The signal available at the CDR-882’s rear output connectors may be the playback signal from, or the input signal to either drive, or a mix of these. The CDR-882 is equipped with a comprehensive audio monitoring system, which includes the capability to monitor playback from one drive while recording from an external source on the other. (See page 18 for more information on simultaneous record and playback.
Basic Operation Recording 6. Press STOP to end the recording (the display will show Close Track). If you wish to sync record additional tracks, press SYNC RECORD again; the process will repeat from Step 3. 7. Note that if the disc becomes full, no further recording is possible and recording will stop. In the CDR-882, CD recording may be carried out in either drive.
Basic Operation Finalisation in Synchronised Recording 1. IF Auto Finalise is set to On, then at the end of a Synchronised Recording, the disc will be finalised automatically, after which no further recording will be possible. 2. This process will start one minute after the recording has entered RECORD PAUSE if there is no further detection of an external trigger. 3.
Basic Operation Recording on CD-RWs Digital Recording restrictions A CD-R can have additional tracks added after recording has finished, but before finalisation. It is not possible to delete tracks from a CD-R, once recorded; neither is it possible to add any further tracks to a CD-R after finalisation. Almost all commercial digital source material is protected by copyright laws, and many CDs use copy control flags to limit digital recording of a source to one generation only.
Menu System Menu System The CDR-882 has been designed to enable most of its basic functions and features to be actioned from dedicated front panel controls, without recourse to the display-based menu system. However, numerous additional settings and features are available from the system’s submenus. The menu system follows a conventional “tree” structure, with various submenus being available from the “top” level of the menu “tree”.
Menu System Example The Submenus An example will illustrate the method of navigation. Suppose we want to adjust the sensitivity of audio threshold detection. (This determines the level above which the audio input signal must rise for synchronous recording to start and below which it must drop for a new track ID to be written – assuming the option is selected otherwise). We will assume this is the first time the menu system has been accessed since the last power-down.
Menu System Audio Submenu Fade-in Time There are seven parameters/settings for adjustment within the AUDIO submenu. They are in turn: Digital Input Level This parameter sets the fade-in time applied when the frontpanel FADER button is used to fade the playback or record levels up from zero. Adjustment is available in 1 second increments from 1 to 10 seconds. This permits adjustment of input level for the digital inputs, so that digital input signals with particularly high or low levels can be trimmed.
Menu System Input Dither Phones Mix The CDR-882 adds dither to some input signals to produce 16bit samples suitable for recording onto a CD. The Phones Mix menu option allows the user to define how the headphone monitoring operates when the front panel PHONES SELECT button is set to “Drive 1 + Drive 2” (see page 14). Priority can be assigned to one or other of the drives.
Menu System Clock Submenu Display Submenu The Clock submenu has only one option for adjustment. Two parameters of the LCD display itself are available for adjustment in the Display submenu. Clock Source Contrast By default, selection of word clock source is automatic, the preferred source being dictated by the input source selected. However, it is possible to “force” the selection of a particular clock source.
Menu System Edit Marker Submenu DiscSpan Submenu The Edit Marker submenu allows adjustment of two parameters. The DiscSpan submenu has five parameters for adjustment. Direct Mark Multi-Machine It is not always possible to capture a cue point with the necessary accuracy. Once a Marker point has been created (by pressing ENTER during PLAY mode), its position may be edited with frame accuracy. This option simply allows activation of the CDR-882’s multimachine mode, and has two options, On and Off.
Menu System Record Submenu Fade-out Time The Record submenu has nine parameters available for adjustment. Record Sync This is the corresponding fade-out time, which sets the duration of the fade down at the end of one disc, as recording passes to the other drive. The length of fade-out can be from 1 to 10 seconds, adjustable in 1 second increments. The factory default value is 4 seconds. This option determines whether the CDR-882 increments the track counter on receipt of Track IDs.
Menu System Auto Track ID Trigger Track Length This option is used to determine the source of track ID triggers, i.e. what defines that a new track should commence on the disc being recorded. There are three possible settings: S/PDIF subcode, Audio Threshold or Time Interval. This sets the length of tracks when Time Interval is selected in the Auto Track ID Trigger menu option. A new track is created regardless of input signal at the time interval specified in this option.
Menu System Digital Output Format Copy Speed This sets the format of the channel status block in the digital output bitstream to be “professional” or “consumer”. The CDR-882’s DISC COPY function permits CDs to be copied at high speed. Different media have different optimum write speeds. This menu option lets the user set a copy speed to optimise the performance for the disc type in use.
Menu System Parallel Port The Parallel Port submenu permits the user to reprogram the pin assignment of the rear panel parallel control port, with the constraint that the port always provides five inputs and three outputs (tallies). The CDR-882 has a factory default pin assignment, full details of which can be found at page 49. This default assignment can be reinstated at any time with the first submenu option, Preset.
Menu System General Submenu Firmware Submenu The General submenu has two settings available for adjustment. The Firmware submenu displays the version numbers of the various firmware files within the CDR-882. The user need not concern him/herself with these, but they may be useful to HHB’s Technical Support engineers should a problem arise with the unit. Timer No adjustments are available within this submenu.
Advanced Features & Operation Advanced Features & Operation Internal & External Clocks Word clock in the CDR-882 can be obtained from several sources. An internal crystal oscillator is provided, which is the preferred source for use with analogue input signals. When digital input signals are used, the word clock may be extracted from the AES/EBU or S/PDIF bitstreams themselves. A further option is to use a separate external clock signal.
Advanced Features & Operation Recording Features Sync Start/Stop and automatic track incrementing will operate as normal in DUALBURN mode if these functions are enabled. Single CD DUALBURN mode may be combined with MULTI-MACHINE OPERATION mode to enable two copies of programme material greater than the duration of a single disc. In this case, the first part of the programme is recorded on the two drives of the Master machine, the remainder on the two drives of the Slave machine.
Advanced Features & Operation As one disc approaches its maximum capacity, the other drive begins recording, so that for a period, both drives are recording the same programme.
Advanced Features & Operation Playback in DiscSpan Mode Discs which have been recorded on a CDR-882 in DiscSpan mode may be replayed on a CDR-882 without any gap in programme. The first disc in the sequence may be loaded into either drive, with the second in the other. Note that audio routing is set automatically to be correct for seamless playback; it is not necessary to make any particular setting of Output Mix and/or Phones Mix.
Advanced Features & Operation Multi-Machine Operation The CDR-882’s recording capacity may be expanded by the connection of up to three further CDR-882 units. The operating system supports a number of Multi Machine modes to facilitate such an expansion. In such a system, one CDR-882 is designated the Master machine and the others are assigned Slave status.
Advanced Features & Operation Multi-Machine + DiscSpan Operation DISCSPAN mode may be used in conjunction with Multi-Machine mode to make a recording of a very long programme across up to eight blank discs, each in a different drive, across four CDR882s. This may be useful where unattended recording has to be performed. Blank discs may be loaded into both drives of all machines in the system, recording initiated (perhaps with the Time Interval option for Track ID selected) and the system then left.
Advanced Features & Operation Program Play Program Copy The CDR-882’s AMS control may be used to quickly locate playback to a particular track on a disc, or to commence playback of a series of consecutive tracks from the first of them. However, it is sometimes necessary to play a series of tracks on a disc in a specific order. Program Play allows the user to create a playlist of tracks in any order.
Advanced Features & Operation CD Text Entering CD Text The CDR-882 is CD Text-compatible. Any CD Text data on CDs being played will be displayed on the front panel LCD by default. CDs being recorded on the CDR-882 can have CD Text data added using a standard QWERTY keyboard plugged into either of the PS/2 ports (on the front and rear panels, see page 15 and page 11). CD Text is formatted into 3 fields, named Title, Artist and Track. Title and Artist are per-disc fields and Track is per-track.
Advanced Features & Operation Cueing Selection of AUTO-CUE mode is confirmed by the text AUTO-CUE in the bottom left-hand corner of the display. Manual Cueing With AUTO-CUE selected, the drive will automatically enter PAUSE at the start of the audio at the beginning of a track, whether it has been located to it with the AMS control, or because the previous track was played.
Advanced Features & Operation Pre-selecting a track before loading a disc Erasing and Unfinalising discs It may be necessary (or desired) to erase some or all the tracks already recorded on a CD-RW prior to recording new tracks on it. The CDR-882 includes a simple-to-use ERASE function which can be used to either erase tracks from a CD-RW, or to completely re-initialise it.
Advanced Features & Operation SCMS Erasing/Initialising a single CD-RW Insert the CD-RW into a drive, and if necessary, select the drive with the DRIVE SELECT button. When the drive has completed the reading process and the track information is displayed, press the ERASE button. The display will change to Erase nn-nn (where nn is the total number of tracks on the disc). This first erase option is to erase only the last track on the disc.
Remote Control Remote Control In some installations, it may be desirable to control the CDR-882 from an external control system of some kind. Two rear panel connectors are provided for this purpose, the Parallel Remote Input and the RS232 Link Input. The Parallel Remote Input provides the main transport commands only, while the RS232 Link Input allows control of virtually every machine function, parameter and setting.
Remote Control RS232 LINK INPUT Abridged command set The rear panel RS232 Link Input provides serial control of virtually every machine function, parameter and setting. This connector will also be used by the Slave machines in a Multi-Machine set-up; the Master machine in such a set-up interchanges control data with the Slaves through its RS232 Link Output connector.
Appendix 1 - Connector Pinouts Appendix 1 - Connector Pinouts NOTE: Numbers refer to the rear panel diagram on page 10. All connector views are looking at the rear of the CDR-882.
Appendix 2 - Menu Flow Diagrams Appendix 2 - Menu Flow Diagrams Submenus 52 www.hhb.co.uk CDR-882 User Manual Version 1.
Appendix 2 - Menu Flow Diagrams Audio CDR-882 User Manual Version 1.0 www.hhb.co.
Appendix 2 - Menu Flow Diagrams Clock Display Edit Marker 54 www.hhb.co.uk CDR-882 User Manual Version 1.
Appendix 2 - Menu Flow Diagrams DiscSpan CDR-882 User Manual Version 1.0 www.hhb.co.
Appendix 2 - Menu Flow Diagrams Record 56 www.hhb.co.uk CDR-882 User Manual Version 1.
Appendix 2 - Menu Flow Diagrams Parallel Port CDR-882 User Manual Version 1.0 www.hhb.co.
Appendix 2 - Menu Flow Diagrams General 58 www.hhb.co.uk CDR-882 User Manual Version 1.
Appendix 3 - Firmware Updates Appendix 3 - Firmware Updates As a responsible manufacturer, HHB adopts a policy of continuous product development. As with all software-based products, it may be desirable from time to time to update the firmware in your CDR-882 with a more recent version. You can contact your HHB dealer or distributor, or visit the HHB website at www.hhb.co.uk for details. Firmware updates are downloadable from the HHB website, or if you prefer, from your local dealer/distributor on a CD.
Appendix 4 - Factory Defaults Appendix 4 - Factory Defaults The table below lists all the menu options and their default factory settings.
Appendix 5 - Specifications Appendix 5 - Specifications Functions Specifications Frequency Response 5-20kHz ±0.5dB S/N Ratio 96dB (16-bit limit) THD+N 0.
Notes Notes 62 www.hhb.co.uk CDR-882 User Manual Version 1.
Notes CDR-882 User Manual Version 1.0 www.hhb.co.
Notes 64 www.hhb.co.uk CDR-882 User Manual Version 1.
#23282 - CDR882 Ops Cover V2 29/2/08 14:56 Page 1 CDR-882 DUAL DRIVE CD RECORDER HHB Communications Ltd 73-75 Scrubs Lane, London NW10 6QU, UK T +44 (0)20 8962 5000 E sales@hhb.co.uk W www.hhb.co.uk In the USA, Central & South America: Sennheiser Electronic Corporation T 860 434 9190 E HHB-Sales@sennheiserusa.com W www.hhbusa.com In Canada: HHB Communications Canada Ltd T 416 867 9000 E sales@hhbcanada.com W www.hhbcanada.com www.hhb.co.uk Version 1.