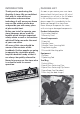
Graphite Instruction Manual Model Graphite 8 GR908 Free-standing Multi Fuel Non-Boiler Stove Published July 2014 Please note This appliance has been independently tested and is recommended as suitable for use in Smoke Control Areas when burning wood logs (see pages 12–19). It must, at all times, be operated in accordance with the instructions to minimise the amount of smoke produced. You will need to refer to the serial number of your stove should you ever need to make a claim under the Graphite Warranty.
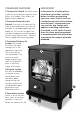
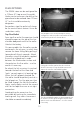
CONTENTS Graphite Page Model Graphite 8 GR908 Free-standing Multi Fuel Non-Boiler Stove PLEASE NOTE This instruction manual is also used for a number of other stove models in the Hi-Flame product range and therefore some of the stove photographs and diagrams used, which are used for guidance purposes only, may differ slightly from your new Graphite stove. However, the principles illustrated here remain the same.
STANDARD FEATURES IMPORTANT 1 Primary Air Control Air which enters under the grate for burning multi fuels, (other than wood). Also used at the beginning of wood fires In the interests of safety please read these instructions carefully before installing or operating your new stove. Even if you have installed or operated stoves before, manufacturers’ requirements can vary and can also change with updates to building regulations.
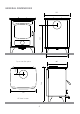
GENERAL DIMENSIONS 585 535 490 405 738 135 Top or rear flue option 535 All sizes in mm 4
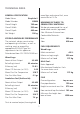
TECHNICAL DATA wood logs and mineral fuel, were carried out at 12 Pa.
INTRODUCTION PACKING LIST Thank-you for purchasing the Graphite 8 stove. We are confident that with its state-of-the-art combustion and convection technology it will warm your home even on the coldest winter days and provide you with many years of pleasurable heat. As soon as you receive your new stove please check that you have a full set of components as set out in the list below. In the unlikely event of a shortage, please report this immediately to the dealer you bought the stove from.
INSTALLATION REGULATIONS buildingcontrol-ni.com Isle of Man Building Regulations (2007) – Isle of Man www.gov.im You must ensure that your stove is installed by a recognised competent person who is appropriately qualified in the installation of stoves and that the installation complies with all local, national and European building regulations.
IMPORTANT SAFETY ADVICE • To ensure your safety make sure that your stove’s installation complies with all local building regulations’ ventilation requirements. Low energy houses have their own particular requirements and these should be strictly adhered to. • Ensure that an approved carbon monoxide detector (BS EN50291:2001) is fitted in the same room as the stove. It should be powered by a battery designed for the working life of the alarm.
ASSEMBLING THE STOVE inside the ‘roof’ of the stove to ensure that it has not moved during transit. This is a heavy metal plate which directs flames and helps retain heat inside the stove. The base of this plate should sit securely on a small ledge at the back of the firechamber, towards the top. The rest of the plate sits on top of the side firebricks to maintain it at the correct angle and in line with the top of these side firebricks.
FLUE OPTIONS The GR908 stove can be configured for a 150mm (6”) top or rear flue outlet. Under no circumstances should the flue pipe diameter be reduced from 150mm (6”) as this could be extremely dangerous. Remember a top flue outlet will always be the most efficient choice if it can be undertaken safely.
Rear Flue Outlet For a rear fitted flue, remove the heat shield / convection scoop to gain access to the rear flue outlet and remove the rear outlet sealing plate. See overleaf. Use the correct sized allen key or ‘hexhead’ screwdriver to avoid damaging the bolts which will be re-used. Once the two bolts are undone on the blanking plate you may have to prise this away very gently to avoid damaging the gasket.
YOUR LEGAL OBLIGATIONS IF YOU LIVE IN A UK SMOKE CONTROL AREA Further information on the requirements of the Clean Air Act can be found at the following website: www.smokecontrol.defra.gov.uk. The Clean Air Act 1993 and Smoke Control Areas Under the Clean Air Act local authorities may declare the whole or part of the district of the authority to be a Smoke Control Area.
RECOMMENDED FUELS providing it is fully seasoned wood. The Graphite 8 GR908 stove lets you burn wood as well as Authorised Smokeless Solid Fuels, in Smoke Control Areas. It must, at all times, be operated in accordance with the instructions to minimise the amount of smoke produced. Never use wet or unseasoned (green) wood as this will cause nuisance smoke and a very disappointing fire.
PROHIBITED FUELS will also leave harmful residue inside the stove and flue system. Never use your stove like an incinerator. Burning prohibited ‘fuels’ is an offence in a Smoke Control Area and could create nuisance smoke which is also an offence in non-Smoke Control Areas. Burning the following ‘illegal’ materials could also damage your stove and flue system, as well as render the product warranties on the stove and flue system components void.
UNDERSTANDING HOW DIFFERENT FUELS BURN IMPORTANT: FIRST FIRES Use smaller and shorter ‘gentle’ fires the first five or six times that you fire up the stove, making these progressively bigger, as this will avoid any potential thermal shock and allow the steel and cast iron components to ‘acclimatise’ with each other. Allow the stove to fully cool down between these fires.
BURNING WOOD LOGS the fire through each lighting phase: As previously stated wood burns best on a bed of its own embers which also forms a barrier that reflects heat and protects the fire grate from being damaged. You can therefore leave a bed of ash in place to create a layer of approximately 25mm (1”), only occasionally removing the surplus ash. A Kindling This is generally finely chopped wood, approximately 5 to 10mm thick (1/4” to 1/2”) from your supply of logs.
temperature quickly. If you feel you have a weak chimney draught, then keeping the stove door slightly ajar for the first 10 – 15 minutes will assist, after which it should be closed. This will also help prevent the build-up of condensation on the door glass until the glass warms up, especially if you have not used the stove for a few days. B A During the lighting phase the Primary and Secondary air settings on the stove should be fully open.
setting the ends of the logs pointing towards the glass as this can cause staining which the Airwash may find difficult to remove. Only reduce the Secondary air control when the wood has ‘carbonised’ and the fire is burning at a high temperature. This is when the ash on the burning wood looks light grey and virtually covers all of the wood. A flue temperature gauge will be invaluable.
harmful gas which could be released into the room when the firechamber door is opened. Rake the embers and spread them out to make an even bed. You may need to add some kindling to re-establish the fire. Add the new wood as before ensuring that the logs are not tightly packed. Newly refuelled wood always requires some additional air so make sure the Secondary air is back in the fully open position after refuelling.
BURNING MINERAL FUELS and quicker to ‘start’ again by adding a suitable quanity of kindling to the reamaining embers ensuring that there are sufficient brightly burning flames before other medium sized logs are then added. Do not use in a Smoke Control Area unless it is an Approved Smokeless Fuel (see www.smokecontrol.defra.gov.uk). Recommended maximum approved smokeless fuel load: pproximately 1.75kg of approved smokeless ovals, see www.hetas.co.uk or ask your Approved Coal Merchant, see www.coalmerchants.
SOME SIMPLE TIPS fuel until a there is a good bed of burning fuel. Avoid stacking too much fuel against the back and sides of the stove as this could potentially overheat the metal components and cause permanent damage. Ideally, when fully burning the fire should look like a shallow dome. 1 When refuelling use small regular loads as this will produce a more efficient and cleaner burning performance.
REMOVING ASH limit the Primary air flow and cause excessive heat build-up which could eventually warp or burn out the grate. Wood will produce a lot less ash than multi fuels and it would not be unrealistic to expect to empty the ash pan every two or three days, depending on the fuel loads and operating times. Remember, you do not need to riddle wood ash during firing, but possibly only at the start when some Primary air is needed to aid the initial combustion.
INSTALLATION B CHECK-LIST E This information is intended to outline the general principles of installing your stove. However, as each installation will vary and must comply with local, national and European building regulations, which could be different from country to country, it is unfortunately not possible for these guidelines to be comprehensive.
• The fireplace recess or opening is suitably constructed and conforms to all applicable building regulations and can accommodate the stove along with the safe minimum operating distances required (see page 6 and 23). • The proximity of all combustible materials to the intended stove installation conforms to the minimum requirements outlined within this handbook (page 6) as well as local, national and European building regulations, whichever is the greater.
brick or stone recess and 150mm (6”) at each side of the recess. For a free-standing stove the minimum hearth size should be 840mm by 840mm (2’10” by 2’10” approx) and should provide the minimum clearances for the stove which are outlined in this handbook. The hearth should extend by a minimum of 225mm (9”) from the front of the stove (which includes the edge of the ash lip).
www.chimneyworks.co.uk or the Guild of Master Chimney Sweeps at www.guildofmasterchimneysweeps. co.uk. any event we would recommend that, where possible, the connecting flue pipe features at least one easily accessible inspection hatch near the top of the stove and that any bends which have been used also have inspection hatches, irrespective of any other hatches in the system.
dangerous ‘invisible’ carbon monoxide into other parts of the building. fuel flexible liner which is specified should be double skinned stainless steel, either 904L or 316Ti grade and be CE marked and / or Hetas Approved. • Condensation or creosote ‘tar’, often associated with burning wood, could eventually seep through the walls, particularly if they are made of old or porous brick and / or are jointed with lime mortar, eventually causing unsightly stains on decorative coverings.
COMMISSIONING TROUBLE-SHOOTING 1 Confirm that all internal parts of the stove are correctly fitted, including the baffle plate CHIMNEY FIRE If your stove has been installed correctly and you have also operated it correctly and regularly carried out the recommended routine checks on page 33 then it is unlikely that you will ever experience a chimney fire, which can be highly dangerous.
STOVE, FLUE OR OTHER COMPONENTS GLOWING RED therefore that your flue system, chimney closure (registration) plate and chimney has as many cleaning access points as practicable to enable comprehensive removal of soot, creosote and other debris from every point in the system. This will also minimise the amount of time it takes for a qualified sweep to clean the system making the system safer and its cleaning more cost-effective in the long run.
situation you should take immediate avoiding action. combustion air and the advice of the original installer should be sought. • Prevention Open doors and windows to ventilate the room and let the fire go out to allow the stove to cool.
STOVE NOT PROVIDING ENOUGH HEAT of the air controls so that the fire burns with very strong bright yellow flames and with very little difference when the air controls are operated. In such circumstances an adjustable draught stabiliser in the flue pipe may need to be fitted to ensure that the stove will always operate under a stable draught to allow the stove’s controls to function correctly.
• Causes: Air Controls Ensure that you fully understand how the Airwash system works and that you have determined, through some trial and air, the correct balance between Primary and Secondary air that your stove needs. Generally, try to use more Secondary air as this air flows down and over the glass to help burn and wash away any particulates that have accumulated there. See pages 15 – 19 controls make to the performance of the stove and the best way to burn your type of fuel.
ROUTINE CHECKS STANDING DOWN During routine checks if you notice anything wrong with your stove then it should be rectified immediately. Never use a stove that you know is not fully functioning – this includes flue components. There will be some point in the year when you will not need to use your stove for a considerable time and taking care to clean it thoroughly then will save you much time later.
ROUTINE MAINTENANCE due to the high temperatures created inside the stove. If necessary small cracks can be repaired using a proprietary heat resistant fire cement (your stove dealer should be able to advise you). Bricks only need replacing if they have crumbled or part of the brick has broken away revealing the stove bodywork. Firebricks are deemed as ‘consumable’ and are therefore not covered under your Warranty.
fluid have been removed and the glass is thoroughly dry as any residue can be ‘baked’ on causing unsightly smearing. Repair worn or scratched surfaces with a proprietary heat-resistant spray paint made specially for stoves, also available from your stove dealer. Never use an aerosol spray on, or near, the stove when it is burning or it is hot. Read the section on fuels on page 13. • Replacing Glass Never use your stove if it has cracked or missing glass.
ANNUAL SERVICE Door Seal Check that this continues to make an air-tight seal and replace if necessary. Ensure that the new rope joint is also in the middle at the base of the rope seal channel. Replacement door rope seal should be 9mm dia. See page 32 In the interests of safety it is important that your Graphite stove is serviced on an annual basis in accordance with the instructions outlined below.
FIRST SERVICE Date Work carried out: Next Service Due Signed Print Dealer’s Stamp or HETAS Registration Number SECOND SERVICE Date Work carried out: Next Service Due Signed Print Dealer’s Stamp or HETAS Registration Number THIRD SERVICE Date Work carried out: Next Service Due Signed Print Dealer’s Stamp or HETAS Registration Number FOURTH SERVICE Date Work carried out: Next Service Due Signed Print Dealer’s Stamp or HETAS Registration Number FIFTH SERVICE Date Work carried out: Ne
GRAPHITE WARRANTY specifically covers the installation of the stove, has been issued. A copy of this must be attached to the claim form. For legal and insurance reasons, without this approved paperwork, the stove installation must be regarded by Hi-Flame as illegal and potentially lifethreatening and therefore we cannot entertain the Warranty claim (This does not limit your statutory rights). In such instances you must contact the stove installer.
What the Hi-Flame Warranty covers • Painted surfaces • Bodywork The Warranty does not cover an illegally installed stove (see point 1 above). • Doors, Door Handles and Door Hinges • Flue collar The Warranty does not cover parts deemed to be consumables which include paint, firebricks, fire grates, vermiculite panels, smoke deflection plates (baffle plates), gaskets, rope seals and heat-resistant glass.
Graphite Spares Service In the interests of safety, only ever use genuine Graphite replacement components. Once you have identified the component you need you can order it from your authorised Graphite dealer – they will know your Graphite stove inside out! External Air Option The optional Graphite easy-fit External Air Box will effectively ‘room seal’ the stove to allow it to draw almost all of its combustion air from outside when burning wood and when the primary air control is ‘locked’ closed.