HiTi BS-G400 User Manual E English 0
Table of Content 1. Check the Package Content.............................................................. 2 2. Get the Latest Application................................................................ 3 3. Comprehend BS-G400.................................................................................. 4 LCD Controller Front Back 4. Install BS-G400......................................................................................
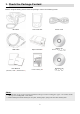
1. Check the Package Content : Before using BS-G400, please check the package content for following items BS-G400 LCD Controller USB Cable Paper Cassette* User Manual (BS-G400 / PDD* / GalaD Deluxe* ) Printer Cleaning Kit* Power Cord Master CD (BS-G400 / PhotoDesiree Deluxe) Software CD (GalaDesiree Deluxe ) Note Paper Cassette: 2 types of paper cassettes are included. One type is used for loading photo paper or 1x1 stickers and the other type is for loading 4/2/4 or 4x4 stickers.
2. Acquiring the Latest Application HiTi website provides the latest driver, application, user manual etc. for users to download. Please log on to www.hi-ti.com for more information. If there is any question toward HiTi product, please contact your local service center for detail.
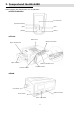
3.
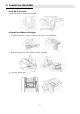
4. Install the BS-G400 Set Up the Printer Connect the LCD controller to BS-iD400 Install the Ribbon Cartridge 1. Twist the spool lock counter clockwise and remove it as illustrated. 2. Open the ribbon door and install the ribbon cartridge 3.
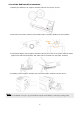
Load the Dedicated Consumables * 1. Identify the difference of 2-paper cassette and then choose the correct 2. Follow the instruction marked on the plastic bag to properly handling of consumables 3. Load photo papers into the paper cassette and then close the cover( Please hold the photo papers wide side and toward the Hiti mark side to the back into the paper cassette) 4.
Power Up the Printer Plug the power cord in the socket and then turn on the power 7
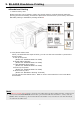
5. BS-G400 Standalone Printing Standalone Printing 1. Insert memory card Please insert the correct memory card in the printer memory card slot that will make the printing process successfully, because the photo files will come from your memory card when BS-G400 printing in standalone printing situation. * 2. Print photos without a PC When you finished those steps as below, you can use the LCD Controller to process the printer output. A. Set up the printer (Please see ‘Install BS-G400’ for detail) B.
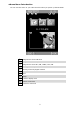
Home Menu Introduction : You can see this menu in your LCD controller when you power up the BS-G400 1 2 3 4 5 6 7 8 9 10 11 Image device from USB host Image device from CF / Micro Drive Image device from SD / SM / MMC / MS / MS Printing control by BS-G400 Printing control by digital camera E-Frame Print Setup E-Frame display area Cancel or Go back Confirm or Continue 9
Main Function Instruction 1. E-Frame You can choose the style what you like in the ‘E-Frame’ * The E-Frame you selected will show on the E-Frame display area of the LCD controller. You can make the decision about usinge the E-frame or not. Select different print format will affect the E-frame style. Setup the E-Frame file source and choose the OK to continue Select the E-Frame style you want.
2. Print A. Quick Print You can choose the ‘print’ to print your photo and select OK to continue Select the print format you want Select ‘quick print’ foundation* Select the picture you want and use the OK or print button to continue BS-G400 is processing the job. Note It will not allow user to edit the photo in the 「Quick print」.
2. Print B. Batch Print You can select ‘Print” to print and use OK to continue Select the print format Select the “Batch Print” foundation*. Select the picture you want to print. You can control this process as below : Use OK to change the print amount Use the “Edit” button to process the picture edition Use the “print” to print your photo. Use directional button to determine the number of copies, and then press OK to go back image navigator.
2. print C. Print All D. DPOF Choose Print, and press OK to continue. Choose Print, and press OK to continue. Select the print format. Select the print format . Select Print All, and then press OK to continue. Select DPOF*, and then press OK to continue. Confirm the number of copies, and press OK or PRINT to start printing. Or press cancel to go back. Confirm print Note DPOF (Digital Print Order Format) function need your camera can supply the DPOF function.
3. Setup : Choose SETUP, and press OK to continue. Printer Setting Allows users to enable or disable Auto-Color and Matte effect, adjust LCD screen, color setting, and print position. : : Language Accessible languages on BSiD400 may vary from region to region. : LinkPrint Users are allowed to control the BSG400 by using the LCD controller or by using a digital camera. : Quick Preview Choose between 2 or 6-image navigator. The image navigator can display up to 6-image per page.
Special Function Introduction 1. Image adjustor & enhancer 2. LCD Adjustment In the image navigator, select an image and press [EDIT] to adjust and enhance the selected image. Choose SETUP, and press OK to continue. Select an image editing function and press OK to start editing. Select Printer Setting and press OK to continue. Example on ‘Move’: Use directional button to adjust the position of output image. Choose LCD Adjustment and press OK to continue.
Special Function Introduction 3. Color Setting 4. Print Position Choose SETUP, and press OK to continue. Choose SETUP, and press OK to continue. Select Printer Setting and press OK to continue. Select Printer Setting and press OK to continue. Choose Color Setting and press OK to continue. Choose Print Position and press OK to continue. Select a reference image saved in the memory card for color calibration, then press OK to continue.
Special Function Introduction 5. PIN Code* Choose SETUP, and press OK to continue. Confirm the new PIN code. PIN code set notice: Confirms the new PIN code when a new PIN code is set. Select PIN Code and press OK to continue. Users may reset PIN code or determine if PIN code is required when the printer reboots or when a user tries to apply printer setting. To reset PIN code, the current code is required. Enter the new PIN code.
6. BS-G400 PC-Link Printing Connect the PC and Printer You can use the USB Cable to connect with your computer and BS-G400 and though the HiTi software to process the Pc-Link printing. Install the Printer Driver You must instill the printer driver before using BS-G400. Please follow those steps as below: 1. Insert the Mater CD to run the installation. 2. Power on the printer to continue. 3. The PC is installing the printer driver. 4.
7. Troubleshooting Indicator Status Status Problem Troubleshooting Blinking x 1 Cover Open Open and close the ribbon door again. Blinking x 2 Ribbon Missing Reinstall the ribbon cartridge Blinking x 3 Ribbon Out Replace the ribbon cartridge Blinking x 4 Paper Out Reinstall photo papers consumables status. Blinking x 5 Paper Jam Open the ribbon door and remove the jammed paper.
8. Specification* HiTi BS-G400 Model BS-G400 Spec. Print Method Resolution Dye Diffusion Thermal Transfer (D2T2) 403 x 403 dpi (Equivalent to a inkjet 6400 dpi) Display 2.5 inch TFT Color LCD Print Size 4 x 6 inch (100 x 152 mm) Paper Size 4 x 7 inch (100 x 178 mm) Ribbon Cartridge 100 prints 100 sheets Paper Cassette Memory Card Slot One type is used for loading photo paper or 1x1 stickers and the other type is for loading 4/2/4 or 4x4 stickers.
9. Customer Service Information Online Support For further inquires, please log on to Hi-Touch Imaging Technologies website at www.hi-ti.com where users can download free updated latest drivers, applications, and etemplates. Global Sites Headquarters – Taiwan China Hi-Touch Imaging Technologies Hi-Touch Imaging Technologies (Suzhou) 3F, No.31, Shuang-Shih Rd. Sec.