HiTi Card Printer CS-300 User Manual Hi-Touch Imaging Technologies V.2007.03 1 www.hi-ti.
ACKNOWLEDGEMENTS Microsoft, MS, MS-DOS and Windows are registered trademarks of Microsoft Corporations. Pentium is a U.S. registered trademark of Intel Corporation. TrueType is a U.S. trademark of Apple Computer, Inc. Adobe and Acrobat are registered trademarks of Adobe Systems Incorporated. Brands and product names are trademarks or registered trademarks of their respective companies. COPYRIGHT The information contained in this document is subject to change without notice.
SAFETY INSTRUCTIONS 1. Read these instructions carefully. Keep these instructions for future reference. Follow all warnings and instructions as marked on the product. 2. Unplug this product from the wall outlet before cleaning. Do not use liquid detergents or aerosol cleaners. Use a damp cloth for cleaning. 3. Do not use this product near water. 4. Do not place this product on an unstable cart, stand, or table. The product may fall, causing serious damage to the product. 5.
Instruction 5 Chapter 1 Hardware Installation 1-1 1-2 1-3 1-4 Check Accessories Appearance Of CS-300 Install Power Cord & USB Cable Install Cleaning Roller 1-5 Install Card & Ribbon Chapter 2 Software Installation 6 6 7 10 11 12 2-1 Install Driver (Win 2000 & XP ) 2-2 Uninstall Driver (Win 2000 & XP ) 14 15 16 2-3 Install Card Desiree CS 2-4 Driver Instruction 17 18 Chapter 3 Operation Instruction 3-1 LCD Display Instruction 28 28 3-2 Operation Instruction 28 Chapter 4 How To Clean & Maintain
Instruction Thank you for choosing HiTi Card Printer. We hope this will just be the beginning of our long-term and successful association. With this HiTi card printer, you can easily and conveniently print high quality plastic cards, such as personalized ID cards/credit cards, membership cards,.…etc. Please read this manual carefully and complete the installation before operating the printer. HiTi Card Printer CS-300 Features Supports double-side printing. High quality printing.
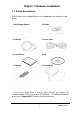
Chapter 1 Hardware Installation 1-1 Check Accessories Please make sure the following items are included when you unpack the card printer. 1.Card Output Hopper 2. Weight 3. USB Cable 4. Power Cord 5. User Manual 6. CD 7. Cleaning Roller 8. Cleaning Kit If any of the above items is missing, please contact your nearest HiTi customer-support facility or your local HiTi distributor. For detailed information, please refer to Appendix E: Customer Service Information. 6 www.hi-ti.
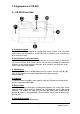
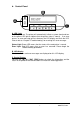
1-2 Appearance of CS-300 CS-300 Front side A. Card Input Hopper This is the Card Input Hopper for storing blank cards. Please insert the blank cards gently and remember to shield them with the built-in cover to avoid any dust entering in there. B. Card thickness selection button HiTi CS-300 provides four selections for thickness: 0.3 mm (10 mil), 0.5 mm (20 mil), 0.8 mm (30 mil) and 1.0 mm (40 mil).
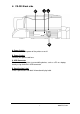
CS-300 Back side D C A B A. Power Switch This switch turns the power of the printer on or off. B. Power Socket Connect your power cord here. C. USB Connector Please connect the printer to a controlling device, such as a PC or a laptop, hereby using the build-in USB connector. D. Specification Label Printer specification and detail information display label. 8 www.hi-ti.
Control Panel. A. LED Light Turn the power on. The printer will automatically initiate a system check and turn on the green LED light to indicate that the printer status is normal. If an error occurs, an error message will be shown on the LCD display and flash the LED. Please refer to “Chapter 5 Troubleshooting” for resolving this error message. Status Light: Green LED means that the status of the card printer is normal. Error Light: Red LED means that an error has occurred.
1-3 Install Power Cord & USB Cable 1. Connect the printer to the AC power outlet using the supplied power cord. 2. Please connect the printer to a PC using the supplied USB Cable. 3. Turn on the “Power Switch". Before you turn on the “Power Switch”, please make sure that you have already installed the printer driver. Please refer to Chapter 2. 4. You will see a "New Hardware Found" message display on the PC screen. Then it will automatically initiate the printer driver. 5.
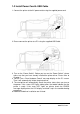
1-4 Install Cleaning Roller ※Please install the cleaning roller before using the card printer. 3. Slide the ID button and lift the ribbon door up. 2. Open the cover of the cleaning module, as illustrated. 3. While holding the cover of the cleaning module open, insert the cleaning roller spool into the spool receivers. Turn the cleaning roller after its installation; if it turns smoothly, then the installation of the cleaning roller should be correct.
1-5 Install Card & Ribbon ※ The HiTi card printer package does not include cards and ribbons. You can contact your local HiTi distributor or refer to Appendix E for consumer ordering information. The Card Installation 1. Please move and slide the selector for 2. Open the door of the Card Input thickness to the correct thickness position Hopper. which matches the thickness of the card to be printed. 1. Insert a blank card, place the weight on the top and close the door of the Card Input Hopper.
The Ribbon Installation 1. Remove the ribbon slack by rotating 2. Remove the fastener on the ribbon the spool as illustrated. as illustrated 3. Slide the ID button and lift the ribbon door up. 4. Hold the ribbon cartridge handle and insert it into the printer as illustrated. Please make sure the drive gear is properly seated against the ribbon spool. 5. Close the ribbon door. Make sure the STATUS LED displays green light and the LCD display shows “READY”. 13 www.hi-ti.
Chapter 2 Software Installation System Requirements Please make sure your PC conforms to the following requirements. Intel Pentium or compatible PC Windows 2000/XP 128 MB RAM or higher Available USB port 100 MB or more free hard disk space CD-ROM Drive Notice!! 1. Microsoft, MS, MS-DOS and Windows are registered trademarks of the Microsoft Corporation. 2. Pentium is a U.S. registered trademark of the Intel Corporation. 3.
2-1 Install Driver (Windows 2000/XP) 1.Insert the “Driver CD” into the CD-ROM drive. If the installation doesn’t start automatically; run the “autorun.exe” in the disk. Please select printer model “CS-300”. 2.Please select “Driver / HiTi CS-300” and install. 3.Click the “Start” button to install the driver. 4.Connect the printer to the PC using the USB cable and turn the printer on. 15 www.hi-ti.
5. In Windows 2000 or Windows XP, if there’s message dialog showing “Digital Signature Not Found” or “Driver Incompatibility”, please click “Yes” to continue to install the driver. 6. After copying several files, the Windows 2000 / XP system recognizes this printer and the installation will be finished. 2-2 Uninstall Driver 1. Under Control Panel/ Add Remove Programs, you can find “HiTi CS-300” Card Printer”. 2. Select [Remove] option, then the system will begin to uninstall the “HiTi CS-300” driver. 3.
2-3 Install CardDesiree CS 1. Insert the “Driver CD” into the CD-ROM drive, if the disc doesn’t auto start, then please execute the “autorun.exe” in the disc. 2. Select "Software / CardDesiree CS" and install. 3. Select language and destination; then press the “Start” button. 4. When the installation is finished, a pop-up message will appear to ask whether or not to place a "Card Desiree CS" icon on the Windows Desktop? 5. The "Card Desiree CS" installation is finished. 17 www.hi-ti.
2-4 Driver Instruction You can access the driver settings in Control Panel-> Printers. Select HiTi CS-300 and right-click the mouse button, then select “Printing Preferences”. The printer driver is divided into seven different categories (not including general properties) integrated in a main page. The seven different categories list as below: 1. Device Option 2. Printing Area 3. Color 4. Tools 5. Magnetic Encoding 6. Import/Export 7. About 18 www.hi-ti.
[Device Option] You can modify the settings of the card printer in this page. A B C H F E D G A. B. C. D. E. F. Ribbon Type: Select the ribbon type you want to use. 1. YMCKO ribbon,2. Resin K ribbon or 3. YMCO ribbon. Card Type: Select the card type you want to use. You may choose “Blank Card”, “6-pin Smart Chip Card”, “8-pin Smart Chip Card”, “Magnetic Stripe Card”, “Chip/Magnetic Card”, and “Adhesive Card”. (Default setting: “Blank Card”) Quality Mode: Quality Mode is the default setting.
※When you select the YMCKO ribbon as your ribbon type, several options for Resin K will be available. The “Resin K” within YMCKO ribbon will not be applied to print the black section and the black (RGB = 0, 0, 0) in graphical objects. It means the color in black (RGB = 0, 0, 0) will always be composed by Y, M and C. The “Resin K” within the YMCKO ribbon will be applied to Always on print all of the black (RGB = 0, 0, 0) in the images.
[Printing Area Setting] In this page, you may modify printing areas which will be covered and uncovered by the ribbon. You can design printing areas, such as the following instructions. The dark area represents the area which will be covered by the ribbon, and the blank area represents the area where the ribbon will not cover anything.
[Edit Area] B C D A E F G H I J K A. Designed Area: You can choose the default layout setting or the custom layout previously designed and saved through the drop-down list. If you would like to create a new layout, please select [User defined]. B. Delete: Delete the layout setting file. C. Save: Save the layout setting file in a particular folder after editing. Save As: Save the layout setting file in any location after the modification.
[Color] You may set the printing color of your preference in this page. D C A B E F A. Color preference setting: There are four options. 1. HiTi Optimized Color (General): The standard color presentation. 2. HiTi Optimized Color (Enhanced): Stronger contrast. 3. Windows Color Management: When applying this option, please follow the procedures as below: a. Please check whether the “hitechca” file exists or not. [Control Panel]→Printers and Faxes→HiTi CS-300→Properties→Color Management 23 www.hi-ti.
b. Please press the “Reset” buttons in C. Printer Color Adjuster and E. Skin Tone Adjuster respectively. c. Meanwhile, unmark □Image Auto Enhancement in “B. Special Function”. 4. Do not apply any color preference: Select this option and follow the steps below to acquire the maximum color space. a. Please press the “Reset” buttons in “C. Printer Color Adjuster” and “E. Skin Tone Adjuster” respectively. Also, please set Gamma as 0.75. b. Meanwhile, unmark □Image Auto Enhancement in “B. Special Function”. B.
[Tools] A B C A. Printing Position Adjuster: You may set the thickness of the card and print out a test chat, then modify parameter [A] or [B] or [C] to adjust the printing position. ※Notice: 1. Please make sure the position of the thickness adjuster on the printer matches the thickness of the card before proceeding to modify parameter [A] or [B] or [C] to adjust the printing position. 2.
[Magnetic Encoding] D A B E C A Magnetic Encoding Data: Input Magnetic Data directly. When you are not using the database, you can manually enter data for the encoding of the magnetic stripe. There are three tracks within the magnetic stripe. The first track includes alphanumeric characters and other simple symbols. The second and the third tracks accept numeric characters only. When you mark □Track 1, □Track 2, □Track 3 for data encoding, the function of □Using Database will be disabled.
3 2468024680 4 HIJKLMN 12345678 5 12345678 2468024680 6 HIJKLMN 2468024680 7 HIJKLMN 2468024680 0987654321 a. b. c. d. 1 ABCDEFRG –this format is for encoding the 1st track only – ex: 1 xxxxxxxx 2 12345678 – this format is for encoding the 2nd track only – ex: 2 11111111 3 2468024680 –this format is for encoding the 3rd track only – ex: 3 00000000 4 HIJKLMN 12345678 - this format is for encoding both the 1st & the 2nd tracks ex: 4 xxxxxxxx 11111111 e.
Chapter 3 Operation Instruction In this Chapter, you will find a detailed introduction about the operation through the LCD display. 3-1 LCD display instruction The printer is equipped with an LCD Display and four buttons, which give access to printer menus. Turn the printer power switch on, the printer system will detect the printer status and feedback the error messages on the LCD display if any error would occur. Some errors may be resolved by troubleshooting instructions from the LCD display.
..CARD OUT SNR ..ADF SENSOR SEL .CLEANING MODE ..PUT CLEANING KIT & OPEN THE DOOR & CLEAN PROCESSING The sensor for cards in the card-insert mechanism. (ENABLE / DISABLE). The default setting is [DISABLE]. However, once you switch [DISABLE] to [ENABLE] and there are no cards in the Card Input Hopper, the error message [CARD OUT] will be shown on the LCD display.
Chapter 4 How to maintain your printer In order to preserve the performance of the printer and the print quality, please remember to maintain your card printer regularly. We will introduce a detailed cleaning procedure in the following sections. Please pay attention to the following when you use the printer. 1.
4-1 Clean Cleaning Roller 1. Switch the card printer off. 2. Slide the ID button and lift the ribbon door up. 3. Open the cover of the cleaning module and take the cleaning roller off, as illustrated. 4. Roll the cleaning roller against the adhesive side of the cleaning card or against the adhesive tape to remove the dust from the cleaning roller. 5. Please insert the cleaning roller spool into the spool receivers.
4-2 Clean Print Path In Stand alone mode 1. Turn the power switch of the printer on. 2. The printer will check the system status automatically, and show “Ready” on the LCD display. 3. Click the [<] or [>] button, and select [Cleaning mode] to begin the cleaning process. 4. The cleaning process will be displayed on the LCD display. Please follow the instructions step by step. a. Take off the ribbon cassette. b.
4-3 Clean TPH Head 1. Please turn off the power before cleaning the TPH head. 2. Open the ribbon door, the TPH head is attached to the ribbon door module. 3. Please use the sponge cleaning swab to clean the TPH head. ※ Notices: 1. Please do not touch the TPH head with your hand. 2. Do not use any liquid detergents or aerosol cleaners to clean the thermal printing head. 4. Please close the ribbon door, make sure the STATUS LED displays green and LCD display displays “READY”.
4-4 Clean Air Filter 1. Switch the card printer off. 2. Open the ribbon door. 3. Slide the air filter out from the side of ribbon door and clean the dust on the filter, as illustrated. 4. Insert the air filter into the ribbon door and close the ribbon door. The cleaning process is finished. 34 www.hi-ti.
4-5 Cleaning Card-insert Mechanism 1. Switch the card printer off. 2. Open and empty the Card Input Hopper. After removing all the cards and the weight, please use the sponge cleaning swab to clean the rollers and the sensor on the card-insert mechanism. 35 www.hi-ti.
4.6 Clean Ribbon Sensors 1. Switch the card printer off. 2. Open the ribbon door. 3. Remove the ribbon cassette. 4. Please use the sponge cleaning swab to clean the ribbon sensors, as shown. 5. Please re-insert the ribbon cassette and close the ribbon door. 36 www.hi-ti.
Chapter 5 Troubleshooting If there is any error message displayed on the LCD screen, please record the message first; do not press [OK] immediately. Please follow the instructions below for troubleshooting. ※Notice: After you press [OK] in the error message dialogue, the printer will reset and the error message may be erased after “Reset”.
Ribbon out 1. Please install a new ribbon. 2. Please follow the instructions from the LCD display to switch the ribbon sensors (Please refer to Chapter 3, section 2, the description of RIBBON 1) The ribbon has been used up. If the error message still occurs, please contact your nearest HiTi distributor or HiTi customer service center. Website: http://www.hi-ti.com 1. Please make sure the ribbon is present. 2. Please make sure the ribbon has been installed properly. 3.
Please remove the card by following the instructions on the LCD monitor of the printer before continuing the print job. Please press [OK] to get step by step instructions. 1. OPEN THE DOOR: Open the ribbon door to see whether the card and the ribbon are sticking together or not. 2. TAKE OFF THE RIBBON: Remove the ribbon. There are three options jammed card removal.
Cam TPH error The error occurs in the mechanism. Cam pinch error Press the ‘Cancel” button to restart the card printer. Or download the latest version of firmware from HiTi website and follow the instructions from the HiTi Card Printer User Manual to re-install the firmware. If the error message still occurs, please contact your nearest HiTi distributor or HiTi customer service center. Website: http://www.hi-ti.
1. The printer will detect the printing temperature automatically. When the temperature is overheated, the printer will stop printing temporarily and cool the temperature down. The card printer will continue until the 1. Please wait a while until the thermal printing head Thermal print head temperature will be below 60 ℃. cools down, and the printer will restart automatically. overheat 2. When you continue printing more 2.
carefully re-install it to its proper position. 3. Please clean the chip on the side of the ribbon and re-install the ribbon. 4. Please make sure the ribbon door is closed. If the error message still occurs, please contact your nearest HiTi distributor or HiTi customer service center. Website: http://hi-ti.com 1. Please clean the chip on the side of the ribbon and re-install the ribbon on the card printer. 2. If the error message still exists, please install a new ribbon.
RJ-BOX FULL RJ-BOX MISSING PRINT FAIL Please remove the invalid cards from the rejected box or follow the instructions from the LCD display and The rejected box is full of cards press [NEXT] → [IGNORE THE ERROR] to clear this error condition. Please make sure the rejected box is installed The rejected box is not placed in the properly. Or please follow the instructions on the proper position LCD display and press [NEXT] → [IGNORE THE ERROR] to clear this error condition. Please restart the card printer.
Appendix A CS-300(i) Specification Model Name Print Method Resolution CS-300 Photo-quality dye sublimation Thermal Transfer Dual-side Printing 300dpi x 300dpi , 256 levels per color Display LCD control panel Memory 32MB, 1MB Flash Print Speed Print Area Accepted card Specification Input hopper card capacity Output hopper card capacity Software driver CS-300i Quality mode : 45 seconds / single side ; Speed mode : 35 sec / single side CR-80 edge-to-edge 86 mm(L) x 54 mm(W) / 3.375"(L) x 2.
Appendix B Safety Instructions Read these instructions carefully. Save these instructions for future reference. Follow all warnings and instructions marked on the product. 1.Unplug this product from the wall outlet before cleaning. Do not use liquid cleaners or aerosol cleaners. Use a damp cloth for cleaning. 2.Do not use this product near water. 3.Do not place this product on an unstable cart, stand, or table. The product may fall, causing serious damage to the product. 4.
Appendix C Limited Warranty Statement CS-300(i) warranty period is one year from the date of original purchase. The detail limitations and extent are as described here below: A. Extent of Limited Warranty 1. Hi-Touch Imaging Technologies (HiTi) warrants to the end-user customer that the HiTi products specified above will be free from defects of materials and workmanship for the duration specified above, which duration begins on the date of purchase by the customer.
B. Limitations of Warranty To the extent allowed by local law, neither HiTi nor its third party suppliers make any other warranty or condition of any kind, whether express or implied, with respect to the HiTi products, and specifically disclaim the implied warranties or conditions of merchantability, satisfactory quality, and fitness for a particular purpose. C. Limitations of Liabilities 1.
Appendix D FCC Compliance Statement FCC Information The Federal communication Commission Radio Frequency Interference Statement includes the following paragraph: This equipment has been tested and found to comply with the limits for a Class B Digital Device, pursuant to Part 15 of the FCC Rules. These limits are designed to provide reasonable protection against harmful interference in a residential installation.
www.hi-ti.
www.hi-ti.
CE Information 51 www.hi-ti.
www.hi-ti.
Appendix E Customer Service Information If your printer does not function normally, please refer to the following procedures for assistance. ◆ Support Process Before you contact HiTi customer support, please try the following: 1. You have consulted the Quick Installation Guide. 2. You have consulted the troubleshooting tips in the manual. 3. You may also consult your printer’s distributor for assistance.
Netherlands Hi-Touch Imaging Technologies Netherlands B.V. ESP 206, 5633 AC, Eindhoven, The Netherlands Tel :+ 31-(0)40-256-5166 Fax :+ 31-(0)40-290-3176 & + 31-(0)40-290-3287 Web :http://www.hi-ti.nl Russia Hi-Touch Imaging Technologies (Russia Representative office) Trubetskaya str., 30A, Balashikha City143910, Russian Federation TEL:+ 7-905-711-5773 Web:http://www.hi-ti.ru Middle East & North Africa Hi-Touch Imaging Technologies (Middle East) Emaar Business Park Bldg #2, Office #426 P.
Appendix F Order Information If you would like to purchase HiTi Printer or accessories. Please contact our dealer or visit HiTi Website http://www.hi-ti.com for quickly order service. Taiwan Hi-Touch Imaging Technologies 3F, 31, Shuang-Shih Rd. Sec.3, Pan-Chiao City, Taipei County 220, Taiwan Tel :+886-2-82583058 Fax:+886-2-82583062 Web:http://www.hi-ti.com/ E-mail : sales@hi-ti.
Middle East & North Africa Hi-Touch Imaging Technologies (Middle East) Emaar Business Park Bldg #2, Office #426 P.O Box 261750, Dubai-United Arab Emirates TEL: +971-4-3674547 FAX: +971-4-3674221 E-mail:sales-me@hi-ti.com Web :http://www.hi-ti.ae India Hi-Touch Imaging Technologies - New Delhi Liaison Office # 401/402, 4th floor, 96, Siddharth Building, Nehru Place, New Delhi 110019, India TEL: +91-11-4180-8191 FAX: +91-11-4180-8193 Web :http://www.hi-ti.com E-mail:sales-india@hi-ti.com 56 www.hi-ti.