Boost Your Bars User Manual Mate Plus Series 4K Mate Plus (F10GTI-5S-IOT) 4K Mate Plus Pro(F10GTI-5S-IOT.Pro) 10K Mate Plus (F15GTI-5S-IOT) 10K Mate Plus Pro(F15GTI-5S-IOT.Pro) 15K Mate Plus (F20GTI-5S-IOT) 15K Mate Plus Pro(F20GTI-5S-IOT.
CONTENTS Package Content 01 Authorized Accessories List 03 Introduction 03 Pre-Installation Instructions 04 APP Assisted Installation 11 LCD Assisted Installation 26 Quick Troubleshooting Guide 40 Technical Specifications 41 FCC and IC Statements 42 Return and Warranty Policies 45
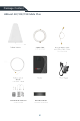
Package Content HIBoost 4K/10K/15K Mate Plus 01
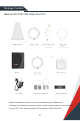
Package Content HiBoost 4K/10K/15K Mate Plus Pro NOTE: Available accessories can be purchased through HiBoost.com Warning: Un-authorized antennas, cables, and/or coupling devices are prohibited by new FCC rules.
Authorized Accessories List Outdoor Antenna & Cable Kit Options Outdoor antenna PFZ-Z 1005 698-2700MHz 8/9 dBi Outdoor cable Hiboost240/4D 49.2ft/15M Indoor Antenna & Cable Kit Options Indoor antenna AI698-2700V09iB 698-960MHz/1710-2700MHz 6.5/8.5dBi Indoor cable Hiboost240/4D 30ft/9.14M Introduction Thanks again for purchasing HiBoost cell Booster.
Pre-Installation Instructions We strongly recommend you to read the user guide completely before beginning the installation. HiBoost 4K/10K Mate Plus/Plus Pro provide 2 options of booster installation, APP and LCD installation ways are unique methods provided by HiBoost 1. App assisted installation, FIRST CHOICE From Page 11~25. It’s more convenient and many work could be done by ONE person, and the most important is that the obtained signal can be very precise.
Then why has HiBoost spent extra big efforts and costs to design APP and LCD signal meters to help you install? Out of the various reasons, the most important reason is that we would like you, our valuable client, to get the maximum output power from the booster system in order to get optimal signal reception for all your mobile devices.
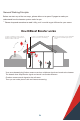
General Working Principle: Before we start any of the two ways, please allow us to spend 3 pages to make you understand how the booster system works for you. ※ Please do spend sometime to read it fully, as it is crucial to get full bars for your rooms. How HiBoost Booster works 1. Outdoor antenna receives outside signal from the nearby cell tower and sends it to HiBoost Booster 2. The booster amplifies the signal and sends to indoor antenna(s); 3.
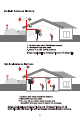
Noted: applicable to 4K Mate Plus and 10K Mate Plus Noted: applicable to 4K Mate Plus Pro and 10K Mate Plus Pro; Or 4K Mate Plus and 10K Mate Plus with purchased secondary indoor antenna.
Noted: applicable to 4K Mate Plus Pro and 10K Mate Plus Pro;when 3 indoor antenna is added.
Working Principle in Formula Outside Signal Outdoor Antenna Gain Outdoor Cable Loss Booster Gain Indoor Cable Loss Indoor Antenna Gain = System Output Power Out of the Formula: Outside Signal: To be received by outdoor antenna from cell tower Outdoor Antenna Gain: The gain of outdoor antenna Outdoor Cable Loss: The loss of the outdoor cable Booster Gain: The actual working gain of the booster Indoor Cable Loss: The loss of the indoor cable Indoor Antenna Gain: The gain of indoor antenna For exampl
More notes on how to keep the maximum booster gain The loop back from the outdoor antenna to the indoor antennas will reduce the gain, so the principle to keep the maximum booster gain is to avoid the loop back from the outdoor antenna to the indoor antennas.
APP Assisted Installation Flow chart of App Assisted Installation 1 Download 3rd Party App 2 Download “Signalsupervisor” and connect with booster 6 Final test and enjoy the mobile services 5 Fix the cables and booster 3 Seek best outside signal and install outdoor antenna 4 Fine tune indoor antenna for best coverage and avoid the loop back Step 1: Download the 3rd Party Mobile Apps We are going to use 3rd party APPs: To find the cell tower location To test the signal strength and quality There are
Step 2: Download Signal Supervisor APP and connect the booster Download the Signal Supervisor App, register ID and booster. 1) Search “Signal Supervisor” on Google Play/ App Store, or scan the above QR Code to download. 2) Register on the Signal Supervisor APP. 3) Switch on the booster * The Bluetooth/WiFi antenna is built in, there is no need to connect outdoor or indoor antennas at this moment. 4) Click “Add Device” to register the booster into the APP.
1 2 3 5 4 7 8 13 6
Remark: Due to the phone types and the WiFi router types, there are few cases though rare that the booster won’t be linked successfully to the signal supervisor app, even after our technical support. In such case: * Please kindly switch to use LCD signal meter to assist your install and will have the same result. And Bluetooth/WiFi disconnection won’t influence the booster working status at all. * Or please use different phone or change your WiFi router if you really want remote monitor.
Notes: * It is a must NOT to connect indoor antenna at this moment as it will influence the outside signal finding. * Please place the booster outdoor within 30ft to the possible location of outdoor antenna if there is only Bluetooth connection. This is to ensure the App links to the booster. 3.2 Select the possible location for best outside signal. Bring your mobile phone with the APPs and the outdoor antenna to the location where the best outside signal can be found.
3.3 Use 3rd party APP to locate the tower(s) Now open “Opensignal”, use it to detect the approximate position of the nearby cell tower. (1)Insert your detail address in “Search city” box. (following figure 1) (2)Enter signal dashboard, and click “CELL TOWERS”. Then zoom in map to find best one, it will show a blue line with your place which means your cellphone connected one. (following figure 2&3) (3)When you find such location, check the strength, test voice and data speed.
You can also use the “Network Cell Info Lite” to locate the tower and measure the signal strength before & after install. The good point of Network Cell Info Lite is that you can see the signal levels. But it seems to be only available for Android Network Cell Info Lite The signal strength requested by the booster system is as below.
3.4 Look for the best location and direction of outdoor antenna After the tower is located, please pick up outdoor antenna and point to the tower and adjust its direction precisely Watch the signal gauge of Signal Supervisor App as it will show the booster’s best output power when you get the strongest outside signal. Target: Try to get the highest possible output power for each band and try to make 2-3 gauges turn green. 1) You can either look at the signal meter value, 10dbm(4k) or 12dbm(10k) is the best.
3.5 Fix outdoor antenna Now install the outdoor antenna firmly The connector of the cable connection part must be glued with black waterproof tape to prevent long-term signal drop and reduce signal loss! 3.6 Reconfirm that the signal on signal gauge is the best! Please do take following screen shot for future comparison during indoor antenna install. What you are going to be paying attention to here, is the gain values.
Step 4: Install the two indoor antennas 4.1 Now it’s turn to install the indoor antenna Note: It is better to have two people at this stage. One can go around to find the best place for indoor antenna. While the other can walk around to make tests all over to make sure every spot is covered with stable and high quality signal. 4.2 Connect the indoor antenna with the booster’s indoor 1 port by indoor cable, and switch on the booster.
4.3 Find the proper location for indoor antenna 1) Determine the location according to the antenna’s radiation pattern. The radiation pattern is 80° horizontal and 70° vertical. So try to make sure the space will fall into its radiation pattern. 30 ft Pannl antenna 30ft 13ft vertical 30ft horizontal 2) After finding the location, hold it there, and watch the gain and power on the App’s signal gauge, they shall keep the same or very nearby with the screen shot taken during outdoor antenna install.
Two requests of indoor antenna install A. Radiation shall be good enough to cover whole space B. Loop back shall be avoided Might be ok Again the tips to avoid the loop back 1. Increase the distance between the outdoor and indoor antennas 2. The outdoor and indoor antennas shall be back to back 3.
4.4 Signal Quality test After finding such a location, hold the indoor antenna there and ask the other person to walk back and forth, and use the 3rd party app Network Cell Info Lite & OpenSignal to test the signal strength, voice, and data. We recommend you to test the signal strength, the voice quality and data speed. *Notes Again: Just remember that strength and quality are two separate issues.
Use the 30ft NM-SMAM cable inside the package to connect Indoor 2 port, and then repeat steps of 1st indoor antenna installation. Booster Indoor Cable Indoor Antenna NF 30ft SMAM-NM Step 5: Install the booster and the cables Mount the signal booster in a dry and cool area, and it shall be easily accessible for maintenance. And run the cables neatly, please do use the water-proof tape to protect all outside connections from the weather.
Test again the performance after installation is done a. First make sure the Signal gauge value is unchanged from the outdoor antenna install. b. Test by a third-party app, calls and network data are smooth in most indoor signal coverage areas. a. Now everything is completed and please start to enjoy the mobile services. b. If the result is not satisfactory or you want to be better, you may repeat the whole or part of the process to improve. c.
LCD Assisted Installation Flow chart of LCD Assisted Install 1 Download 3rd Party App 2 Seek best outside signal and install outdoor antenna 3 Fine tune indoor antenna for best coverage and avoid the loop back 5 Final test and enjoy the mobile services 4 Fix the cables and booster Step 1: Download the 3rd Party Mobile Apps We are going to use 3rd party APPs: To find the cell tower location To test the signal strength and quality There are a variety of resources available online: Opensignal,Cell mapp
Step 2: Install the outdoor antenna 2.1 Connect the booster with outdoor antenna. (1) Put the booster near to the location you would like to install in the future, or a place with power outlet temporarily. (2) Switch on the booster and make sure the signal supervisor app links with it smoothly. (3)Connect the 16.4ft cable with the booster’s outdoor port. The booster supports hot plug. (4) Then connect the window cable with 16.4ft cable and pull the window cable outside and connect it with 49.2ft cable.
2.2 Select the possible location for best outside signal. Bring your mobile phone with the 3rd party APPs and the outdoor antenna to the location where the best outside signal can be found. The outdoor antenna is recommended to be at the four corners or high end of the roof, or attic. The outdoor antenna needs to maintain a clear line of sight with the cell tower. And it is necessary to avoid the roof or other stuffs from blocking the outdoor antenna.
2.3 Use 3rd party APP to locate the tower(s) 1) Now open “Opensignal”, use it to detect the approximate position of the nearby cell tower. 2) Insert your detail address in “Search city” box. (following figure 1) 3) Enter signal dashboard, and click “CELL TOWERS”. Then zoom in map to find best one, it will show a blue line with your place which means your cellphone connected one. (following figure 2&3) 4) When you find such location, check the strength, test voice and data speed.
You can also use the “Network Cell Info Lite” to locate the tower and measure the signal strength before & after install. The good point of Network Cell Info Lite is that you can see the signal levels. But it seems to be only available for Android The signal strength requested by the booster system is as below.
2.4 Look for the best location and direction of outdoor antenna Now pick up the outdoor antenna and point to above cell tower and adjust its position precisely, ask your partner to watch the LCD signal gauge to get a strongest possible output signal. Ask your partner to look at the signal meter value, 10dbm(4k) or 12dbm(10k) is the best. Notes: The output power level in the signal meter is the level for each of the two indoor antennas.
2.5 Fix outdoor antenna Now install the outdoor antenna firmly The connector of the cable connection part is glued with black waterproof tape to prevent long-term signal drop and reduce signal loss! 2.6 Reconfirm that the signal on LCD signal meter is the best! And take photo of LCD signal meter for future comparison during indoor antenna install. What you are going to be paying attention to here, is the gain values.
Step 3: Install the two indoor antennas 3.1 Now it’s turn to install the two indoor antennas Note: It is better to have two people at this stage. One can go around to find the best place for indoor antennas. While the other can walk around to make tests all over to make sure every spot is covered with stable and high quality signal. 3.2 Connect the first indoor antenna with the booster by indoor cable, and switch on the booster.
3.3 Find the proper location for indoor antenna 1) Determine the location according to the antenna’s radiation pattern. The radiation pattern is 80° horizontal and 70° vertical. So try to make sure the space will fall into its radiation pattern.
2) After finding the location, hold it there, and ask the other person to compare the gain and power on LCD signal meter, they shall keep the same or very nearby with the photo taken during outdoor antenna install. This is to avoid the loop back between outdoor and indoor antennas, please move the indoor antenna till you get unchanged or slightly changed gain and power. This step is quite crucial for the booster’s best performance. Might be ok Two requests of indoor antenna install A.
Notes about LCD Display These are instructions that will allow users to install a Barsguard cell phone booster using the LCD Display. Following LCD status indicators and control buttons on the booster. DL Output Power Amount: Indicates the amount of DL output power for this frequency band. 10dbm(4k) or 12dbm(10k) is the best . Band: Shows the working frequency bands the booster is operating on. DL Output Power Status: Indicates the status of DL output power for this frequency band.
3.4 Signal Quality test After finding such a location, hold the indoor antenna there and ask the other person to walk back and forth, and use the 3rd party app to test the signal strength, voice, and data. We recommend you to test the signal strength, the voice quality and data speed. *Notes Again: Just remember that strength and quality are two separate issues. A poor quality “strong” signal can be next to useless, but a clean signal of two bars might be all your device needs.
Step 4: Install the booster and the cables Mount the signal booster in a dry and cool area, and it shall be easily accessible for maintenance. And run the cables neatly, please do use the water-proof tape to protect all outside connections from the weather.
Test again the performance after installation is done a. First make sure the LCD gauge value is unchanged from the outdoor antenna install. b. Test by a third-party app, calls and network data are smooth in most indoor signal coverage areas. a. Now everything is completed and please start to enjoy the mobile services. b. If the result is not satisfactory or you want to be better, you may repeat the whole or part of the process to improve. c.
Quick Troubleshooting Guide Eliminate Yellow Icon Problem (Slight self-oscillation problem): 1. Adjust the outdoor antenna direction, keeping it away from the indoor antenna-restart the booster. 2. Increase the vertical or horizontal distance between the outdoor antenna and the indoor antenna-restart booster. 3. Use metal or wall barriers to increase the isolation between the indoor and outdoor antennas-restart booster. 4.
2. If the signal in a small section of the building hasn't been improved, try the following: ·Check to see if the indoor antenna is installed correctly-try moving and adjusting the indoor antenna to improve coverage. Other Troubleshooting Issues Reference the chart below to identify the current status of the booster. COLOR Blue Yellow Red Gray INDICATION Band works correctly with maximum allowable gain Band gain reduction because of a slight self-oscillation condition 1.
FCC and ISEDC Statements FCC RF EXPOSURE STATEMENT This equipment complies with FCC radiation exposure limits set forth for an uncontrolled environment. End users must follow the specific operating instruction for satisfying RF exposure compliance. This transmitter must not be colocated or operating in conjunction with any other antenna or transmitte.This equipment should be installed andoperated with minimum distance 20cm between the radiator& your body.
FCC 27.50(d)(4) Statement: Fixed, mobile, and portable (handheld) stations operating in the 1710-1755 MHz band are limited to 1-watt EIRP. Fixed stations operating in the 1710-1755 MHz band are limited to a maximum antenna height of 10 meters above ground. FURTHER INFORMATION ON SIGNAL BOOSTER END-USE REGISTRATION The following links are the currently active contacts for booster registration with U.S. wireless providers: https://www.uscellular.com/uscellular/support/fcc-booster-registration.
This is a CONSUMER device. BEFORE USE, you MUST REGISTER THIS DEVICE with your wireless provider and have your provider’s consent. Most wireless providers consent to the use of signal boosters. Some providers may not consent to the use of this device on their network.If you are unsure, contact your provider. In Canada, BEFORE USE, you must meet all requirements set out in ISED CPC-2-1-05. You MUST operate this device with approved antennas and cables as specified by the manufacturer.
Return and Warranty Policies 30-Day Money-Back Guarantee: If for any reason the performance of any product is not acceptable, the product may be returned to the reseller within 30-days with proof of purchase. Please contact the customer support team. 3-Year Warranty: Signal boosters and kits are warranted for 3 years. We will repair or replace the unit and will cover the cost of delivery back to consumers located within the continental US and Canada.
3150 Premier Drive,Suite 130, Irving, TX 75063 (972) 870-5666 service@hiboost.com www.hiboost.