20 CD HOME STEREO SYSTEM INSTRUCTION MANUAL SIZE: 148 x 210mm 811-TK5M91-031
PRECAUTIONS Follow the advice below for safe and appropriate operations. Placement • Do not use the unit in places which are extremely hot, cold, dusty, or humid. • Place the unit on a flat and even surface. • Do not restrict the air flow of the unit by placing it in a place with poor air flow, by covering it with a cloth, or by placing it on a carpet. On AC Voltage • Before use, check that the rated voltage of your unit matches your local voltage.
Important Safety Instructions (F or USA) (For 1. Read Instructions - All the safety and operating instructions should be read before the appliance is operated. 2. Retain Instructions - The safety and operating instructions should be retained for future reference. 3. Heed Warnings - All warnings on the appliance and in the operating instructions should be adhered to. 4. Follow Instructions - All operating and use instructions should be followed. 5.
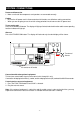
SYSTEM CONNECTIONS Important Switch off the power before connecting speakers and other equipment. Speaker Cord Connections Connect the Red wires to the Red (+) terminals and the Black wires to the Black (-) terminals Note: Connecting speakers other than the speakers supplied with the unit, may damage the unit.
SYSTEM CONNECTIONS Power cord Connection 1. Make sure that all the components and speakers are connected correctly. Caution • Be sure the AC power cord is disconnected and all functions are off before making connections. • When you are not going to use the unit for a long period of time, disconnect the AC power cord. To turn on the unit Press the STANDBY/ON button. The display will light up. Select the desired function and the corresponding function indicator will light up.
PARTS IDENTIFICA TIONS IDENTIFICATIONS 1 1) 2) 3) 4) 5) 6) 7) 8) 9) 10) 11) 2 3 12 13 4 5 6 7 8 9 10 14 15 16 17 18 19 20 21 11 22 DISPLAY CD DOOR SKIP/SEARCH buttons MULTI-JOG/DISC SKIP control STANDBY indicator FUNCTION button PHONES socket STANDBY/ON button HIGH SPEED DUBBING button Cassette holder ( Deck A) Cassette deck A operation controls RECORD button PLAY button REWIND button F.
REMOTE CONTROL 1 2 3 4 5 6 7 8 9 13 10 18 14 15 16 17 19 20 11 12 1) FUNCTION button 2) PLAY/PAUSE button 3) STOP button 4) RANDOM button 5) REPEAT button 6) SKIP button 7) DIMMER 8) VOL – button 9) SKIP button 10) Number (0-9) and (+10) buttons 11) MEMORY button 12) 13) 14) 15) 16) 17) 18) 19) 20) 21) 22) FM MODE button STANDBY/ON button SOUND button SLEEP button TIMER button VOL + button TUNE UP/SEARCH button TUNE DOWN/SEARCH button DISC UP button DISC DOWN button BAND button 21 22 Using the R
ADJUSTING THE SOUND TO ADJUST THE VOLUME Rotate the VOLUME knob to adjust the sound. TO USE THE X-BASS Press the SOUND mode button repeatedly, so that "X-BASS" appears on the display window. Rotate the MULTI-JOG the control to select the level 1, 2 or off. S OU ND X-BASS is designed specifically to boost the low frequency sound to obtain a more powerful bass.
SETTING THE CLOCK 1. In standby mode press the PLAY/PAUSE button. Notes: • The clock starts operating from “0” seconds. (Seconds are not displayed.) • In the event of a power failure or when the AC power lead is disconnected, the clock display will go out. When the AC power supply is restored, the clock display will flash on and off to indicate the time when the power failure occurred or when the AC power lead was disconnected. • You can only set the clock in standby mode. 2.
HOW TO SET THE TIMER 7. Rotate the MULTI JOG to adjust the time for playback. SLEEP OPERATION The tuner, CD, tape and AUX can all be turned off automatically. 1. Select the desired sound source. 2. Press the TIMER/SLEEP button, so that “SLEEP” is displayed. 3. To change the sleep time: Sleep time will initially be 90 minutes. Sleep selection (Rotate MULTI-JOG) control to change minutes 240, 210, 180, 150, 120, 90, 60, 30, 10, 5, 4, 3, or 2. 8.
FOR BETTER RECEPTION FM AM Fully unwind the wire aerial. Then extend the wire aerial and place it in the position that receives best reception. NOTE: Do not connect to an outside aerial. Connect the loop aerial (provided) to the 'AM LOOP aerial' snap terminals at the back of the unit. TUNING INTO A STATION MANUALLY The system can store a total of 60 stations. (30 FM and 30 AM ). Presetting allows you to tune in to a station directly. 1.
PRESETTING STATIONS 1. Press the FUNCTION button to TUNER. 2. Press the STOP/BAND button to select the desired band and tune to the required station. FUNCTIO N 3. Press the MEMORY button. R E P E AT M E M OR Y S TO P/ B A N D TUNI NG R A N D OM 4. Press / SKIP/SEARCH button to select the required preset number. 5. Press the MEMORY button to store the station. M E M OR Y Repeat steps 2-5 to set other preset station.
COMPACT DISC OPERATION 5. Insert a disc with the label side facing right. 1. Press STANDBY /ON to turn on the player. 2. Press FUNCTION repeatedly until " 20 CD" appears. 3. Open the CD door by pushing the top right edge of the cover. P USH O PE N Disc number Disc slot at the loading position DO W MU JO LT I - G D IS C S K IP N UP 4. Rotate the DISC SKIP control to turn the tray . Place other disc(s) in the disc holder(s). And turn to select disc number. 6.
COMPACT DISC OPERATION LOCATING A PARTICULAR POINT IN A TRACK Searching for the beginning of a track To find a later track Press the SKIP button repeatedly until you find the track. To find a previous track Press the SKIP button repeatedly until you find the track. Locating a particular point in a track To move backward at high speed Keep the SKIP button pressed during play and release at the desired point. To move forward at high speed Keep the SKIP pressed during play and release at the desired point.
COMPACT DISC OPERATION PROGRAMME PLAYBACK --- in the stop mode You can play back the tracks on the CDs in the disc 1-20 positions in any order desired. By specifying the disc numbers from 1 to 20 and the tracks numbers from 1 to 99. A program of up to 20 tracks from all the available discs in the disc tray can be played in a preset order. In stop mode 1. Press MEMORY button (in stop mode). 3. Press the numbered buttons and the +10 button or SKIP/SEARCH button to program a track.
TAPE PLAYBACK Usable tapes - use only normal (type I) tapes for playback. You can playback only the front sides of the tapes in Decks A and B. 1. Press the FUNCTION button to TAPE. 2. Press the STOP/EJECT button and load a cassette into the cassette compartment of Deck A or Deck B. PRERECORDED TAPE 3. Press the PLAY button to begin playback. DECK A FUNCTIO N OR DECK B DECK A DECK B To stop playback Press the STOP/EJECT button. To pause playback Press the PAUSE button.
TAPE CARE TIPS Preventing accidental erasure 1. Cassette tapes have two erase-protection tabs - one for each side. To protect a recording from being accidentally recorded over or erased, use a screwdriver to remove one or both of the cassette tape's erase-protection tabs. Side A Tab Side B Tab 2. If you want to record on a tape side after you have removed the erase protection tab, place a piece of strong plastic tape over that side's erase-protection hole.
RECORDING ---- DECK A ONLY RECORDING FROM THE CD PLAYER 2. Insert a tape into the cassette compartment. 1. Press the FUNCTION button to CD. FUNCTIO N DECK A 3. Press the RECORD button which also engages the PLAY button. 4. Press the PLAY/PAUSE button of the CD player. DECK A TO STOP RECORDING Press the STOP/EJECT button of Deck A. TO INTERRUPT RECORDING Press the PAUSE button of Deck A. To resume recording, press the PAUSE button again. - 17 - TO ERASE A RECORDED TAPE 1.
MAINTENANCE CLEANING CD If the CD skips or will not play, the disc may need cleaning. Before playing, wipe the disc from the center out with a clean cloth. After playing, store the disc in its case. CLEANING THE TAPE HEADS To clean the tape heads use a tape cleaner available from all hifi stores DECK A DECK B CLEANING THE UNIT Before cleaning the unit ensure that it is unplugged from the mains. Do not use volatile chemicals on this unit. Clean by lightly wiping with a soft cloth.
SPECIFICATIONS Power consumption Power requirements 86W AC ~ 100V 50/60Hz (Japan) AC ~ 110V/120 - 220/240 50/60Hz (Other countries) AC ~ 120V 60Hz (USA and Canada) AC ~ 220V 50Hz (Hong Kong and China) AC ~ 230-240V 50Hz (Europe) AC ~ 240V 50Hz (Australia) Specifications and external appearance are subject to change without advance notice due to continuous product improvement.