
DL.2 Digital Light User Manual


DL.2 Digital Light User Manual 5
Chapter 2:
Setup and Configuration
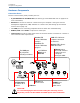
Hardware setup includes mounting, connecting to power and Ethernet and
DMX linking. Software setup includes launching the Content Management
Application (CMA) and configuring the fixture for DMX control.
Hardware Setup
The following steps make up the hardware setup for DL.2 fixtures:
1. Unpack DL.2 Media Server.
2. Install power cord cap if necessary for your location
3. Mount the fixture upright or suspended from a standard truss.
4. Connect to an Ethernet network linked to a computer or an Axon media server
running CMA software, and any other DL.2 or Axon units you wish to control via
the CMA.
5. Connect the fixture to a DMX controller via DMX cabling or an Art-Net box on the
Ethernet network.
6. Connect the fixture to power.
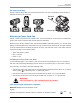
Unpacking the Fixture
Your DL.2 fixture ships in a road case specifically designed to protect the product during
transport. When unpacking, inspect both the outside of the fixture and the projector for physical
damage to components.
Your DL.2 fixture ships with the following:
• One DL.2 fixture in road case
• Two mounting brackets
• One safety cable
• Documentation CD that contains
— CMA application
— User Manual in .pdf format
— Fixture software
— Recovery software image
High End Systems® assumes no responsibility for products that are damaged during transport.
Return a product for repair in its road case.
Before sending anything to the factory, call your High End Systems dealer/distributor
for a Return Material Authorization (RMA) number. The factory cannot accept any
goods shipped without an RMA number.