
DL.2 Digital Light User Manual
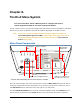


CHAPTER 3
The DL.2 Menu System
22 DL.2 Digital Light User Manual
Functionality for each of these three buttons automatically reverses when the fixture is rotated
to keep operation consistent. You can also manually set this option (see
Display Options on
page 30).
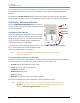
The fields in the Active Screen display current configuration settings and uses drop down
boxes, numeric up/down selectors, and other user interface options to select in editable fields.
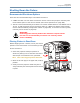
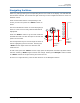
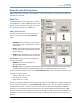
LCD Display Adjustment Buttons
The four LCD Display Adjustment buttons next to
the LCD screen control and provide visual
Menu Display Adjustment Buttons
Display LED
Menu
Menu Select
LCD Power
adjustments
for the menu display.
LCD Display Power Button
The button nearest the green LED is the LCD display
power button. Holding it down for two seconds turns
the Menu display on or off. Use this in situations when
you need to turn the Menu display completely off
instead of dimming it to video black.
If you turn the LCD off and then remove power to the
DL-2, the LCD power will restore the default (ON)
when you reapply power to the fixture.
Note: The LCD screen power button doesn’t affect power to the fixture or
the internal projector
LCD Display Menu Options and Selection
The button furthest from the green LED is the menu button. Pressing this brings up the different
functions contained in the LCD screen itself. The screen menu options are:
• Picture adjusts the sharpness of the screen
• Color adjusts the richness of the color
• Contrast adjustment
• Black Level adjustment
• Tint adjustment
• Restore returns the screen to the factory defaults
The other two buttons are used to adjust the currently selected function.
Note: Display Black Level can also be controlled by the DL.2 menu system (see
Set Tab on page 30) or remotely through the configuration options in the
CMA (see Editing Configuration Values on page 205).