High Lifter Products, Inc. 780 Professional N. Dr.
Installation Instructions 1. Drain the stock radiator and dispose of used fluid according to your local regulations. Use care in disposal, antifreeze is toxic. 2. Remove the stock radiator and fan from the ATV. 3. Leave the inlet and outlet radiator hoses attached to the engine. 4. Attach the mounting bracket to the ATV front rack. NOTE: We have supplied basic hardware required to mount the radiator to the front rack of many popular ATV’s.
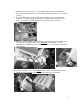
7. Whichever location you choose, we recommend that you have a minimum of three points fastened to the front rack. This will allow the radiator to be mounted securely. 8. For non-tubular racks use the 8x35mm bolts, 8mm lock nuts, and 10mm flat washers to connect the bracket to the rack. For tubular racks use the ¼ x 1 ¼” bolts, ¼” lock nuts and 8mm washers to fasten the bracket to the rack. 9.
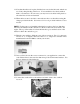
11. Now that the radiator is in place, find the best route for the inlet and outlet hoses. Avoid any sharp bending of the hoses. You want fluid to flow freely without kinks or obstructions. In some cases you may need to cut holes in the plastic to allow the lines to flow unobstructed. 12. When the best route is decided, connect the new hoses to the radiator using the clamps provided in the kit. Seven feet of ¾” hose is provided in this kit. Cut as needed.
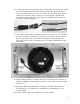
16. Connect the fan on the radiator kit to the stock fan plug. You may need to extend the wires and run them up to the fan on the front rack. Provided in the kit are some extra crimp connectors. If you do not have the same plug setup as the fan cut the ends and use the crimp connectors to connect the fan to the fan wires. Some ATV’s already have the correct connectors on them and just need to be extended in length or plugged in. 17.
21. Upon filling the radiator, make sure there are no air pockets that can cause a false full level on the radiator. Also be sure that the overflow bottle is filled to the appropriate level. NOTE: It will probably be necessary to idle the ATV after your initial fill to circulate the fluid and remove air pockets. It is a good idea to keep track of total fluid added to know you have added at least close to the original capacity.