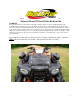
780 Professional Drive N. Shreveport, LA 71105 Phone (318)-524-2270 Fax (318)-524-2297 Polaris 850 and 550 Low Profile Radiator Kit WARNING: Be advised that there are certain hazards of burning or scalding, that are created by installing radiators with potentially boiling hot fluids in locations other than those selected by the ATV manufacturer.
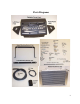
Parts Diagrams 2
Installation Instructions 1. Remove front plastic and top rack from ATV. 2. Drain the stock radiator and dispose of used fluid according to your local regulations. Use care in disposal, antifreeze is toxic. 3. Remove the stock radiator and unplug the fan from the ATV. 4. Leave both stock radiator hoses attached to the engine.
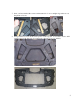
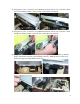
5. Preassemble the new radiator cover. Assemble the frame using the ¼ x ¾ carriage bolts (8ea) and ¼ lock nuts (8ea) 6. Once the kit is assembled, place the kit on the front rack and mark the holes that need to be drilled to allow the kit to be mounted. You will also mark the corners of the cover. When you mark the corners move in 1” and make another mark. Use these marks to trace your cut out pattern. A large center portion of the top rack will need to be removed so the radiator can fit into it.
7. Once you have marked the corners and measured in 1” use a straight edge and trace out the pattern to be cut. 8. Using a dremel tool cut out the center portion of the top rack. You will also need to drill out the holes for the shroud to be connected to the rack. Use a ¼” drill bit.
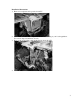
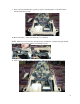
9. Once you have trimmed the top rack you need to trim the plastic on the ATV that is directly under the top rack. 10. Review the photo of the area that needs to be trimmed. NOTE: Make sure to relocate any wires that can potentially be cut when using the dremel tool or that may prevent the radiator from fitting properly. 11. Trace out the area that needs to be cut first! This will make your trimming easier.
12. Using a dremel tool cut the marked area.
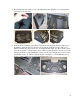
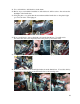
13. Next the rectifier needs to be relocated to give clearance for the radiator. 14. Disconnect the rectifier from the frame and using the small spacers and 6x55mm hex bolts and ¼” washers space the rectifier out. You will use the stock nuts to fasten the rectifier tight. 15. Once you have removed the plastic you need to drill the holes for the mounting brackets. You will need to mark four holes in the frame that need to be drilled.
18. Using the two 3/8 x 1” hex bolts, four 10mm flat washers, and two 3/8” lock nuts connect the lower mounting bracket to the front side of the radiator and shroud. 19. Using the two 3/8 x 1” hex bolts, four 10mm flat washers, and two 3/8” lock nuts connect the upper mounting bracket to the back side of the radiator and shroud. 20. Using the marks for the lower mounting bracket as a guide, line the bracket up with the marks on the frame and using a pen mark the bolt holes.
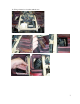
21. Use a 3/8 drill bit to drill the holes in the frame. 22. Before we proceed with the installation of the radiator it will be easier to first relocate the headlight on the handle bars. 23. Using the photo as a, guide trim the area underneath the handle bars on the plastic light pod. Do both sides of the light pod. 24. Now you will need to remove the light pod from the handle bars. You will need to disconnect the wires and completely remove the plastic pod from the ATV. 25.
27. You will need to relocate the light bracket from under the handle bar to the top of the handle bar. 28. Using the four large spacers, four ¼ x 3 ½ hex bolts, and ¼” flat washers lift the light mount bracket on the handle bars. Use factory nuts to fasten tight. 29. Position the handlebars and tighten the handlebar bolts to the factory specification. (11 – 13 ft. lbs.) 30. Reinstall the lights and all wiring to the light mounting bracket. 31. Reinstall the modified plastic light pod.
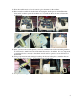
32. Use the protective sleeve provided in the kit to secure all wires and vent lines. Fasten the sleeve with the zip ties provided in the kit. 33. Attach the radiator and brackets to the frame. You should have drilled the holes already. 34. Connect the lower mounting bracket to the frame using two 3/8 x 2” hex bolts, two 10mm washers, and two 3/8” lock nuts. 35. Connect the upper mounting bracket to the frame using two 3/8 x 1 ¾ hex bolts, two 10mm washers, two 3/8” washers and 3/8” lock nuts.
36. With all the plastic cut, holes drilled, rectifier relocated, headlight modified, and radiator installed you will need to reattach the front plastic and top rack. 37. Now test the rack to see if it will clear the radiator when it is opened. 38. Once you have tested the rack for clearance take it back off the ATV. 39. Assuming that it opened properly, connect the new radiator shroud to the rack. You should have drilled the holes earlier in the installation. 40.
42. Attach the aluminum hose adapters to the stock hoses that you left connected to the engine and use the 1” clamps provided to fasten the adapters. 43. Using the new ¾” hose provided in the kit run hose to the inlet and outlet bungs on the radiator. Use the ¾” hose clamps to fasten the hoses to the adapters and bungs. 44. Plug the fan to the stock fan connector. 45. On the top of the overflow bottle there is a small pin hole, you will need to seal this hole with silicone.
46. Next connect the overflow bottle to the frame using zip ties provided in the kit. 47. Now connect the ¼” black hose provided in the kit to the radiator and to the overflow bottle. 48. Using zip ties provided in the kit secure all hoses so that they do not rub or interfere with moving parts. 49. Fill the radiator and overflow bottle with factory approved fluid. Make sure that all air is removed from the system. 50. Attach the front rack and shroud cover onto the ATV.