
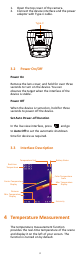
User's Manual


8
You can view the live view, or capture
snapshots via the app.
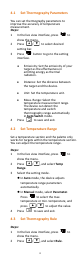
7 Image Settings
Steps:
1. In the live view interface, press to
show the menu.
2. Press / , and select Image.
3. Press , go to Image->Preview
Mode, and select the preview mode
needed.
⚫ Thermal: Display the thermal image
only.
⚫ Fusion: Fuse the optical image with
the thermal image. The fused image
with clear edge is displayed in this
mode.
⚫ Picture in Picture: Display a part of
the thermal image on the optical
image.
⚫ Optical: Display the optical image
only.
4. Optional: When selecting the fusion
mode, you need to select the Fusion
Level according to the target distance.
5. Press to save and exit.
Note
Certain models support the Image Setting
function. Please refer to the actual device.
8 Set LED Light
In the live view interface, press , and go
to White Light to enable or disable the LED
light.
Note
Certain models support the White Light. Please
refer to the actual device or datasheet.
9 Cast Screen
Before You Start
● Connect the device and PC with supplied
Type-C cable
● Install HIKMICRO Analyzer that supports
UVC protocol on your PC.