
Quick Start Guide


2
English
1. Brief Description
The Handheld Thermography Camera is a camera with
both optical images and thermal images. The built-in
high-sensitivity IR detector and high-performance sensor
detects the temperature change and measure the
real-time temperature. The temperature measurement
range is -20 °C to 550 °C (-4 °F to 1022 °F) with the
accuracy of ± 2 °C (± 3.6 °F ) or ± 2% when the ambient
temperature is 15 °C to 35 °C (59 °F to 95 °F) and the
object temperature is above 0 °C (32 °F).
You can view live view, capture snapshots, record videos
via HIKMICRO Viewer App on your phone. You can also
analyze pictures offline, generate and share a report via
the app. Scan the QR codes on the cover to download the
App.
And you can download HIKMICRO Analyzer
(www.hikmicrotech.com) to analyze pictures offline
professionally, and generate a custom format report on
your PC.
HIKMICRO Viewer Android
HIKMICRO Viewer iOS
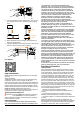
2. Component & Interface (Page 1)
No.
Component
Function
1
Charging
Indicator
Red: Charging
Green: Fully charged
2
Touch Screen
Show the live view
interface.
Touch-screen operation.
3
Microphone
Input audio information
4
Loud Speaker
Play voice note, voice alarm and
video voice.
Navigation
Button
Menu Mode:
Press , , , and to
select parameters.
Press OK to confirm.
5
Non-Menu Mode:
Press to turn on/off the
LED light supplement.
Press to start digital
zoom.
6
Power Button
Hold: Power on/off
7
Laser Button
Hold the button to turn on laser,
and release the button to turn
off laser.
8
Shutter Button
Cover the lens to perform the
correction.
9
Back Button
Exit the menu or return to
previous menu.
10
Focus Ring
Adjust lens to make the image
clear.
11
Thermal Lens
View the thermal image.
12
Tripod Interface
Insert the tripod.
13
Trigger
Menu Mode: pull the
trigger to return to the live
view interface.
Non-Menu Mode: Pull the
trigger to capture. Hold the
trigger to record videos.
14
Battery
Provide power for the deivce.
15
Lens Cover
Cover the lens.
16
LED Light
Increase ambient brightness in
dark environment.
17
Laser
Transmitter
Indicate the direction.
18
Optical Lens
View the optical image.
19
Cable Interface
Charge the device or export files
with supplied cable.
20
SD Card Slot
Insert the SD card.
Note: The warning sign is inside the lens cover.
3. Charge Device
After the device starts up, the OSD (on-screen display)
shows the battery status. When the battery is low, please
charge the device as soon as possible. For the first charge,
charge the device for more than 8 hours and do not shut
down the device during the first charge. The device clock
may roll back to the default time, if the device is not fully
charged.
Note:
The built-in cell battery that powers the real time
clock (RTC) of the device may drain during longtime
transportation or storage. It is recommended to
recharge the RTC battery for the wellfunctioning of
the device clock.
To fully charge the RTC battery, the following
requirements should be met:
a) The rechargeable lithium batteries should be
installed on the device.
b) The device should keep working for more than 8
hours before shutting down.
3.1
Charge Device via Cable Interface
Steps
1. Lift the cover of interface.
2. Plug in the cable, and charge the device.
3.2
Charge Device via Charging Base
Steps:
1. Hold the device, and press both battery lock catches
of the device.
Battery Lock Catch
Battery Base
2. Hold the lock catches, and draw the battery base to
take out the battery.