
User manual
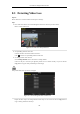
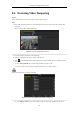
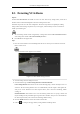
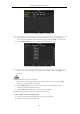
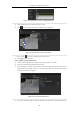

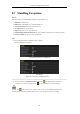
Table Of Contents
- Product Key Features
- Chapter 1 Introduction
- Chapter 2 Getting Started
- Chapter 3 Live View
- Chapter 4 PTZ Controls
- Chapter 5 Recording Settings
- 5.1 Configuring Recording Parameters
- 5.2 Configuring Record Schedule
- 5.3 Configuring Motion Detection Record
- 5.4 Configuring Alarm Triggered Record
- 5.5 Configuring VCA Record
- 5.6 Configuring Manual Record
- 5.7 Configuring Holiday Record
- 5.8 Configuring Redundant Recording
- 5.9 Configuring HDD Group for Recording
- 5.10 Files Protection
- Chapter 6 Playback
- Chapter 7 Backup
- Chapter 8 Alarm Settings
- Chapter 9 Network Settings
- Chapter 10 HDD Management
- Chapter 11 Camera Settings
- Chapter 12 DVR Management and Maintenance
- Chapter 13 Others
- Appendix

User Manual of Digital Video Recorder
130
8.3 Detecting Video Loss
Purpose:
Detect video loss of a channel and take alarm response action(s).
Steps:
1. Enter Video Loss interface of Camera Management and select a channel you want to detect.
Menu> Camera> Video Loss
Figure 8. 10 Video Loss Setup Interface
2. Set up handling method of video loss.
Check the checkbox of “Enable Video Loss Alarm”.
Click button to set up handling method of video loss.
3. Set arming schedule of the channel.
Select Arming Schedule tab to set the channel’s arming schedule.
Choose one day of a week and up to eight time periods can be set within each day. Or you can click the
Copy button to copy the time period settings to other day(s).
Time periods shall not be repeated or overlapped.
Figure 8. 11 Set Arming Schedule of Video Loss
Repeat the above steps to set arming schedule of other days of a week. You can also use Copy button to
copy an arming schedule to other days.