
User manual
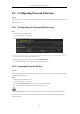
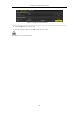
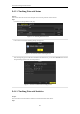
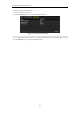

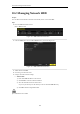
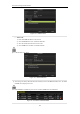
Table Of Contents
- Product Key Features
- Chapter 1 Introduction
- Chapter 2 Getting Started
- Chapter 3 Live View
- Chapter 4 PTZ Controls
- Chapter 5 Recording Settings
- 5.1 Configuring Recording Parameters
- 5.2 Configuring Record Schedule
- 5.3 Configuring Motion Detection Record
- 5.4 Configuring Alarm Triggered Record
- 5.5 Configuring VCA Record
- 5.6 Configuring Manual Record
- 5.7 Configuring Holiday Record
- 5.8 Configuring Redundant Recording
- 5.9 Configuring HDD Group for Recording
- 5.10 Files Protection
- Chapter 6 Playback
- Chapter 7 Backup
- Chapter 8 Alarm Settings
- Chapter 9 Network Settings
- Chapter 10 HDD Management
- Chapter 11 Camera Settings
- Chapter 12 DVR Management and Maintenance
- Chapter 13 Others
- Appendix

User Manual of Digital Video Recorder
168
10.2 Managing Network HDD
Purpose:
You can add the allocated NAS or disk of IP SAN to DVR, and use it as network HDD.
Steps:
1. Enter the HDD Information interface.
Menu > HDD>General
Figure 10. 6 HDD Information Interface
2. Click the Add button to enter the Add NetHDD interface, as shown in Figure 10. 7.
Figure 10. 7 HDD Information Interface
3. Add the allocated NetHDD.
4. Select the type to NAS or IP SAN.
5. Configure the NAS or IP SAN settings.
• Add NAS disk:
1) Enter the NetHDD IP address in the text field.
2) Click Search to search the available NAS disks.
3) Select the NAS disk from the list shown below.
Or you can just manually enter the directory in the text field of NetHDD Directory.
4) Click OK to add the configured NAS disk.
Up to 8 NAS disks can be added.