
User manual
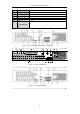
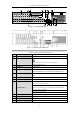

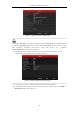
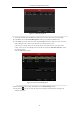
Table Of Contents
- Product Key Features
- Chapter 1 Introduction
- Chapter 2 Getting Started
- Chapter 3 Live View
- Chapter 4 PTZ Controls
- Chapter 5 Recording Settings
- 5.1 Configuring Recording Parameters
- 5.2 Configuring Record Schedule
- 5.3 Configuring Motion Detection Record
- 5.4 Configuring Alarm Triggered Record
- 5.5 Configuring VCA Record
- 5.6 Configuring Manual Record
- 5.7 Configuring Holiday Record
- 5.8 Configuring Redundant Recording
- 5.9 Configuring HDD Group for Recording
- 5.10 Files Protection
- Chapter 6 Playback
- Chapter 7 Backup
- Chapter 8 Alarm Settings
- Chapter 9 Network Settings
- Chapter 10 HDD Management
- Chapter 11 Camera Settings
- Chapter 12 DVR Management and Maintenance
- Chapter 13 Others
- Appendix

User Manual of Digital Video Recorder
38
Figure 2. 7 General Network Configuration
1 self-adaptive 10M/100M network interface for DS-7100, DS-7204/7208HGHI-SH and DS-7200HGHI-E1/E2;
2 self-adaptive 10M/100M/1000M network interfaces for DS-8100HQHI&HGHI-SH series, with three working
modes configurable: multi-address, load balance, network fault tolerance; and 1 self-adaptive
10M/100M/1000M network interface for other models.
4. Click Next button after you having configured the network parameters, which will take you to the
Advanced Network Setup Wizard window, as shown in Figure 2. 8.
Figure 2. 8 Advanced Network Configuration
5. Set the parameters of port No., EZVIZ Cloud P2P, Auto UPnP or DDNS if required.
6. Click Next button after configuring the advanced network parameters, which will take you to the HDD
Management window, shown in Figure 2. 9.